

Switches and Controls


Lighting Control
Headlight High-Low Beam
The headlights switch between high and low beams by moving the lever forward or backward.
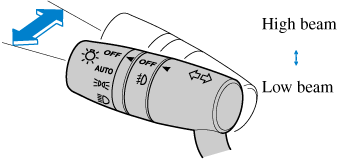
When the headlight high-beams are on, the headlight high-beam indicator light is turned on.

Daytime Running Lights
Some countries require moving vehicles to have their lights on (daytime running lights) during the daytime.
The daytime running lights turn on when the vehicle is driven and turn off when the parking brake is operated or the selector lever is shifted to the P position (automatic vehicle).
(Except Canada)
The daytime running lights can be deactivated.
Refer to Personalization Features (Search).


Windshield Wipers and Washer
The ignition must be switched ON to use the wipers.
Use only windshield washer fluid or plain water in the reservoir:
Using radiator antifreeze as washer fluid is dangerous. If sprayed on the windshield, it will dirty the windshield, affect your visibility, and could result in an accident.
Only use windshield washer fluid mixed with anti-freeze protection in freezing weather conditions:
Using windshield washer fluid without anti-freeze protection in freezing weather conditions is dangerous as it could freeze on the windshield and block your vision which could cause an accident. In addition, make sure the windshield is sufficiently warmed using the defroster before spraying the washer fluid.
If the windshield wipers are operated under cold weather conditions or during snowfall, they could stop due to accumulated snow on the windshield. If the windshield wipers stop due to accumulated snow on the windshield, park the vehicle in a safe place, turn the wiper switch off, and then remove the accumulated snow. If the wiper switch is turned to another position other than OFF, the wipers will operate. If the wipers do not operate even though the wiper switch is turned to a position other than OFF, consult an Authorized Mazda Dealer as soon as possible.
Windshield Wipers


 position, the rain sensor senses the amount of rainfall on the windshield and turns the wipers on or off automatically (off―intermittent―low speed―high speed).

Programming the HomeLink System
When programming a garage door opener or a gate, disconnect the power to these devices before performing programming. Continuous operation of the devices could damage the motor.
The HomeLink system provides 3 buttons which can be individually selected and programmed using the transmitters for current, on-market devices as follows:
-
Disconnect the power to the garage door opener or gate programmed to the hand-held transmitter.
-
Position the end of your hand-held transmitter 2.5―7.5 cm (1―3 inches) away from the HomeLink button you wish to program while keeping the indicator light in view.
-
Simultaneously press and hold both the chosen HomeLink and hand-held transmitter buttons. Do not release the buttons until step 3 has been completed.
Some gate operators and garage door openers may require you to replace this Programming Step 2 with procedures noted in the “Gate Operator/Canadian Programming” section.
-
After the HomeLink indicator light changes from a slow to a rapidly blinking light, release both the HomeLink and hand-held transmitter buttons.
If the HomeLink indicator light does not change to a rapidly blinking light, contact HomeLink at www.homelink.com or call 1-800-355-3515 for assistance.
-
Connect the power to the garage door opener or gate programmed to the hand-held transmitter.
-
Firmly press and hold the programmed HomeLink button for five seconds, and then release it. Perform this operation two times to activate the door or gate. If the door or gate does not activate, press and hold the just-trained HomeLink button and observe the indicator light.
If the indicator light stays on constantly, programming is complete and your device should activate when the HomeLink button is pressed and released.
To program the remaining two HomeLink buttons, begin with “Programming”― step 1
If the indicator light blinks rapidly for two seconds and then turns to a constant light, continue with “Programming” steps 7―9 to complete the programming of a rolling code equipped device (most commonly a garage door opener).
-
At the garage door opener receiver (motor-head unit) in the garage, locate the “learn” or “smart” button. This can usually be found where the hanging antenna wire is attached to the motor-head unit.
-
Firmly press and release the “learn” or “smart” button. (The name and color of the button may vary by manufacturer.)
-
Return to the vehicle and firmly press, hold for two seconds and release the programmed HomeLink button. Repeat the “press/hold/release” sequence a second time, and, depending on the brand of the garage door opener (or other rolling code equipped device), repeat this sequence a third time to complete the programming process.
HomeLink should now activate your rolling code equipped device.
To program the remaining two HomeLink buttons, begin with “Programming”― step 1
For questions or comments, please contact HomeLink at www.homelink.com or 1-800-355-3515.
