


Switches and Controls


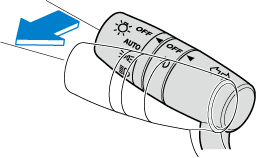
Coming Home Light
The coming home light turns on the headlights (low beams) when the lever is operated.
To turn on the lights
When the lever is pulled with the ignition switched to ACC or OFF, the low beam headlights turn on.
The headlights turn off after a certain period of time has elapsed after all of the doors are closed.
-
The time until the headlights turn off after all of the doors are closed can be changed.
Refer to the Settings section in the Mazda Connect Owner's Manual.
-
If no operations are done for 3 minutes after the lever is pulled, the headlights turn off.
-
The headlights turn off if the lever is pulled again while the headlights are illuminated.


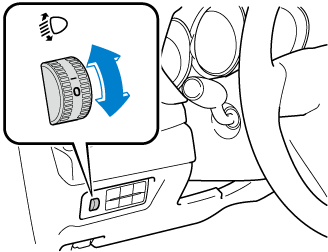
Headlight Leveling
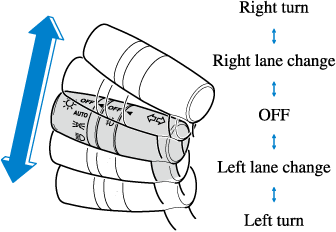
Turn Signals
Move the signal lever down (for a left turn) or up (for a right turn) to the stop position. The signal will self-cancel after the turn is completed.
If the indicator light continues to flash after a turn, manually return the lever to its original position.
The turn signal indicators in the instrument cluster flash according to the operation of the turn signal lever to show which signal is working.

-
If an indicator light stays on without flashing or if it flashes abnormally, one of the turn signal bulbs may be burned out.
-
A personalized function is available to change the turn indicator sound volume.
Refer to the Settings section in the Mazda Connect Owner's Manual.
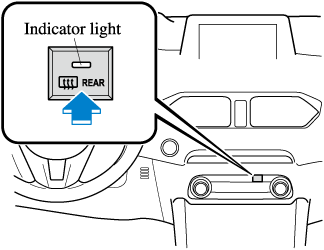
Windshield Wiper De-icer (Some Models)
The thermal filaments at the following positions heat up and facilitate the removal of snow accumulated on the windshield.
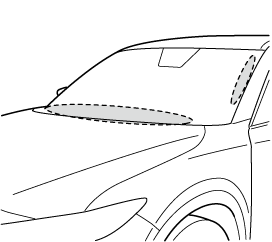
The windshield wiper de-icer operates in conjunction with the rear window defogger.
To turn on the windshield wiper de-icer, switch the ignition ON and press the rear window defogger switch (Search).
Manual Climate Control System

Fully Automatic Climate Control System
Pre-programming the HomeLink System
It is recommended that a new battery be placed in the hand-held transmitter of the device being programmed to HomeLink for quicker training and accurate transmission of the radio-frequency signal.
-
Verify that there is a remote control transmitter available for the device you would like to program.
-
Disconnect the power to the device.
Operating the HomeLink System
Press the programmed HomeLink button to operate a programmed device. The code will continue being transmitted for a maximum of 20 seconds.
Erasing Programmed HomeLink Buttons
To erase the existing programming from all three operating channels, press and hold the two outside buttons ( ,
,  ) on the auto-dimming mirror until the HomeLink indicator light begins to flash after approximately 10 seconds.
Verify that the programming has been erased when you resell the vehicle.
Gate operator/Canadian Programming
Canadian radio-frequency laws require transmitter signals to “time-out” (or quit) after several seconds of transmission ― which may not be long enough for HomeLink to pick up the signal during programming. Similar to this Canadian law, some U.S. gate operators are designed to “time-out” in the same manner.
If you live in Canada or are having difficulties programming a gate operator by using the programming procedures (regardless of where you live), replace Step 3 of Programming the HomeLink System with the following:
If programming a garage door opener or gate operator, it is advised to unplug the device during the “cycling” process to prevent possible overheating.
While the indicator light is flashing in amber, press the button on the hand-held transmitter for 2 seconds and release it repeatedly until the indicator light changes from amber to green.
Go back to Step 4 of Programming the HomeLink System to complete the procedure.
Erasing Programmed HomeLink Buttons
-
All of the programmed HomeLink buttons are reset. Individual buttons cannot be reset, however, individual buttons can be reprogrammed. For individual button reprogramming, refer to Reprogramming the HomeLink System (Search).
-
Verify that the programming has been erased if you resell the vehicle.
-
Press the two outer HomeLink buttons continuously at the same time until the indicator light flashes.

-
Stop pressing the HomeLink buttons.
