Owner Maintenance
Owner Maintenance Precautions
Owner Maintenance Precautions
The owner or a qualified service technician should make these vehicle inspections at the indicated intervals to ensure safe and dependable operation.
Bring any problem to the attention of an Authorized Mazda Dealer or qualified service technician as soon as possible.
When Refueling
-
Brake and clutch fluid level (Search)
-
Engine coolant level (Search)
-
Engine oil level (Search)
-
Washer fluid level (Search)
At Least Monthly
-
Tire inflation pressures (Search)
At Least Twice a Year (For Example, Every Spring and Fall)
You can do the following scheduled maintenance items if you have some mechanical ability and a few basic tools and if you closely follow the directions in this manual.
Improper or incomplete service may result in problems. This section gives instructions only for items that are easy to perform.
As explained in the Introduction (Search), several procedures can be done only by a qualified service technician with special tools.
Improper owner maintenance during the warranty period may affect warranty coverage. Refer to Introduction (Search) for owner's responsibility in protecting your investment. For details, read the separate Mazda Warranty statement provided with the vehicle. If you are unsure about any servicing or maintenance procedure, have it done by an Authorized Mazda Dealer.
There are strict environmental laws regarding the disposal of waste oil and fluids. Please dispose of your waste properly and with due regard to the environment.
We recommend that you entrust the oil and fluid changes of your vehicle to an Authorized Mazda Dealer.
Do not perform maintenance work if you lack sufficient knowledge and experience or the proper tools and equipment to do the work. Have maintenance work done by a qualified technician:
Performing maintenance work on a vehicle is dangerous if not done properly. You can be seriously injured while performing some maintenance procedures.
If you must run the engine while working under the hood, make certain that you remove all jewelry (especially rings, bracelets, watches, and necklaces) and all neckties, scarves, and similar loose clothing before getting near the engine or cooling fan which may turn on unexpectedly:
Working under the hood with the engine running is dangerous. It becomes even more dangerous when you wear jewelry, loose clothing or have long hair or a long beard.
Either can become entangled in moving parts and result in injury.
 Pull over to a safe location, then switch the ignition off and make sure the fan is not running before attempting to work near the cooling fan:
Working near the cooling fan when it is running is dangerous. The fan could continue running indefinitely even if the engine has stopped and the engine compartment temperature is high. You could be hit by the fan and seriously injured.
Do not leave items in the engine compartment:
After you have finished checking or doing servicing in the engine compartment, do not forget and leave items such as tools or rags in the engine compartment.
Tools or other items left in the engine compartment could cause engine damage or a fire leading to an unexpected accident.


Hood
Hood
Always check that the hood is closed and securely locked:
A hood that is not closed and securely locked is dangerous as it could fly open while the vehicle is moving and block the driver's vision which could result in a serious accident.
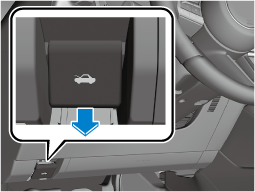
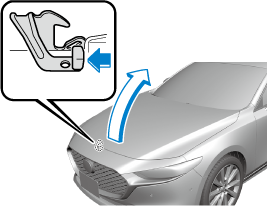
Opening the Hood
-
With the vehicle parked, pull the release handle to unlock the hood.
-
Insert your hand into the hood opening, slide the latch lever in the direction of the arrow as shown in the illustration, and lift up the hood.
-
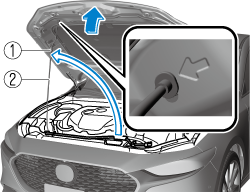
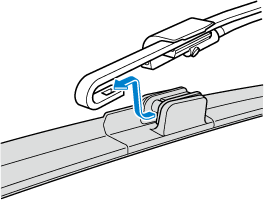
Grasp the support rod in the padded area and secure it in the support rod hole indicated by the arrow to hold the hood open.
-
Pad
-
Support rod
-
Closing the Hood
-
Check under the hood area to make certain all filler caps are in place and all loose items (e.g. tools, oil containers, etc.) have been removed.
-
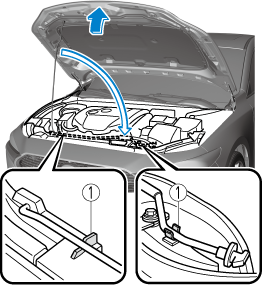
Lift the hood, grasp the padded area on the support rod, and secure the support rod in the clip. Verify that the support rod is secured in the clip before closing the hood.
-
Clip
-
-
Lower the hood slowly to a height of about 20 cm (7.9 in) above its closed position and then let it drop.
When closing the hood, do not push it excessively such as by applying your weight. Otherwise, the hood could be deformed.
Recommended Oil
U.S.A., Canada
SKYACTIV-G 2.0 and SKYACTIV-G 2.5
Use ILSAC GF-V or higher/ SAE 0W-20 engine oil.
Mazda Genuine Oil is used in your Mazda vehicle. Mazda Genuine 0W-20 Oil is required to achieve optimum fuel economy.
For maintenance service, Mazda recommends Genuine Mazda Parts and Genuine Mazda Premium Oil.

Only use SAE 0W-20 oil “Certified For Gasoline Engines” by the American Petroleum Institute (API).
Oil with this trademark symbol conforms to the current engine and emission system protection standards and fuel economy requirements of the International Lubricant Standardization and Approval Committee (ILSAC), comprised of U.S. and Japanese automobile manufacturers.

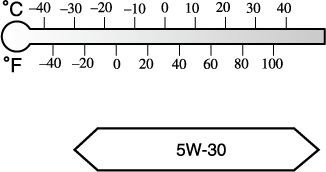
SKYACTIV-G 2.5T
Use SAE 5W-30 engine oil.
Mazda Genuine Oil is used in your Mazda vehicle. Mazda Genuine 5W-30 Oil is required to achieve optimum fuel economy.
For maintenance service, Mazda recommends Genuine Mazda Parts and Genuine Mazda Premium Oil.
Only use SAE 5W-30 oil “Certified For Gasoline Engines” by the American Petroleum Institute (API).
Oil with this trademark symbol conforms to the current engine and emission system protection standards and fuel economy requirements of the International Lubricant Standardization and Approval Committee (ILSAC), comprised of U.S. and Japanese automobile manufacturers.
Except U.S.A., Canada
Use SAE 5W-30 engine oil.
Oil container labels provide important information.
A chief contribution this type of oil makes to fuel economy is reducing the amount of fuel necessary to overcome engine friction.
For maintenance service, Mazda recommends Mazda Genuine Parts.

(Mexico)
SKYACTIV-G 2.0 and SKYACTIV-G 2.5
Use API SM or higher, or ILSAC GF-IV or higher/SAE 5W-30 engine oil. If SAE 5W-30 engine oil is not available, use SAE 5W-20 engine oil.
The quality designation SM, SN or SP, or ILSAC must be on the label.
SKYACTIV-G 2.5T
Use API SM or higher, or ILSAC GF-IV or higher/SAE 5W-30 engine oil. If SAE 5W-30 engine oil is not available, use SAE 0W-30 or SAE 10W-30 engine oil.
The quality designation SM, SN or SP, or ILSAC must be on the label.
Inspecting Engine Oil Level
-
If the engine oil level warning indication/warning light turns on, add 1 L (0.26 US gal, 0.22 Imp gal) of engine oil.
-
Be sure the vehicle is on a level surface.
-
Warm up the engine to normal operating temperature.
-
Turn it off and wait at least 5 minutes for the oil to return to the oil pan.
-
Pull out the dipstick, wipe it clean, and reinsert it fully.

-
MAX
-
OK
-
MIN
-
-
Pull it out again and examine the level.
The level is normal if it is between the MIN and MAX marks.
If it is near or below MIN, add enough oil to bring the level to MAX.
-
Make sure the O-ring on the dipstick is positioned properly before reinserting the dipstick.
-
Reinsert the dipstick fully.
Inspecting Brake/Clutch Fluid Level
If the brake/clutch fluid level is low, have the brakes inspected:
A low brake/clutch fluid level is dangerous.
A low level could indicate brake lining wear or a brake system leak which could cause the brakes to fail and lead to an accident.
The brakes and clutch draw fluid from the same reservoir.
Inspect the fluid level in the reservoir regularly. It should be kept between the MAX and MIN lines.
The level normally drops with accumulated distance, a condition associated with wear of brake and clutch linings. If it is excessively low, have the brake/clutch system inspected by an Authorized Mazda Dealer.

Body Lubrication
Body Lubrication
All moving points of the body, such as door and hood hinges and locks, should be lubricated each time the engine oil is changed. Use a non-freezing lubricant on locks during cold weather.
Make sure the hood's secondary latch keeps the hood from opening when the primary latch is released.
Wiper Blades
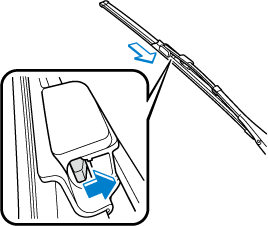
Replacing Windshield Wiper Blades
When the wipers no longer clean well, the blades are probably worn or cracked.
Replace them.
-
To prevent damaging a windshield wiper blade, wiper arm, or the hood, perform the following procedure.
-
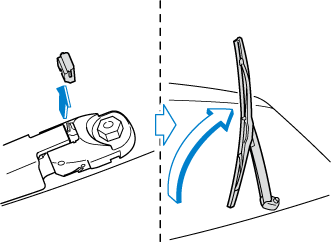
Before lifting the windshield wiper blades off the windshield, always move them to the service position.
-
When putting the windshield wiper blades back on the windshield, make sure that they are in the service position before switching the ignition ON and operating the windshield wipers.
-
-
Replace with Mazda genuine wiper blades. If they are replaced with wiper blades other than a Mazda genuine product, they may not wipe with the same efficiency as the genuine product.
-
To prevent damage to the wiper arms and other components, do not try to sweep the wiper arm by hand.
-
Do not bend the blade rubber unnecessarily when replacing it. Otherwise, the metal stiffener in the blade may deform and the windshield wiper operation may be adversely affected.
-
Do not hold a wiper blade by its end when raising the wiper arm. Otherwise, the part may deform and the wiping performance may lower.
-
Forcefully lowering the wiper arms could damage the wiper arm and blade, and may scratch or crack the windshield.
You can replace the wiper blades yourself, however you cannot replace the wiper arms.
If you want to replace the wiper arms, consult an Authorized Mazda Dealer.
Replace the wiper blades using the following procedure.
-
Move the wipers to the service positions using the following procedure.
-
Switch the ignition ON.
-
Switch the ignition OFF.
-
Press up the wiper switch to the MIST position 2 times within 30 seconds after switching the ignition OFF.
When the procedure is completed, the wipers operate and they stop at the service positions.
-
-
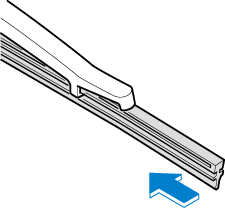
Raise the wiper arms.
-
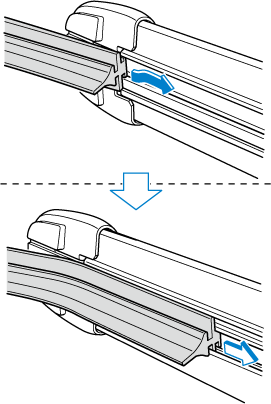
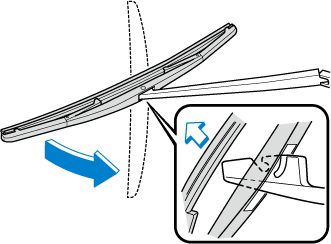
Slide the blade component in the direction of the arrow while pressing the wiper arm tab to remove the blade component from the wiper arm.
-
Pull the blade rubber in the direction of the arrow and slide it to a position where the blade holder groove can be checked.
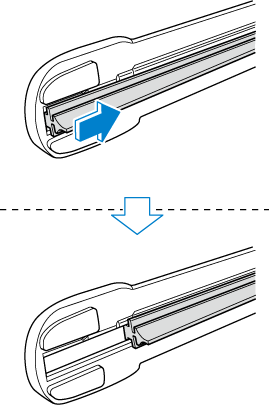
-
Pull the end of the blade rubber from the blade holder groove in the direction of the arrow and remove the blade rubber from the blade holder.
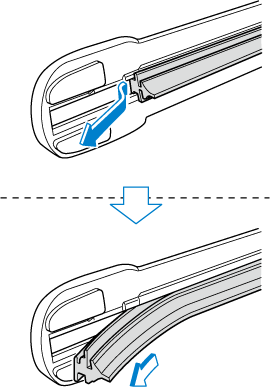
-
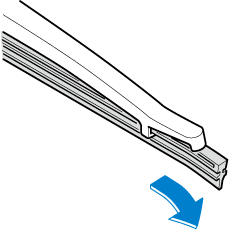
Insert the end of the new blade rubber into the groove of the blade holder until it contacts the end of the blade holder.
-
After pulling the blade rubber in the direction of the arrow and sliding the blade rubber to a position to check the blade holder groove, slide the blade rubber end in the opposite direction.
-
Make sure that the blade rubber is correctly installed to the blade holder.
-
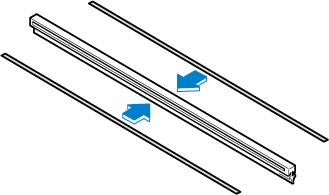
Slide the blade component and install it to the wiper arm.
-
Slowly lower the wiper arms onto the windshield.
To prevent damage to the windshield let the wiper arm down easily, do not let it slap down on the windshield.
-
Move the wipers to their initial positions using the following procedure.
-
Make sure that the wipers are set on the windshield.
-
Switch the ignition ON.
-
Press up the wiper switch to the MIST position 1 time.
When the procedure is completed, the wipers operate and they stop at the initial positions.
-
Replacing Rear Window Wiper Blade (5-Door)
When the wiper no longer cleans well, the blade is probably worn or cracked.
Replace it.
To prevent damage to the wiper arm and other components, do not move the wiper by hand.
-
Remove the cover.
-
Remove the stopper and raise the wiper arm.
-
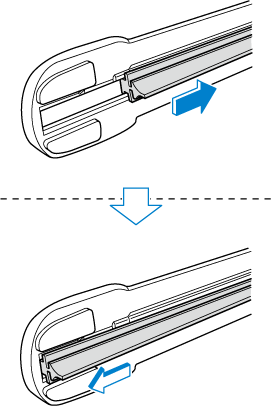
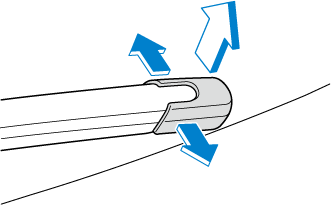
Firmly rotate the wiper blade to the right until it unlocks, then remove the blade.
To prevent damage to the rear window, do not let the wiper arm fall on it.
-
Pull down the blade rubber and slide it out of the blade holder.
-
Remove the metal stiffeners from the blade rubber and install them in the new blade.
-
Carefully insert the new blade rubber.
Then install the blade assembly in the reverse order of removal.
Battery Maintenance
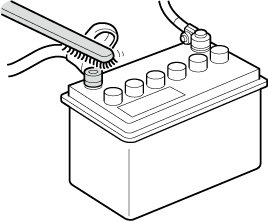
To get the best service from a battery:
-
Keep it securely mounted.
-
Keep the top clean and dry.
-
Keep terminals and connections clean, tight, and coated with petroleum jelly or terminal grease.
-
Rinse off spilled electrolyte immediately with a solution of water and baking soda.
-
If the vehicle will not be used for an extended time, disconnect the battery cables and charge the battery every 6 weeks.
Battery Replacement
Contact an Authorized Mazda Dealer for battery replacement.
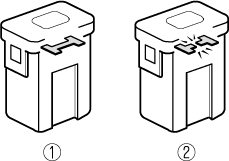
Key Battery Replacement
Tires
Tires
For reasons of proper performance, safety, and better fuel economy, always maintain recommended tire inflation pressures and stay within the recommended load limits and weight distribution.
Using Different Tire Types:
Driving your vehicle with different types of tires is dangerous. It could cause poor handling and poor braking; leading to loss of control.
Except for the limited use of the temporary spare tire, use only the same type tires (radial, bias-belted, bias-type) on all four wheels.
Using Wrong-Sized Tires:
Using any other tire size than what is specified for the vehicle (Search) is dangerous. It could seriously affect ride, handling, ground clearance, tire clearance, and speedometer calibration. This could cause you to have an accident. Use only tires that are the correct size specified for the vehicle.
Tire Inflation Pressure
Always inflate the tires to the correct pressure:
Overinflation or underinflation of tires is dangerous. Adverse handling or unexpected tire failure could result in a serious accident.
Refer to Tires (Search).
Use only a Mazda-genuine tire valve cap:
Use of a non-genuine part is dangerous as the correct tire air pressure cannot be maintained if the tire valve becomes damaged. If the vehicle is driven under this condition, the tire air pressure will decrease which could result in a serious accident. Do not use any part for the tire valve cap that is not a Mazda-genuine part.
Inspect all tire pressures monthly (including the spare) when the tires are cold. Maintain recommended pressures for the best ride, handling, and minimum tire wear.
Refer to the specification charts (Search).
-
Always check tire pressure when tires are cold.
-
Warm tires normally exceed recommended pressures. Do not release air from warm tires to adjust the pressure.
-
Underinflation can cause reduced fuel economy, uneven and accelerated tire wear, and poor sealing of the tire bead, which will deform the wheel and cause separation of tire from rim.
-
Overinflation can produce a harsh ride, uneven and accelerated tire wear, and a greater possibility of damage from road hazards.
Keep your tire pressure at the correct levels. If one frequently needs inflating, have it inspected.
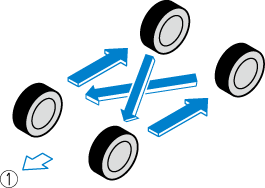
Tire Rotation
Rotate tires periodically:
Irregular tire wear is dangerous. To equalize tread wear for maintaining good performance in handling and braking, rotate the tires periodically or sooner if irregular wear develops.
Please refer to Scheduled maintenance for your tire rotation interval.
During rotation, inspect them for correct balance.
-
Forward
Do not include (TEMPORARY USE ONLY) spare tire in rotation.
Also, inspect them for uneven wear and damage. Abnormal wear is usually caused by one or a combination of the following:
-
Incorrect tire pressure
-
Improper wheel alignment
-
Out-of-balance wheel
-
Severe braking
After rotation, inflate all tire pressures to specification (Search) and inspect the lug nuts for tightness.
Rotate unidirectional tires and radial tires that have an asymmetrical tread pattern or studs only from front to rear, not from side to side. Tire performance will be reduced if rotated from side to side.
Replacing a Tire
Always use tires that are in good condition:
Driving with worn tires is dangerous. Reduced braking, steering, and traction could result in an accident.
Replace all four tires at the same time:
Replacing just one tire is dangerous. It could cause poor handling and poor braking resulting in loss of vehicle control. Mazda strongly recommends that you replace all four tires at the same time.
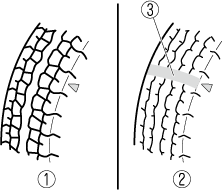
If a tire wears evenly, a wear indicator will appear as a solid band across the tread.
Replace the tire when this happens.
-
New tread
-
Worn tread
-
Tread wear indicator
You should replace the tire before the band crosses the entire tread.
Tires degrade over time, even when they are not being used on the road. It is recommended that tires generally be replaced when they are 6 years or older. Heat caused by hot climates or frequent high loading conditions can accelerate the aging process. You should replace the spare tire when you replace the other road tires due to the aging of the spare tire. The period in which the tire was manufactured (both week and year) is indicated by a 4-digit number.
Refer to Tire Labeling (Search).
Temporary Spare Tire
Inspect the temporary spare tire at least monthly to make sure it is properly inflated and stored.
The temporary spare tire condition gradually deteriorates even if it has not been used.
The temporary spare tire is easier to handle because of its construction which is lighter and smaller than a conventional tire. This tire should be used only for an emergency and only for a short distance.
Use the temporary spare tire only until the conventional tire is repaired, which should be as soon as possible.
Refer to Tires (Search).
-
Do not use your temporary spare tire rim with a snow tire or a conventional tire. Neither will properly fit and could damage both tire and rim.
-
The temporary spare tire has a tread life of less than 5,000 km (3,000 miles). The tread life may be shorter depending on driving conditions.
-
The temporary spare tire is for limited use, however, if the tread wear solid-band indicator appears, replace the tire with the same type of temporary spare (Search).
Tires degrade over time, even when they are not being used on the road. It is recommended that tires generally be replaced when they are 6 years or older. Heat caused by hot climates or frequent high loading conditions can accelerate the aging process. You should replace the spare tire when you replace the other road tires due to the aging of the spare tire. The period in which the tire was manufactured (both week and year) is indicated by a 4-digit number.
Refer to Tire Labeling (Search).
Replacing a Wheel
Always use wheels of the correct size on your vehicle:
Using a wrong-sized wheel is dangerous. Braking and handling could be affected, leading to loss of control and an accident.
A wrong-sized wheel may adversely affect:
-
Tire fit
-
Wheel and bearing life
-
Ground clearance
-
Snow-chain clearance
-
Speedometer calibration
-
Headlight aim
-
Bumper height
-
Tire Pressure Monitoring System
-
When replacing a wheel, make sure the new one is the same as the original factory wheel in diameter, rim width, and offset (inset/outset).
-
For details, contact an Authorized Mazda Dealer.
Proper tire balancing provides the best riding comfort and helps reduce tread wear. Out-of-balance tires can cause vibration and uneven wear, such as cupping and flat spots.
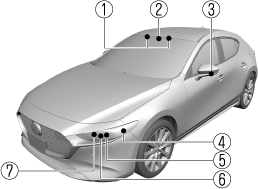
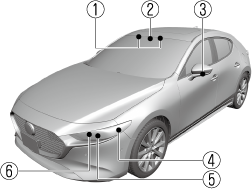
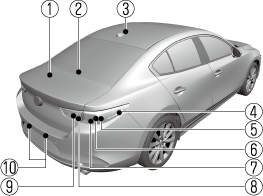
Light Bulbs
Light Bulbs
Front
Type A
-
Vanity mirror lights (Some Models)
-
Overhead lights/ Front map lights
-
Side turn signal lights (Some Models)
-
Front side-marker lights
-
Parking lights
-
Headlights (High/Low beam)/ Daytime running lights
-
Front turn signal lights
Type B
-
Vanity mirror lights (Some Models)
-
Overhead lights/ Front map lights
-
Side turn signal lights (Some Models)
-
Parking lights/Front side-marker lights
-
Headlights (High/Low beam)/ Daytime running lights
-
Front turn signal lights
Rear
4–Door
-
Trunk light
-
High-mount brake light
-
Overhead light (Rear)
-
Rear side-marker lights
-
Brake lights/Taillights (Some Models)
-
Rear turn signal lights
-
Brake lights/Taillights
-
Taillights (Some Models)
-
Reverse lights
-
License plate lights
5–Door
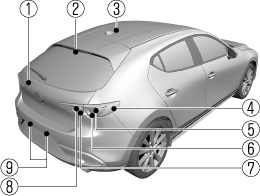
-
Luggage compartment light
-
High-mount brake light
-
Overhead light (Rear)
-
Rear side-marker lights
-
Rear turn signal lights
-
Brake lights/Taillights
-
Taillights (Some Models)
-
Reverse lights
-
License plate lights
When removing the lens or lamp unit using a flathead screwdriver, make sure that the flathead screwdriver does not contact the interior terminal. If the flathead screwdriver contacts the terminal, a short circuit may occur.
-
When replacing a bulb, contact an Authorized Mazda Dealer if necessary.
-
Use the protective cover and carton for the replacement bulb to dispose of the old bulb promptly and out of the reach of children.
-
For details regarding the installation positions of the interior lights, refer to the following:
Replacing Exterior Light Bulbs
The exterior lights have either LEDs or normal bulbs.
Only the bulb for a parking lights/front side-marker lights (type B) can be replaced.
LED type
-
Headlights
-
Daytime running lights
-
Parking lights (Type A)
-
Front turn signal lights
-
Front side-marker lights (Type A)
-
Side turn signal lights (Some Models)
-
High-mount brake light
-
Rear turn signal lights
-
Rear side-marker lights
-
Brake lights
-
Taillights
-
Reverse lights
-
License plate lights
The LED bulb cannot be replaced as a single unit because it is an integrated unit.
The LED bulb has to be replaced with the unit. We recommend an Authorized Mazda Dealer when the replacement is necessary.
Bulb type
Parking lights/Front side-marker lights (Type B)
-
Make sure the ignition is switched off, and the headlight switch is off.
-
If you are changing the left bulb, start the engine, turn the steering wheel all the way to the right, and turn off engine. If you are changing the right bulb, turn the steering wheel to the left.
-
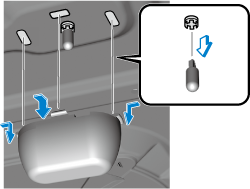
Pull the center of each plastic retainer and remove the retainers.

-
Removal
-
Installation
-
-
Pull the center of each plastic retainer and remove the retainers.
-
Removal
-
Installation
-
-
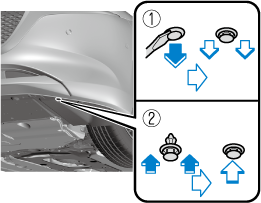
Turn the screw counterclockwise and remove it, and then partially peel back the mudguard.
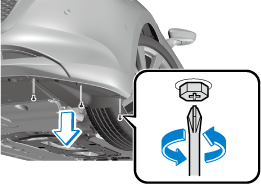
-
Turn the socket and bulb assembly counterclockwise and remove it.
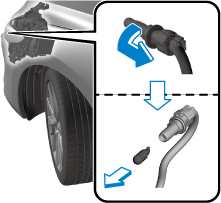
-
Disconnect the bulb from the socket.
-
Install the new bulb in the reverse order of the removal procedure.
Replacing Interior Light Bulbs
Overhead lights/Front map lights, Overhead light (Rear), Vanity mirror lights (Some Models), Luggage compartment light (5–Door)
The LED bulb cannot be replaced as a single unit because it is an integrated unit.
The LED bulb has to be replaced with the unit. We recommend an Authorized Mazda Dealer when the replacement is necessary.
Trunk light (4–Door)
-
Press both sides of the lens cap to remove it.
-
Disconnect the bulb by pulling it out.
-
Install the new bulb in the reverse order of the removal procedure.
Fuses
Fuses
Your vehicle's electrical system is protected by fuses.
If any lights, accessories, or controls do not work, inspect the appropriate circuit protector. If a fuse has blown, the inside element will be melted.
If the same fuse blows again, avoid using that system and consult an Authorized Mazda Dealer as soon as possible.
Fuse Replacement
Replacing the fuses on the vehicle's left side
If the electrical system does not work, first inspect the fuses on the vehicle's left side.
-
Make sure the ignition is switched off, and other switches are off.
-
Open the fuse panel cover.
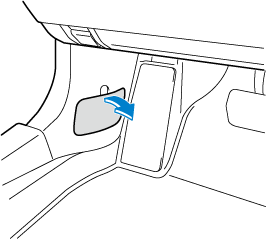
-
Pull the fuse straight out with the fuse puller provided on the fuse block located in the engine compartment.
-
Inspect the fuse and replace it if it is blown.
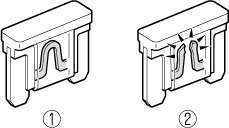
-
Normal
-
Blown
-
-
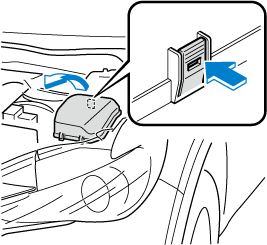
Insert a new fuse of the same amperage rating, and make sure it fits tightly. If it does not fit tightly, have an expert install it. Consult an Authorized Mazda Dealer.
If you have no spare fuses, borrow one of the same rating from a circuit not essential to vehicle operation, such as the audio or accessory socket circuit.
Always replace a fuse with a genuine Mazda fuse or equivalent of the same rating. Otherwise, you may damage the electric system.
-
Reinstall the cover and make sure that it is securely installed.
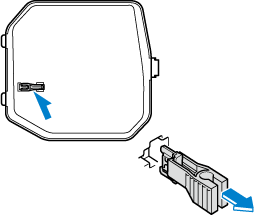
Replacing the fuses under the hood
If the headlights or other electrical components do not work and the fuses in the cabin are normal, inspect the fuse block under the hood.
If a fuse is blown, it must be replaced. Follow these steps:
-
Make sure the ignition is switched off, and other switches are off.
-
Remove the fuse block cover.
-
If any fuse but the MAIN fuse is blown, replace it with a new one of the same amperage rating.
-
Normal
-
Blown
Do not replace the main fuse by yourself. Have an Authorized Mazda Dealer perform the replacement:
Replacing the fuse by yourself is dangerous because the MAIN fuse is a high current fuse. Incorrect replacement could cause an electrical shock or a short circuit resulting in a fire.
-
-
Reinstall the cover and make sure that it is securely installed.
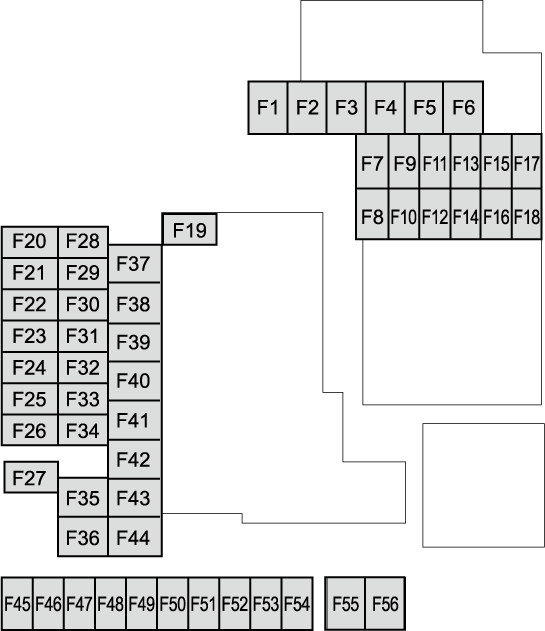
Fuse Panel Description
Fuse block (Engine compartment)
|
No. |
FUSE RATING |
PROTECTED COMPONENT |
|---|---|---|
|
F1 |
― |
― |
|
F2 |
20 A |
Windshield wiper de-icer (Some Models) |
|
F3 |
30 A |
Engine control system |
|
F4 |
20 A |
S-VT |
|
F5 |
40 A |
Engine control system |
|
F6 |
― |
― |
|
F7 |
20 A |
Fuel pump |
|
F8 |
15 A |
Engine control system |
|
F9 |
15 A |
Transmission control system (Some Models) |
|
F10 |
15 A |
Engine control system |
|
F11 |
7.5 A |
Air conditioner |
|
F12 |
15 A |
Engine control system |
|
F13 |
― |
― |
|
F14 |
20 A |
Front seat warmer (Some Models) |
|
F15 |
― |
― |
|
F16 |
15 A |
For protection of various circuits |
|
F17 |
― |
― |
|
F18 |
15 A |
For protection of various circuits |
|
F19 |
60 A |
Power steering system |
|
F20 |
15 A |
Headlight (LH) 1 |
|
F21 |
15 A |
Headlight (RH) 1 |
|
F22 |
15 A |
Keyless system |
|
F23 |
30 A |
ABS, Dynamic stability control system |
|
F24 |
15 A |
Headlight (LH) 2 |
|
F25 |
15 A |
Headlight (RH) 2 |
|
F26 |
7.5 A |
On board diagnostics |
|
F27 |
25 A |
For protection of various circuits |
|
F28 |
25 A |
For protection of various circuits |
|
F29 |
15 A |
Windshield washer |
|
F30 |
15 A |
Accessory sockets |
|
F31 |
15 A |
Horn |
|
F32 |
― |
― |
|
F33 |
― |
― |
|
F34 |
― |
― |
|
F35 |
50A |
ABS, Dynamic stability control system |
|
F36 |
― |
― |
|
F37 |
40 A |
Rear window defogger |
|
F38 |
50 A |
For protection of various circuits |
|
F39 |
― |
― |
|
F40 |
40 A |
Air conditioner |
|
F41 |
― |
― |
|
F42 |
20 A |
Windshield wipers |
|
F43 |
30 A |
Cooling fan (Some Models) |
|
F44 |
30 A |
Starter |
|
F45 |
10 A |
Engine control system |
|
F46 |
15 A |
Audio |
|
F47 |
15 A |
For protection of various circuits |
|
F48 |
7.5 A |
Air bag |
|
F49 |
15 A |
Instrument cluster |
|
F50 |
15 A |
Room light |
|
F51 |
25 A |
Audio |
|
F52 |
10 A |
Moonroof (Some Models) |
|
F53 |
15 A |
Engine control system |
|
F54 |
15 A |
i-ACTIVSENSE |
|
F55 |
― |
― |
|
F56 |
15 A |
Electric water pump (Some Models) |
Fuse block (Left side)
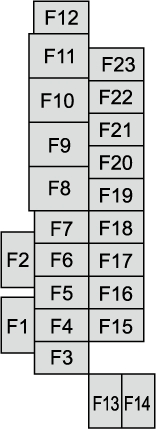
|
No. |
FUSE RATING |
PROTECTED COMPONENT |
|---|---|---|
|
F1 |
― |
― |
|
F2 |
― |
― |
|
F3 |
― |
― |
|
F4 |
15 A |
Power door locks (Driver) |
|
F5 |
15 A |
Power door locks (Passenger) |
|
F6 |
― |
― |
|
F7 |
― |
― |
|
F8 |
― |
― |
|
F9 |
30 A |
Power windows (Driver) |
|
F10 |
30 A |
Power windows (Passenger) |
|
F11 |
30 A |
Power seat (Driver) (Some Models) |
|
F12 |
― |
― |
|
F13 |
15 A |
Audio |
|
F14 |
― |
― |
|
F15 |
15 A |
Liftgate lock |
|
F16 |
15 A |
Illumination |
|
F17 |
10 A |
Brake lights |
|
F18 |
10 A |
Reverse lights |
|
F19 |
10 A |
Rear turn signal lights |
|
F20 |
10 A |
Taillights |
|
F21 |
10 A |
Taillights |
|
F22 |
7.5 A |
Air bag (Some Models) |
|
F23 |
― |
― |