

Owner Maintenance
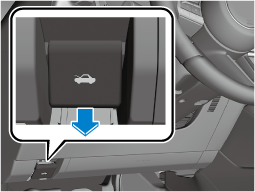
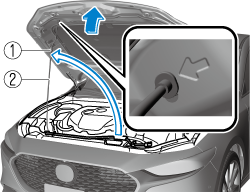
Opening the Hood
-
With the vehicle parked, pull the release handle to unlock the hood.
-
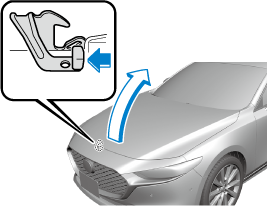
Insert your hand into the hood opening, slide the latch lever in the direction of the arrow as shown in the illustration, and lift up the hood.
-
Grasp the support rod in the padded area and secure it in the support rod hole indicated by the arrow to hold the hood open.
-
Pad
-
Support rod
-
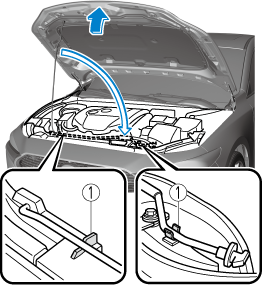
Closing the Hood
-
Check under the hood area to make certain all filler caps are in place and all loose items (e.g. tools, oil containers, etc.) have been removed.
-
Lift the hood, grasp the padded area on the support rod, and secure the support rod in the clip. Verify that the support rod is secured in the clip before closing the hood.
-
Clip
-
-
Lower the hood slowly to a height of about 20 cm (7.9 in) above its closed position and then let it drop.
When closing the hood, do not push it excessively such as by applying your weight. Otherwise, the hood could be deformed.


Engine Compartment Overview
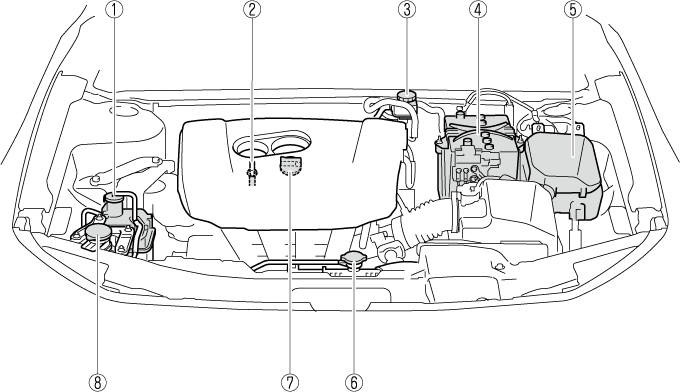
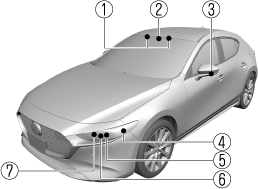
SKYACTIV-G 2.0 and SKYACTIV-G 2.5
-
Engine coolant reservoir
-
Engine oil dipstick
-
Brake/Clutch fluid reservoir
-
Battery
-
Fuse block
-
Cooling system cap
-
Engine oil-filler cap
-
Windshield washer fluid reservoir
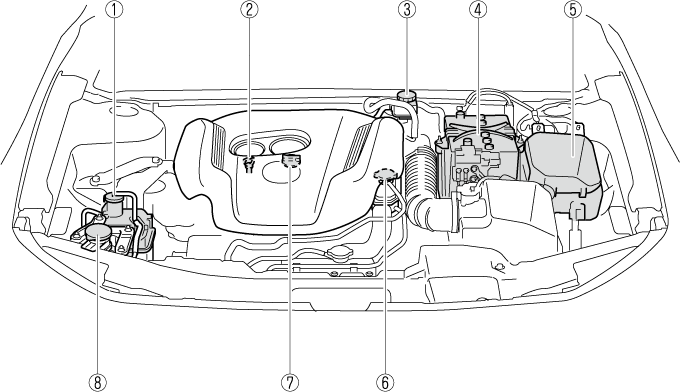
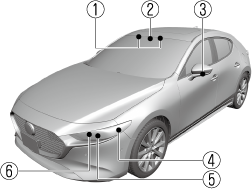
SKYACTIV-G 2.5T
-
Engine coolant reservoir
-
Engine oil dipstick
-
Brake fluid reservoir
-
Battery
-
Fuse block
-
Cooling system cap
-
Engine oil-filler cap
-
Windshield washer fluid reservoir
Engine Oil
Inspecting Coolant Level
Do not use a match or live flame in the engine compartment. DO NOT ADD COOLANT WHEN THE ENGINE IS HOT:
A hot engine is dangerous. If the engine has been running, parts of the engine compartment can become very hot. You could be burned. Carefully inspect the engine coolant in the coolant reservoir, but do not open it.
 Pull over to a safe location, then switch the ignition off and make sure the fan is not running before attempting to work near the cooling fan:
Working near the cooling fan when it is running is dangerous. The fan could continue running indefinitely even if the engine has stopped and the engine compartment temperature is high. You could be hit by the fan and seriously injured.
 Do not remove either cooling system cap when the engine and radiator are hot:
When the engine and radiator are hot, scalding coolant and steam may shoot out under pressure and cause serious injury.
Inspect the antifreeze protection and coolant level in the coolant reservoir at least once a year―at the beginning of the winter season―and before traveling where temperatures may drop below freezing.
Inspect the condition and connections of all cooling system and heater hoses.
Replace any that are swollen or deteriorated.
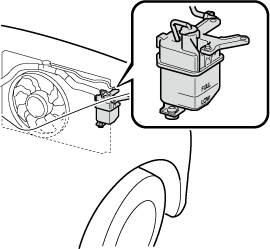
The coolant should be at full in the radiator and between the FULL and LOW marks on the coolant reservoir when the engine is cool.
SKYACTIV-G 2.0 and SKYACTIV-G 2.5
SKYACTIV-G 2.5T
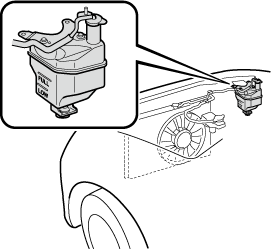
If it is at or near LOW, add enough coolant to the coolant reservoir to provide freezing and corrosion protection and to bring the level to FULL.
Securely tighten the coolant reservoir tank cap after adding coolant.
-
Radiator coolant will damage paint.
Rinse it off quickly if spilled.
-
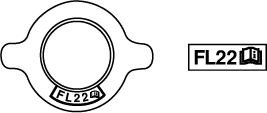
If the “FL22” mark is shown on or near the cooling system cap, use of FL-22 is recommended when replacing engine coolant. Using engine coolant other than FL-22 may cause serious damage to the engine and cooling system.
If the coolant reservoir is empty or new coolant is required frequently, consult an Authorized Mazda Dealer.
Wiper Blades
Replacing Windshield Wiper Blades
When the wipers no longer clean well, the blades are probably worn or cracked.
Replace them.
-
To prevent damaging a windshield wiper blade, wiper arm, or the hood, perform the following procedure.
-
Before lifting the windshield wiper blades off the windshield, always move them to the service position.
-
When putting the windshield wiper blades back on the windshield, make sure that they are in the service position before switching the ignition ON and operating the windshield wipers.
-
-
Replace with Mazda genuine wiper blades. If they are replaced with wiper blades other than a Mazda genuine product, they may not wipe with the same efficiency as the genuine product.
-
To prevent damage to the wiper arms and other components, do not try to sweep the wiper arm by hand.
-
Do not bend the blade rubber unnecessarily when replacing it. Otherwise, the metal stiffener in the blade may deform and the windshield wiper operation may be adversely affected.
-
Do not hold a wiper blade by its end when raising the wiper arm. Otherwise, the part may deform and the wiping performance may lower.
-
Forcefully lowering the wiper arms could damage the wiper arm and blade, and may scratch or crack the windshield.
You can replace the wiper blades yourself, however you cannot replace the wiper arms.
If you want to replace the wiper arms, consult an Authorized Mazda Dealer.
Replace the wiper blades using the following procedure.
-
Move the wipers to the service positions using the following procedure.
-
Switch the ignition ON.
-
Switch the ignition OFF.
-
Press up the wiper switch to the MIST position 2 times within 30 seconds after switching the ignition OFF.
When the procedure is completed, the wipers operate and they stop at the service positions.
-
-
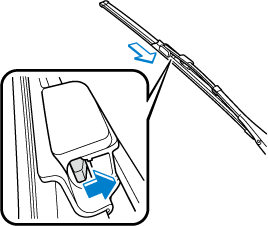
Raise the wiper arms.
-
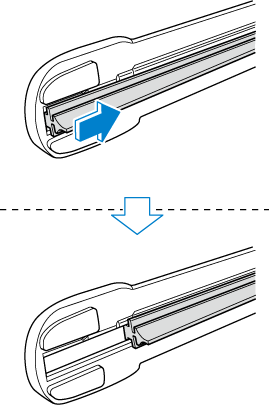
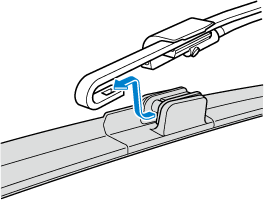
Slide the blade component in the direction of the arrow while pressing the wiper arm tab to remove the blade component from the wiper arm.
-
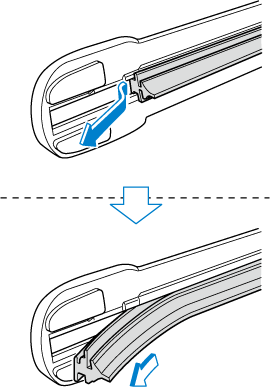
Pull the blade rubber in the direction of the arrow and slide it to a position where the blade holder groove can be checked.
-
Pull the end of the blade rubber from the blade holder groove in the direction of the arrow and remove the blade rubber from the blade holder.
-
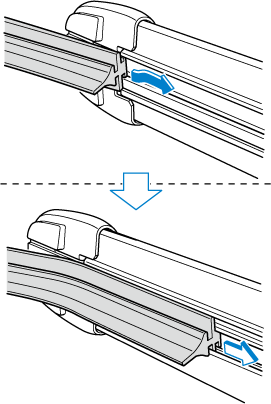
Insert the end of the new blade rubber into the groove of the blade holder until it contacts the end of the blade holder.
-
After pulling the blade rubber in the direction of the arrow and sliding the blade rubber to a position to check the blade holder groove, slide the blade rubber end in the opposite direction.
-
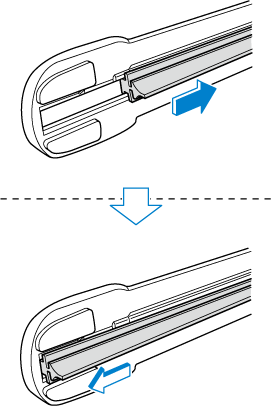
Make sure that the blade rubber is correctly installed to the blade holder.
-
Slide the blade component and install it to the wiper arm.
-
Slowly lower the wiper arms onto the windshield.
To prevent damage to the windshield let the wiper arm down easily, do not let it slap down on the windshield.
-
Move the wipers to their initial positions using the following procedure.
-
Make sure that the wipers are set on the windshield.
-
Switch the ignition ON.
-
Press up the wiper switch to the MIST position 1 time.
When the procedure is completed, the wipers operate and they stop at the initial positions.
-
Battery Maintenance
To get the best service from a battery:
-
Keep it securely mounted.
-
Keep the top clean and dry.
-
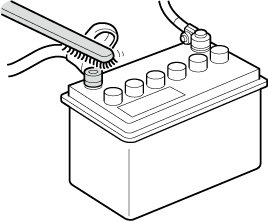
Keep terminals and connections clean, tight, and coated with petroleum jelly or terminal grease.
-
Rinse off spilled electrolyte immediately with a solution of water and baking soda.
-
If the vehicle will not be used for an extended time, disconnect the battery cables and charge the battery every 6 weeks.
Key Battery Replacement
Tires
Replacing a Wheel
Always use wheels of the correct size on your vehicle:
Using a wrong-sized wheel is dangerous. Braking and handling could be affected, leading to loss of control and an accident.
A wrong-sized wheel may adversely affect:
-
Tire fit
-
Wheel and bearing life
-
Ground clearance
-
Snow-chain clearance
-
Speedometer calibration
-
Headlight aim
-
Bumper height
-
Tire Pressure Monitoring System
-
When replacing a wheel, make sure the new one is the same as the original factory wheel in diameter, rim width, and offset (inset/outset).
-
For details, contact an Authorized Mazda Dealer.
Proper tire balancing provides the best riding comfort and helps reduce tread wear. Out-of-balance tires can cause vibration and uneven wear, such as cupping and flat spots.
Light Bulbs
Light Bulbs
Front
Type A
-
Vanity mirror lights (Some Models)
-
Overhead lights/ Front map lights
-
Side turn signal lights (Some Models)
-
Front side-marker lights
-
Parking lights
-
Headlights (High/Low beam)/ Daytime running lights
-
Front turn signal lights
Type B
-
Vanity mirror lights (Some Models)
-
Overhead lights/ Front map lights
-
Side turn signal lights (Some Models)
-
Parking lights/Front side-marker lights
-
Headlights (High/Low beam)/ Daytime running lights
-
Front turn signal lights
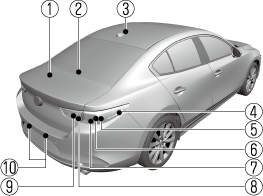
Rear
4–Door
-
Trunk light
-
High-mount brake light
-
Overhead light (Rear)
-
Rear side-marker lights
-
Brake lights/Taillights (Some Models)
-
Rear turn signal lights
-
Brake lights/Taillights
-
Taillights (Some Models)
-
Reverse lights
-
License plate lights
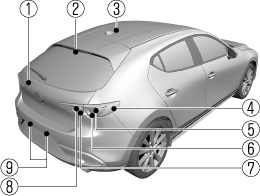
5–Door
-
Luggage compartment light
-
High-mount brake light
-
Overhead light (Rear)
-
Rear side-marker lights
-
Rear turn signal lights
-
Brake lights/Taillights
-
Taillights (Some Models)
-
Reverse lights
-
License plate lights
When removing the lens or lamp unit using a flathead screwdriver, make sure that the flathead screwdriver does not contact the interior terminal. If the flathead screwdriver contacts the terminal, a short circuit may occur.
-
When replacing a bulb, contact an Authorized Mazda Dealer if necessary.
-
Use the protective cover and carton for the replacement bulb to dispose of the old bulb promptly and out of the reach of children.
-
For details regarding the installation positions of the interior lights, refer to the following:
Replacing Exterior Light Bulbs
The exterior lights have either LEDs or normal bulbs.
Only the bulb for a parking lights/front side-marker lights (type B) can be replaced.
LED type
-
Headlights
-
Daytime running lights
-
Parking lights (Type A)
-
Front turn signal lights
-
Front side-marker lights (Type A)
-
Side turn signal lights (Some Models)
-
High-mount brake light
-
Rear turn signal lights
-
Rear side-marker lights
-
Brake lights
-
Taillights
-
Reverse lights
-
License plate lights
The LED bulb cannot be replaced as a single unit because it is an integrated unit.
The LED bulb has to be replaced with the unit. We recommend an Authorized Mazda Dealer when the replacement is necessary.
Bulb type
Parking lights/Front side-marker lights (Type B)
-
Make sure the ignition is switched off, and the headlight switch is off.
-
If you are changing the left bulb, start the engine, turn the steering wheel all the way to the right, and turn off engine. If you are changing the right bulb, turn the steering wheel to the left.
-
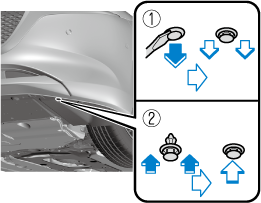
Pull the center of each plastic retainer and remove the retainers.

-
Removal
-
Installation
-
-
Pull the center of each plastic retainer and remove the retainers.
-
Removal
-
Installation
-
-
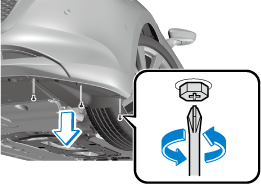
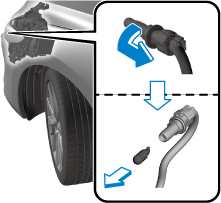
Turn the screw counterclockwise and remove it, and then partially peel back the mudguard.
-
Turn the socket and bulb assembly counterclockwise and remove it.
-
Disconnect the bulb from the socket.
-
Install the new bulb in the reverse order of the removal procedure.
Replacing Interior Light Bulbs
Overhead lights/Front map lights, Overhead light (Rear), Vanity mirror lights (Some Models), Luggage compartment light (5–Door)
The LED bulb cannot be replaced as a single unit because it is an integrated unit.
The LED bulb has to be replaced with the unit. We recommend an Authorized Mazda Dealer when the replacement is necessary.
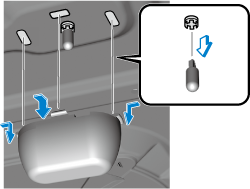
Trunk light (4–Door)
-
Press both sides of the lens cap to remove it.
-
Disconnect the bulb by pulling it out.
-
Install the new bulb in the reverse order of the removal procedure.
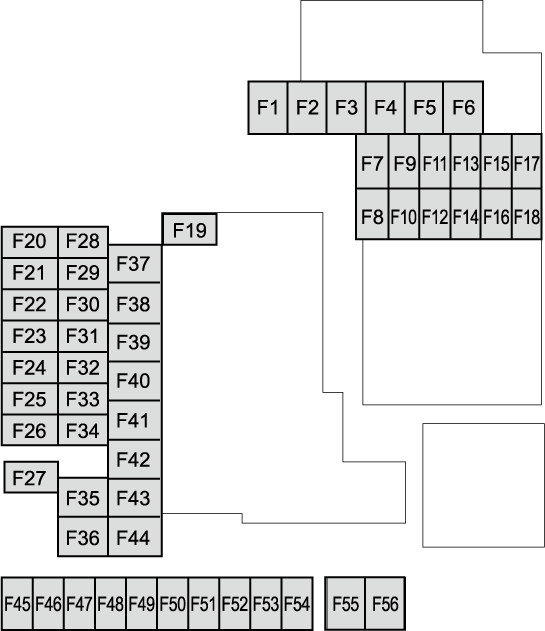
Fuses
Fuse Replacement
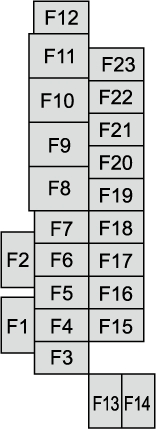
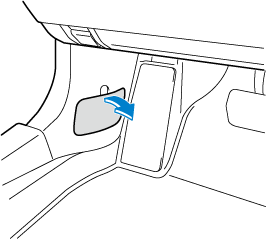
Replacing the fuses on the vehicle's left side
If the electrical system does not work, first inspect the fuses on the vehicle's left side.
-
Make sure the ignition is switched off, and other switches are off.
-
Open the fuse panel cover.
-
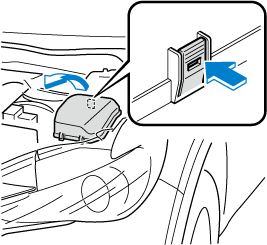
Pull the fuse straight out with the fuse puller provided on the fuse block located in the engine compartment.
-
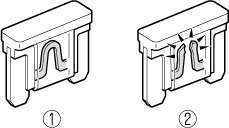
Inspect the fuse and replace it if it is blown.
-
Normal
-
Blown
-
-
Insert a new fuse of the same amperage rating, and make sure it fits tightly. If it does not fit tightly, have an expert install it. Consult an Authorized Mazda Dealer.
If you have no spare fuses, borrow one of the same rating from a circuit not essential to vehicle operation, such as the audio or accessory socket circuit.
Always replace a fuse with a genuine Mazda fuse or equivalent of the same rating. Otherwise, you may damage the electric system.
-
Reinstall the cover and make sure that it is securely installed.
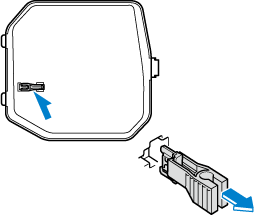
Replacing the fuses under the hood
If the headlights or other electrical components do not work and the fuses in the cabin are normal, inspect the fuse block under the hood.
If a fuse is blown, it must be replaced. Follow these steps:
-
Make sure the ignition is switched off, and other switches are off.
-
Remove the fuse block cover.
-
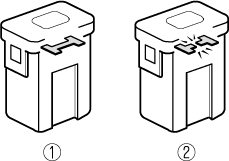
If any fuse but the MAIN fuse is blown, replace it with a new one of the same amperage rating.
-
Normal
-
Blown
Do not replace the main fuse by yourself. Have an Authorized Mazda Dealer perform the replacement:
Replacing the fuse by yourself is dangerous because the MAIN fuse is a high current fuse. Incorrect replacement could cause an electrical shock or a short circuit resulting in a fire.
-
-
Reinstall the cover and make sure that it is securely installed.