


Charging
Warnings and Cautions For Charging
For occupants who use any medical device such as an implanted-type heart pacer or defibrillator, ask a doctor or manufacturer of the device about how the medical device may be affected by the charging operation.
Otherwise, the operation of the medical device could be affected resulting in an accident.
For occupants who use any medical device such as an implanted-type heart pacer or defibrillator, do not enter the cabin including the luggage compartment while charging.
Otherwise, the operation of the medical device could be affected resulting in an accident.
Do not disassemble or modify the charge port and the charge cable.
Otherwise, it could lead to an electrical shock resulting in an accident.
Always heed the following when charging.
Otherwise, it could lead to an electrical shock resulting in an accident.
-
Never allow children to charge the battery.
-
Do not charge the battery while the vehicle is covered with a car cover.
Always heed the following when charging in the rain or snow.
Otherwise, it could lead to an electrical shock resulting in an accident.
-
Do not charge the battery outside if there is the possibility of heavy rain, strong winds, or lightning.
-
Remove water with a clean cloth if the charge connector or charge plug is wet.
-
Do not touch the charge port or charge cable with wet hands.
-
If the outlet is covered with snow while charging, turn off the power such as turning off the breaker, remove the snow, and then remove the charge plug.
Refer to the instruction manual accompanying the charge cable and use the charge cable correctly.
If you handle the charge cable mistakenly, it could result in an unexpected accident.
Do not use the charge cable if it has any of the following malfunctions.
Otherwise, it could lead to an electrical shock resulting in an accident.
-
The charge connector is rusted or corroded.
-
The charge connector is damaged or foreign matter penetrates the charge connector.
Always heed the following when using the charge cable.
Otherwise, the charge cable could be damaged resulting in an accident.
-
Do not pull out or bend the charge cable excessively.
-
Do not step on the charge cable or drag it on the ground.
-
When inserting/pulling out the charge connector and the charge plug, do not twist them excessively.
-
Do not apply excessive force to the connected charge connector such as by applying your weight.
-
Keep objects which generates intense heat (such as a heater or cigarette) away from the charge cable.
-
Do not apply organic solvents, acid or alkaline agents to the charge cable.


-
Do not connect the booster cable to the lead-acid battery or remove the lead-acid battery while charging the high voltage battery. Otherwise, the vehicle or charging device could be damaged.
-
If the charge connector is removed after the charging is finished, close the charging port cap immediately. If the charging port lid is closed with the charging port cap open, water or foreign matter may enter the charging inlet causing a malfunction.
-
Always make sure that the charge cable is not connected to the vehicle before driving. If the charge connector is connected correctly, the vehicle cannot be driven. However, if it is not connected completely, the vehicle can be driven, which could result in an accident.
-
If the charging port is frozen shut, defrost the port using a hair dryer. If the charge cable is inserted/pulled out with the charging inlet frozen, it could cause damage.
Charging Related Part Overview
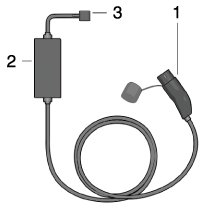
Charge cable
The charge cable is connected to the electrical outlet and the vehicle to send electrical power to the vehicle. For details regarding the charge cable, refer to the instruction manual accompanying the charge cable.
-
Charge connector
-
Control box
-
Charge plug
charge connector
The charge connector is the part used for connecting to the charging port on the vehicle side.
When the charge connector is connected to the charging port, a vehicle system locks the charge connector.
When the charge connector is locked by the vehicle system, it unlocks when the driver’s door is unlocked.
If the charge connector locked by the vehicle system is not unlocked even though the driver’s door is unlocked, consult an Authorized Mazda Dealer.
The conditions for locking the vehicle system can be changed.
Refer to Convenient Ways to Use of Charging (Search).
Control box
The control box indicates the charge status by turning on/flashing the indicator light.
For the indicator light illumination/flash pattern, refer to the instruction manual accompanying the charge cable.
charge plug
The charge plug is the part for connecting to the electrical outlet.
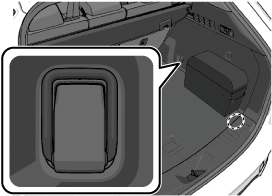
In general, keep the charge cable at home. If the charge cable is kept in the vehicle, firmly secure it using the following procedure.
-
Store the charge cable in its special storage bag.
-
Attach the 2 hooks of the storage bag to each of the 2 luggage hooks on the right side of the luggage compartment, and tightly secure the storage bag. At this time, make sure that the logo on the storage bag is facing toward the center of the luggage compartment.
Be careful when handling the storage bag because the hooks on the storage bag have sharp areas. If your hands or fingers touch the sharp areas, your hands or fingers could be injured.
When the storage bag hooks and the luggage hooks hit against each other, they make noise. If the noise distracts your attention while driving, wrap the included sheet around the areas the hooks make contact.
Charge port

-
Charging indicator
-
Charge port
-
Charging port cap
-
Charging port lid
Charging indicator
The charging indicator indicates the charging status by turning on/flashing the light.
For the charging indicator illumination/flash pattern, refer to [Charging].
Charging port lid
The charging port lid is locked/unlocked in conjunction with the door locking/unlocking mechanism.
When unlocking the driver’s door, the charging port lid is unlocked. When locking the driver’s door, the charging port lid is locked.
However, if the driver’s door is unlocked using the auxiliary key, the charging port lid is not unlocked.
When the driver's door is locked using any of the following functions, the charging port lid is also locked at the same time.
-
Vehicle speed sensing auto door lock function
-
Auto re-lock function
Charge port
The charge port is the part used for connecting to the charge connector of the charge cable. It is used for charging.
How to Perform Charging
It can be charged with a maximum of 7.2 kW of power.
When charging is started after the high voltage battery warning indication/warning light turns on, the time until fully charged is as follows.
-
(7.2 kW normal charging)
About 2.5 hours
For charging, the charging timer function can be used to charge automatically from start to finish. For details on use, refer to [Charging Settings].
-
Installation of charging equipment is required for 7.2 kW normal charging. Consult an Authorized Mazda Dealer for details.
-
If a power outage occurs while charging, remove the charge plug and the charge connector and start charging from the beginning again.
-
Make sure that no water has accumulated in the charge connector and the charging port before charging. If any foreign matter enters the charge connector or the charging port, do not start charging and consult an Authorized Mazda Dealer.
-
Switch the vehicle power OFF.

-
Open the charging port cap.

-
Connect the charge plug to the outlet.
-
Connect the charge connector to the charging port.

Charging starts after connection is completed.
When the charging timer is set, charging does not start even if the charge connector is connected. When you prefer to start charging immediately, use the charging timer cancellation function.
Make sure to lock all the doors before leaving the vehicle while charging.
-
When charging is finished, unlock the door to unlock the charge connector.
-
Remove the charge connector.
-
Close the charging port cap.
-
Close the charging port lid.
-
Disconnect the charge plug.
Charge indicator
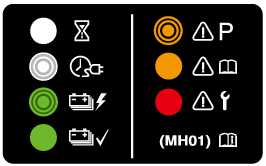
The illumination/flash pattern of the charge indicator can be checked using the labels on the charge lid.
|
Charge indicator illumination/flash pattern |
Content |
|
|---|---|---|
|
— |
OFF |
Charging is possible. |
 (White) |
ON |
Turns on when waiting for starting to charge. |
 (White) |
Flashes slowly |
The brightness changes when the charging timer is set. |
 (Green) |
Flashes slowly |
The brightness changes during charging. |
 (Green) |
ON |
Turns on when charging is completed. Turns off after a certain period of time has passed since charging was completed. |
 (Amber) |
Flashes |
Flashes when the charging connector is connected and the selector lever is in a position other than P. Shift the selector lever to the P position. |
 (Amber) |
ON |
Turns on if there is a problem with the charging system when the charging connector is connected. Wait a few minutes then reconnect the charging connector. |
 (Red) |
ON |
Turns on if there is a problem with the charging system and the charging port lid is opened or the charging connector is connected. Have your vehicle inspected by an Authorized Mazda Dealer. |
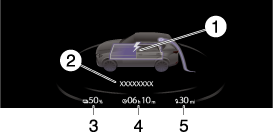
Charge status screen
When the driver's door is opened while the charge connector is connected, the charging status is displayed in the instrument cluster.
-
Charge status icon
-
Message
-
Remaining power of the high voltage battery (Displayed only when vehicle power is switched OFF)
-
Time to complete charging
-
EV maximum driving distance (Displayed only when vehicle power is switched OFF)
When charging is started, the charging status screen is displayed. The charging status screen turns off after a certain period of time passes or the doors or liftgate is locked. The screen is displayed again when the doors or liftgate is unlocked.
Convenient Ways to Use of Charging
Charging Schedule
Timer charging is a function which charges the battery automatically according to a preset time.
You can charge the battery using this function during time periods when electricity rates are low. In addition, the maximum charge limit can be set and changed.
-
Select Settings from the home screen on Mazda Connect.
-
Select EV Settings from the setting screen.
-
Select Charging Schedule from the selection screen.
|
Function |
Available setting changes |
|
|---|---|---|
|
1 ---- |
Enable, Disable*1 |
Edit, Delete*2 |
|
2 ---- |
||
|
3 ---- |
||
|
4 ---- |
||
|
5 ---- |
||
|
6 ---- |
||
|
7 ---- |
||
-
If a list selected using the cursor has been set, the item can be Enable or Disable.
-
Settings can be Edit/Delete by sliding a list selected using the cursor to the right.
-
The charging timer does not work immediately after the lead-acid battery is removed or installed, or when no GPS signal has been received. When charging without receiving GPS, charging begins. When GPS signals are received, the charging timer becomes operational.
-
Immediately after switching to daylight savings, charging may occur at the charging timer time set before the switch to daylight savings until the vehicle power is switched ON.
Edit
|
Function |
Available setting changes |
|---|---|
|
Start Time Select the desired charging start time. |
Time (10-minute intervals) |
|
End Time Select the desired charging end time. |
Time (10-minute intervals) |
|
Repeat Select the day(s) of the week to repeat. |
Monday ― Sunday |
|
Charge Limit Select the desired charge limit method. |
According to Battery Charge Level, According to Estimated Range |
|
Battery Charge Level*1 Select the desired maximum charge level. |
100% ― 20% (9 levels) |
|
Estimated Range*2 Select the desired estimated range. |
In 10 km (10 mi) increments |
-
Can be changed when According to Battery Charge Level is selected for Charge Limit.
Use when you want to charge only the amount of charging you need. This helps you save power and prevent high voltage battery deterioration.
-
Can be changed when According to Estimated Range is selected for Charge Limit.
Use when you want to charge according to your planned driving distance.
The distance-to-full discharge changes depending on the driving conditions and surrounding environment. Check the actual remaining distance-to-full discharge.
If you change the distance unit after setting the Estimated Range, the Estimated Range will be calculated in the unit after the change. (If you change the units to miles after setting the estimated range to 100 km, the charge distance will be for 60 miles.)
-
A charging day is set using Repeat
If 1 repeat day is set, charging is repeated every week on the set day of the week.
Depending on the set days of the week, the Repeat indication is displayed as Weekdays, Weekends, and Daily. Otherwise, it is displayed as Custom.
Setting example
Function
Available setting changes
Start Time
21 : 00
End Time
6 : 00
Repeat
Friday
Charge Limit
According to Battery Charge Level
Battery Charge Level
80%
In this case, charging is done every week from Friday at 21 : 00 hours to Saturday at 6:00 hours. However, if the Battery Charge Level reaches 80%, the charging is stopped even if it is before the End Time.
-
No day is set using Repeat
If no Repeat day is designated, charging is done only 1 time at the set hours.
Setting example (if settings below are made at 13 : 00 hours)
Function
Available setting changes
Start Time
12 : 00
End Time
18 : 00
Repeat
Once
Charge Limit
According to Estimated Range
Estimated Range
50 km (30 mi)
In this case, when the charge connector is connected, charging starts immediately for charging to 18 : 00 hours on the same day.
However, if a charging amount allowing a 50 km (30 miles) trip is reached, the charging is stopped even if it is before the end time.
Setting example (if settings below are made at 13 : 00 hours)
Function
Available setting changes
Start Time
1 : 00
End Time
8 : 00
Repeat
Once
Charge Limit
According to Battery Charge Level
Battery Charge Level
100%
In this case, charging is done from the next day at 1 : 00 hours to 8 : 00 hours. However, if the Battery Charge Level reaches 100% is reached, the charging is stopped even if it is before the End Time.
Charge When Connected
Cancels charging schedule to allow immediate charging.
-
Select Settings from the home screen on Mazda Connect.
-
Select EV Settings from the setting screen.
-
Select Charge When Connected from the selection screen.
|
Available setting changes |
|---|
|
Enable, Disable |
-
The charging timer can also be canceled on the screen displayed on the center display when the vehicle power is switched OFF.
-
When the charging is completed using the Charge When Connected setting, the charging timer schedule is restored.
Charge Limit for AC Charging
Sets the charge limit when using an AC charger.
-
Select Settings from the home screen on Mazda Connect.
-
Select EV Settings from the setting screen.
-
Select Charge Limit for AC Charging from the selection screen.
|
Available setting changes |
|---|
|
100% ― 20% (9 levels) |
For normal charge, set the maximum charge limit of the high voltage battery. Set the Battery Charge Level of the charging timer for each charging timer setting.
Climate control timer
The climate control timer is a function which operates the cooling or heating system automatically according to a preset time. The power consumption of the air conditioner after starting to drive the vehicle is reduced by operating the air conditioner and providing a comfortable temperature in the cabin before driving.
Refer to Convenient Ways to Use the Fully Automatic Air-Conditioning (Search).
Charge Connector Lock
The charge connector lock is a function which locks the charge connector connected to the vehicle so that it cannot be pulled out. You can also select the lock conditions for the charge connector according to locations and situations.
-
Select Settings from the home screen on Mazda Connect.
-
Select EV Settings from the setting screen.
-
Select Charge Connector Lock from the selection screen.
-
Set the lock condition from the selection screen.
|
Available setting changes |
|---|
|
Locked When Charging Unlocks connector when charging is complete or vehicle is unlocked. |
|
Locked When Connected Unlocks connector only when vehicle is unlocked. |
|
Off Charge connector remains unlocked at all times. |
Functions using a Smartphone
You can check the remaining high voltage battery power, operate the charging, and operate the air conditioner remotely by a Smartphone remote control operation using the Connected Service. For details, consult an Authorized Mazda Dealer.