Audio System


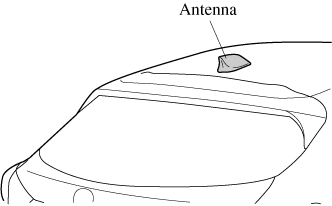
Antenna (5-Door)
AM/FM Radio Antenna (Some Models)
The AM/FM radio antenna receives both AM and FM signals.
(Type A)
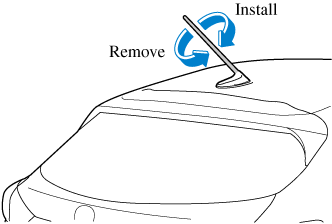
To remove the antenna, turn it counterclockwise.
To install the antenna, turn it clockwise.
Make sure the antenna is securely installed.
-
To prevent damage to the antenna, remove it before entering a car wash facility or passing beneath a low overhead clearance.
-
Be careful around the antenna when removing snow from the roof. Otherwise the antenna could be damaged.


When leaving your vehicle unattended, we recommend that you remove the antenna and store it inside the vehicle.
(Type B)
Antenna for AM/FM and Satellite Radio Antenna (Some Models)
The antenna for AM/FM and satellite radio antenna receives both AM and FM signals and SiriusXM signals.
Operating Tips for AAC
AAC stands for Advanced Audio Coding, which is standardized voice compression established by the ISO*1 working group (MPEG). Audio data can be created and stored at a higher compression ratio than MP3.
This unit plays files with the extensions (.aac/.m4a/.wav*2) as the AAC files.
Do not use an audio file extension on files other than audio files. In addition, do not change the audio file extension. Otherwise, the unit will not recognize the file correctly resulting in noise or a malfunction.
-
AAC files written under specifications other than the indicated specification may not play normally or files or folder names may not display correctly.
-
The file extension may not be provided depending on the computer operating system, version, software, or settings. In this case, add the file extension “.aac ”, “.m4a”, or “.wav*2” to the end of the file name, and then write it to the memory.
-
International Organization for Standardization
-
Type B
Operating Tips for USB device
This unit plays audio files as follows:
|
Extension |
Playback with this unit |
|---|---|
|
.mp3 |
MP3 |
|
.wma |
WMA |
|
.aac*1 |
AAC |
|
.m4a |
|
|
.wav*1 |
WAV |
|
.ogg*1 |
OGG |
Do not use an audio file extension on files other than audio files. In addition, do not change the audio file extension. Otherwise, the unit will not recognize the file correctly resulting in noise or a malfunction.
-
Playback may not be possible depending on the type and condition of the USB flash memory even if the audio file complies with the standard.
-
A copyright protected WMA/AAC file cannot be played in this unit.
-
(Type B)
If a file name in the USB memory is too long, it could cause operation problems such as not being able to playback the song.
(Recommended: Within 80 characters)
-
The order of the music data stored in the device may differ from the playback order.
-
To prevent loss or damage of stored data, we recommend that you always back up your data.
-
If a device exceeds the maximum electric current value of 1,000 mA, it may not operate or recharge when connected.
-
Do not pull out the USB device while in the USB mode (only pull it out while in FM/AM radio or CD mode).
-
The device will not operate if the data is password protected.
MP3/WMA/AAC/OGG*1 files written under specifications other than the indicated specification may not play normally or files/folder names may not display correctly.
-
Type B
Operating Tips for iPod
This unit supports playback of music files recorded to an iPod.
-
iPod is a trademark of Apple Inc., registered in the U.S. and other countries.
The iPod may not be compatible depending on the model or OS version. In this case, an error message is displayed.
-
Remove the iPod when it is not in use. Because the iPod is not designed to withstand excessive changes in temperature inside the cabin, it could be damaged or the battery may deteriorate due to the excessive temperature or humidity inside the cabin if it is left in the vehicle.
-
If data in the iPod is lost while it is connected to the unit, Mazda cannot guarantee recovery of any lost data.
-
If the iPod battery is deteriorated, the iPod may not recharge and playback may not be possible when it is connected to the unit.
-
Be careful not to pinch the iPod connecting cable when opening/closing the center console.
-
For details on using the iPod, refer to the iPod instruction manual.
-
When connecting the iPod to a USB port, all commands are made from the audio unit. iPod control is not possible.
Power/Volume/Sound Controls
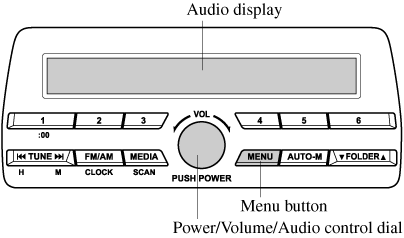
Power ON/OFF
Switch the ignition to ACC or ON. Press the power/volume dial to turn the audio system on. Press the power/volume dial again to turn the audio system off.
Volume adjustment
To adjust the volume, turn the power/volume dial. Turn the power/volume dial clockwise to increase volume, counterclockwise to decrease it.
Audio sound adjustment
-
Press the menu button (
 ) to select the function. The selected function will be indicated.
 -
Turn the audio control dial to adjust the selected functions as follows:
|
Indication |
Setting value |
|
|---|---|---|
|
Turn Counterclockwise |
Turn Clockwise |
|
|
ALC (Automatic volume adjustment) |
Level decrease |
Level increase |
|
BASS (Low pitch sound) |
Decrease bass |
Increase bass |
|
TREB (Treble sound) |
Decrease treble |
Increase treble |
|
FADE (Front/back volume balance) |
Shift the sound to the front |
Shift the sound to the rear |
|
BAL (Left/right volume balance) |
Shift the sound to the left |
Shift the sound to the right |
|
BEEP (Audio operation sound) |
Off |
On |
|
BT SETUP* |
Select mode |
|
|
12Hr (12 Hr/24 Hr time adjustment) |
12Hr (Flashing) |
24Hr (Flashing) |
 24Hr
24Hr-
Depending on the model, this function may not be available.
If not operated for several seconds, the display returns to the previous display. To reset bass, treble, fade, and balance, press the menu button () for 2 seconds. The unit will beep and “CLEAR” will be displayed.
ALC (Automatic volume adjustment)
The automatic level control (ALC) changes the audio volume automatically according to the vehicle speed. The faster the vehicle speed, the higher the volume increases. ALC has ALC OFF and ALC LEVEL 1 to 7 modes. At ALC LEVEL 7, the amount that the volume can increase is at the maximum. Select the mode according to the driving conditions.
BEEP (Audio operation sound)
The setting for the operation sound when pressing and holding a button can be changed. The initial setting is ON. Set to OFF to mute the operation sound.
BT SETUP mode (Some Models)
Music and other audio such as voice data recorded on portable audio devices and mobile phones available on the market which are equipped with the Bluetooth® transmission function can be listened to via wireless transmission over the vehicle's speakers. Using the BT SETUP mode, these devices can be programmed to the Bluetooth® unit or changed (Search).
12Hr  24Hr (12 Hr/24 Hr time adjustment)
Rotating the audio control dial switches the display between 12 and 24-hour clock time (Search).
Clock

 ) for about 2 seconds until a beep is heard.
 ,
,  ) while the clock's current time is flashing.
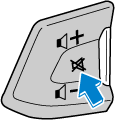
Mute Switch (Some Models)
Press the mute switch ( ) once to mute audio, press it again to resume audio output.
If the ignition is switched off with the audio muted, the mute will be canceled. Therefore, when the engine is restarted, the audio is not muted. To mute the audio again, press the mute switch ().