


Audio Set


Basic Operation Method
-
The explanation of functions described in this manual may differ from the actual operation, and the shapes of screens and buttons and the letters and characters displayed may also differ from the actual appearance.
Additionally, depending on future software updates, the content may successively change without notice.
-
For additional information regarding Mazda Connect, please refer to the following Website.


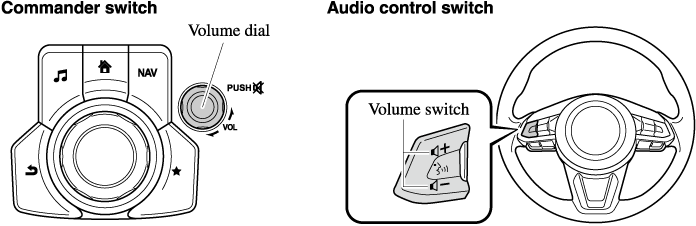
Audio Set has 3 different human interfaces.
-
Commander switch
-
Touch panel
-
Voice recognition with steering switch and microphone
Refer to Voice Recognition (Search).
Home screen

|
Icon |
Function |
|---|---|
 |
Applications Information such as average fuel economy, maintenance, and warnings can be verified. Depending on the grade and specification, the screen display may differ. |
 |
Entertainment Operates audio such as the radio. The audio source most recently used is displayed. An audio source which cannot be used at that time is skipped and the previous audio source is displayed. To change the audio source, select the |
 |
Communication Bluetooth® related functions are available. |
 |
Navigation Navigation screen is displayed (vehicles with navigation system). If the SD card for the navigation system is not inserted, the compass indicating the direction in which the vehicle is moving is displayed. The compass may not indicate the correct bearing when the vehicle is stopped or traveling at a slow speed. |
 |
Settings Overall setting menu (Such as display, sound, Bluetooth® and Language). Depending on the grade and specification, the screen display may differ. |
 icon displayed at the bottom of the screen.
Volume/Display/Sound Controls
Audio sound adjustment
Select the  icon on the home screen to display the Settings screen.
Select the  tab to select the item you would like to change.
|
Indication |
Setting value |
|---|---|
|
Bass (Low pitch sound) |
|
|
Treble (Treble sound) |
|
|
Fade (Front/Rear volume balance) |
Front: Front speaker volume enhancement Rear: Rear speaker volume enhancement |
|
Balance (Left/right volume balance) |
Right: Right speaker volume enhancement Left: Left speaker volume enhancement |
|
Guidance Volume (Some Models) (Volume adjustment during route guidance on navigation screen) |
Left: Low volume Right: High volume |
|
ALC*1 (Automatic volume adjustment) |
Off―Adjustment at seven levels |
|
Bose® Centerpoint*2 (Automatic surround level adjustment) |
On/Off |
|
Bose® AudioPilot*2 (Automatic volume adjustment) |
On/Off |
|
Beep (Audio operation sound) |
On/Off |
 Side: Low pitch enhancement
 Side: Low pitch reduction
-
Standard audio
-
Bose® sound system
ALC (Automatic volume adjustment)
The automatic level control (ALC) is a feature that automatically adjusts audio volume and sound quality according to the vehicle speed. The volume increases in accordance with the increase in vehicle speed, and decreases as vehicle speed decreases.
Bose® Centerpoint (Automatic surround level adjustment)
Centerpoint®*3 lets vehicle owners enjoy a Bose® surround sound experience from their existing MP3s and satellite radio.
Specifically engineered to meet the unique demands of reproducing surround sound in a vehicle.
Converts stereo signals to multiple channels allowing greater precision when reproducing the sound.
An enhanced algorithm to simultaneously create a wider, more spacious sound field.
*3 Centerpoint® is a registered trademark of Bose Corporation.
Bose® AudioPilot (Automatic volume adjustment)
When driving, background noise can interfere with enjoying music.
AudioPilot®*4 noise compensation technology continuously adjusts the music to compensate for background noise and vehicle speed.
It reacts only to sustained noise sources and not intermittent ones, such as speed bumps.
An enhanced DSP algorithm allows faster and more effective compensation for unusual situations, such as driving on a very rough road or at high speeds.
*4 AudioPilot® is a registered trademark of Bose Corporation.
Bluetooth® Hands-Free
Making a Call
For Mazda Connect, making calls is possible using any of the following six methods:
-
Phonebook downloaded from Bluetooth® device (mobile phone) (voice recognition function can be used)
-
Favorites
-
Call record
-
Dialing a telephone number (voice recognition function can be used)
-
“Redial” - Voice recognition command for making a call to the latest outgoing call record.
-
“Call back” - Voice recognition command for making a call to the latest incoming call record.
Phonebook Usage
Telephone calls can be made by saying the contact name in the downloaded phonebook or the name of a person whose phone number has been registered in the Bluetooth® Hands-Free. Refer to Import contact (Download Phonebook).
-
Press the talk button.
-
Wait for the beep sound.
-
Say: “Call XXXXX... (Ex. “John”) Mobile”. (You can also say, “Home”, “Work”, or “Other” instead of “Mobile”, depending on how you set up your contact information.)
-
Follow the voice guidance to make the call, or simple press the pick-up button on the steering switch during or after the guidance to make the call.
Screen operation
-
Select the
 icon on the home screen to display the Communication screen.
 -
Select
 to display the contact list.
 -
Select the contact you would like to call to display the details for the contact.
-
Select the desired phone number to make the call.
Import contact (Download Phonebook)
Phonebook data from your device (Mobile phone) can be sent and registered to your Bluetooth® Hands-Free phonebook using Bluetooth®.
(Automatic downloading)
The “Auto Download Contacts” setting must be on. When hands-free is connected to the device, the phonebook is downloaded automatically.
Refer to Communication Settings (Search).
(Manually downloading)
If the “Auto Download Contacts” setting is off, download the phonebook using the following procedure.
-
Select the
icon on the home screen to display the Communication screen. -
Select
to display the contact list. -
Select
 .
. -
Select
 or
or  to switch to the device operation.
 -
If
is selected, select  .
. -
Download will be started from the mobile phone.
-
If “Import All Contacts” is performed after saving the phonebook to the Bluetooth® unit, the phonebook will be overwritten.
-
A maximum of 1,000 contacts can be registered to the phonebook.
-
Phonebook, incoming/outgoing call record, and favorite memories are exclusive to each mobile phone to protect privacy.
Favorites Contacts
A maximum of 50 contacts can be registered. It will take less time to make a call after registering the telephone number. In addition, you do not have to look for the person you want to call in the phonebook.
Registering your favorites
-
Select the
icon on the home screen to display the Communication screen. -
Select
 to display the favorites list.
 -
Select
 .
. -
Select
 or
or  .
. -
Select from the displayed list.
When “Add New Contact” is selected, information such as the selected person’s name is also registered. In addition, when “Add New Contact Details” is selected, only the telephone number of the selected person is registered.
Calling a favorite
-
Select the
icon on the home screen to display the Communication screen. -
Select
to display the favorites list. -
(If only one phone number is registered to contact)
Select the contact information you would like to call. Go to Step 5.
(If multiple phone numbers are registered to contact)
Select the contact you would like to call to display the screen indicating the details for the contact. Go to Step 4.
-
Select the phone number you would like to call.
-
Select
 .
.
Deleting a favorite
-
Select the
icon on the home screen to display the Communication screen. -
Select
to display the favorites list. -
Select
. -
Select
 .
. -
Select the contact information which you would like to delete.
-
Select
.
Changing the display order of your favorites list
-
Select the
icon on the home screen to display the Communication screen. -
Select
to display the favorites list. -
Select
. -
Select
 .
. -
The contact can be moved after it is selected.
-
Slide the contact or move it using the commander switch, then select
 .
.
Changing contact name of your favorites
-
Select the
icon on the home screen to display the Communication screen. -
Select
to display the favorites list. -
Select
. -
Select
 .
. -
Select the contact to display the keyboard screen.
-
If a new name is input and
is selected, the contact name is stored.
If the contact is long-pressed when the favorites list is displayed, the contact information can be edited (deleted, moved).
Telephone Number Input
Practice this while parked until you are confident you can do it while driving in a non-taxing road situation. If you are not completely comfortable, make all calls from a safe parking position, and only start driving when you can devote your full attention to driving.
-
Select the
icon on the home screen to display the Communication screen. -
When
 is pressed, the dial pad is displayed.
 -
Input the telephone number using the dial pad.
-
Select
 to make the call.
Numeral or symbol entry
Use the dial pad.
Long-press the  to input +.
Select  to delete the currently input value.
Long-press to delete all input values.
Redial Function
Makes a call to the last person called (latest person on outgoing call record) from the mobile phone/vehicle.
-
Press the talk button.
-
Wait for the beep sound.
-
Say: “Redial”
Call back Function
Makes a call to the last person who called your (latest person on incoming call record) mobile phone/vehicle.
-
Press the talk button.
-
Wait for the beep sound.
-
Say: “Call back”
Mobile 911 (U.S.A./Canada only)
If the vehicle is involved in a moderate to severe collision, a call is made automatically to 911 from the connected device. The “Emergency Assistance Call” setting must be on.
Refer to Communication Settings (Search).
Though the system can be set to not call 911, doing so will defeat the purpose of the system. Mazda recommends that the Mobile 911 system remain activated.
-
Mobile 911 is a secondary function of the audio entertainment system. Therefore, the mobile 911 function does not assure that the call is always made to 911 after an accident occurs.
-
A Hands-free device must be paired and connected. The 911 operator can verify the vehicle's position information using the Hands-free device GPS if equipped.
-
If the vehicle is involved in a moderate to severe collision, notification of the call to 911 is made via audio and screen display. To cancel the call, press
 or hang-up button within 10 seconds.
 -
If
or hang-up button is not pressed within 10 seconds, the call is made to 911 automatically.
Receiving an Incoming Call
When an incoming call is received, the incoming call notification screen is displayed. The “Incoming Call Notifications” setting must be on.
Refer to Communication Settings (Search).
To accept the call, press the pick-up button on the audio control switch or select  on the screen.
To reject the call, press the hang-up button on the audio control switch or select  on the screen.
The following icons are displayed on the screen during a call. Icons which can be used differ depending on use conditions.
|
Icon |
Function |
|---|---|
|
Displays the Communication menu. |
 |
Ends the call. |
 |
Transferring a call from hands-free to a mobile phone Communication between the Bluetooth® unit and a device (mobile phone) is canceled, and an incoming call will be received by the device (mobile phone) like a standard call. |
 |
Transferring a call from a device (mobile phone) to hands-free Communication between devices (mobile phone) can be switched to Bluetooth® Hands-Free. |
 |
Mute The microphone can be muted during a call. When selected again, the mute is canceled. |
 |
To make a 3-way call, select the contacts from the following:
The device may be unusable depending on the contractual content. |
 |
The call on hold is made to make a 3-way call. The device may be unusable depending on the contractual content. |
 |
Switches the call on hold. |
 |
DTMF (Dual Tone Multi-Frequency Signal) Transmission This function is used when transmitting DTMF via the dial pad. The receiver of a DTMF transmission is generally a home telephone answering machine or a company's automated guidance call center. Input the number using a dial pad. |
 : Call History is displayed.
 : The dial pad is displayed. Input the phone number.
-
If the ignition is switched off during a hands-free call, the line is transferred to the device (Mobile phone) automatically.
-
If the DTMF code has two or more digits or symbols, each one must be transmitted individually.
Receiving and Replying to Messages (available only with E-mail/SMS compatible phones)
SMS (Short Message Service) messages, and E-mail received by connected devices can be downloaded, displayed, and played (read by the system).
Additionally, replies can also be made to calls and messages in the received messages.
Downloading messages
Up to 20 new messages can be downloaded and displayed from a connected device.
(Automatic downloading)
The “Auto Download Email” (E-mail) or “Auto Download Text Message” (SMS) setting must be on. A message is downloaded automatically when the Bluetooth® unit is connected to the device.
Refer to Communication Settings (Search).
(Manually downloading)
When the “Auto Download Email” (E-mail) or “Auto Download Text Message” (SMS) setting is off, the message is downloaded using the following procedure.
-
Select the
icon on the home screen to display the Communication screen. -
Select
 or
or  to display the Inbox.
 -
Select
 .
. -
Download will be started from the mobile phone.
-
Attached data is not downloaded.
-
Messages up to 1 kilobyte (E-mail)/140-bytes (SMS) can be downloaded.
-
A message list is created for each device.
-
If the connected device does not correspond to MAP 1.0, the AT command is used to download. The downloaded message indicates that it is already read.
-
Downloading using the AT command may not function depending on the connected device.
-
If an iPhone is connected, the following functions cannot be used.
-
Downloading past messages
-
Replying to messages
-
-
iPhone is a trademark of Apple Inc., registered in the U.S. and other countries.
Receiving messages
(Method 1)
When a device receives a message, a message received notification is displayed. The “Email Notifications” (E-mail) or “Text Notifications” (SMS) setting must be on.
Refer to Communication Settings (Search).
Select  and display the message.
(Method 2)
-
Select the
icon on the home screen to display the Communication screen. -
Select
 and display the new message list for E-mail and SMS.
 -
Select the message you would like to display.
The following icons are displayed in the lower part of the details on the message. Icons which can be used differ depending on use conditions.
|
Icon |
Function |
|---|---|
|
Displays the Communication menu. |
 |
Displays the inbox. |
 |
Plays back a message. When selected again, playback is temporarily stopped. |
 |
Displays the previous message. |
 |
Displays the next message. |
 |
Only replies to the sender of the currently displayed message. Select the sentence on the displayed reply screen and select the sentence for sending from the preset message. Select |
 |
(Only E-mail) Replies to all members including CC. Select the sentence on the displayed reply screen and select the sentence for sending from the preset message. Select |
 |
Makes a call to a person who sent a message. For E-mail, this function may not work depending on the device. |
 |
Deletes a message. The messages stored in a device is also deleted. |
 .
.Example of use (verify unread E-mail)
-
Select the
icon on the home screen to display the Communication screen. -
Select
to display the inbox.
-
Select the unread message displayed in bold.
-
The details of the message are displayed and replying to the message, making a call, or playback can be performed.
Changing account for displaying (E-mail only)
-
Select
 .
. -
Select the account which you would like to display. Only the messages for the selected account are displayed in the inbox.
Editing preset messages
-
Select the
icon on the home screen to display the Communication screen. -
Select
 .
. -
Select
 .
. -
Select the preset message which you would like to edit. The keyboard screen is displayed.
-
When the message is input and
 is selected, the message is stored as a preset message.
-
Select the
 icon to change the language.
 -
Select the
 icon to switch between capitalized and lower-case characters.
 -
Select the
 icon to return to the previous screen without storing the edit.
