

Owner Maintenance


Owner Maintenance Precautions
The owner or a qualified service technician should make these vehicle inspections at the indicated intervals to ensure safe and dependable operation.
Bring any problem to the attention of an Authorized Mazda Dealer or qualified service technician as soon as possible.
When Refueling
-
Brake fluid level (Search)
-
Engine coolant level (Search)
-
Engine oil level (Search)
-
Washer fluid level (Search)
At Least Monthly
-
Tire inflation pressures (Search)
At Least Twice a Year (For Example, Every Spring and Fall)
You can do the following scheduled maintenance items if you have some mechanical ability and a few basic tools and if you closely follow the directions in this manual.
Improper or incomplete service may result in problems. This section gives instructions only for items that are easy to perform.
As explained in the Introduction (Search), several procedures can be done only by a qualified service technician with special tools.
Improper owner maintenance during the warranty period may affect warranty coverage. Refer to Introduction (Search) for owner's responsibility in protecting your investment. For details, read the separate Mazda Warranty statement provided with the vehicle. If you are unsure about any servicing or maintenance procedure, have it done by an Authorized Mazda Dealer.
There are strict environmental laws regarding the disposal of waste oil and fluids. Please dispose of your waste properly and with due regard to the environment.
We recommend that you entrust the oil and fluid changes of your vehicle to an Authorized Mazda Dealer.
Do not perform maintenance work if you lack sufficient knowledge and experience or the proper tools and equipment to do the work. Have maintenance work done by a qualified technician:
Performing maintenance work on a vehicle is dangerous if not done properly. You can be seriously injured while performing some maintenance procedures.
If you must run the engine while working under the hood, make certain that you remove all jewelry (especially rings, bracelets, watches, and necklaces) and all neckties, scarves, and similar loose clothing before getting near the engine or cooling fan which may turn on unexpectedly:
Working under the hood with the engine running is dangerous. It becomes even more dangerous when you wear jewelry, loose clothing or have long hair or a long beard.
Either can become entangled in moving parts and result in injury.
 Pull over to a safe location, then switch the ignition off and make sure the fan is not running before attempting to work near the cooling fan:
Working near the cooling fan when it is running is dangerous. The fan could continue running indefinitely even if the engine has stopped and the engine compartment temperature is high. You could be hit by the fan and seriously injured.
Do not leave items in the engine compartment:
After you have finished checking or doing servicing in the engine compartment, do not forget and leave items such as tools or rags in the engine compartment.
Tools or other items left in the engine compartment could cause engine damage or a fire leading to an unexpected accident.


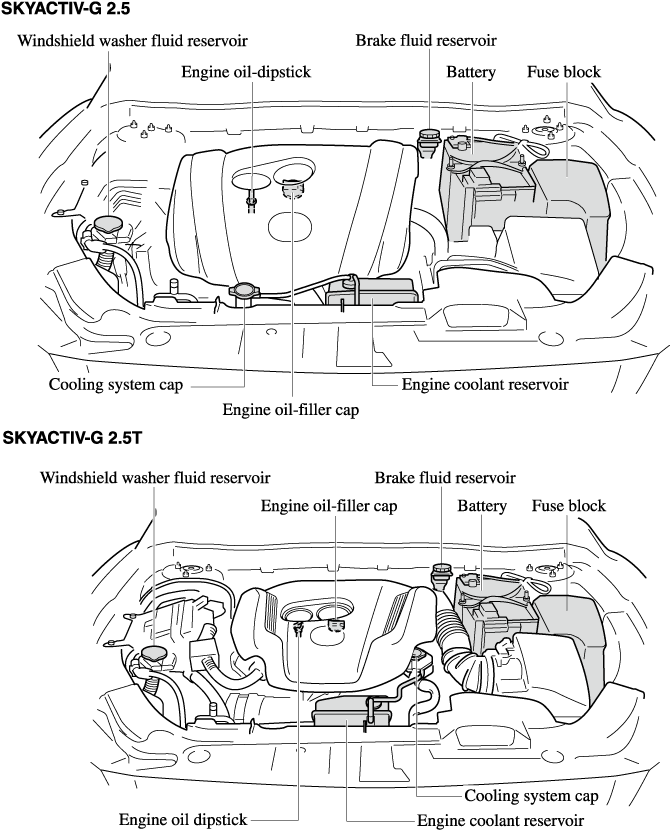
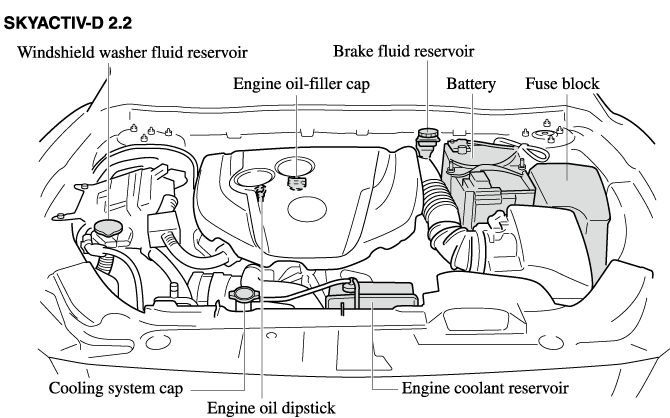
Engine Compartment Overview
Inspecting Engine Oil Level
-
Be sure the vehicle is on a level surface.
-
Warm up the engine to normal operating temperature.
-
Turn it off and wait at least 5 minutes for the oil to return to the oil pan.
-
Pull out the dipstick, wipe it clean, and reinsert it fully.
SKYACTIV-G 2.5 and SKYACTIV-G 2.5T

SKYACTIV-D 2.2

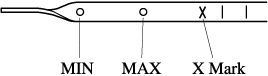
(SKYACTIV-D 2.2)
When inspecting the engine oil level, pull out the dipstick straight without twisting. In addition, when inserting the dipstick, always insert it without twisting so that the “X” mark faces the front of the vehicle.
-
Pull it out again and examine the level.
The level is normal if it is between the MIN and MAX marks.
If it is near or below MIN, add enough oil to bring the level to MAX.
-
Make sure the O-ring on the dipstick is positioned properly before reinserting the dipstick.
-
Reinsert the dipstick fully.
(SKYACTIV-D 2.2)
Inspect the engine oil level periodically. When inspecting the engine oil, if the engine oil level is exceeds the “X” mark on the dipstick, replace the engine oil. This should be done by an Authorized Mazda Dealer. When replacing the engine oil, inspect the oil level using the oil dipstick and refill so that the engine oil level is within the range between MIN and MAX as shown in the figure.
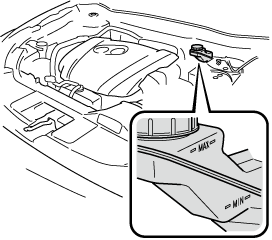
Inspecting Brake Fluid Level
Battery
Wash hands after handling the battery and related accessories:
Battery posts, terminals and related accessories contain lead and lead compounds, chemicals known to the State of California to cause cancer and reproductive harm.
 Read the following precautions carefully before using the battery or inspecting to ensure safe and correct handling:
 Always wear eye protection when working near the battery:
Working without eye protection is dangerous. Battery fluid contains SULFURIC ACID which could cause blindness if splashed into your eyes. Also, hydrogen gas produced during normal battery operation, could ignite and cause the battery to explode.
 Wear eye protection and protective gloves to prevent contact with battery fluid:
Spilled battery fluid is dangerous.
Battery fluid contains SULFURIC ACID which could cause serious injuries if it gets in eyes, or on the skin or clothing. If this happens, immediately flush your eyes with water for 15 minutes or wash your skin thoroughly and get medical attention.
 Always keep batteries out of the reach of children:
Allowing children to play near batteries is dangerous. Battery fluid could cause serious injuries if it gets in the eyes or on the skin.
 Keep flames and sparks away from open battery cells and do not allow metal tools to contact the positive (
 ) or negative (
 ) terminal of the battery when working near a battery. Do not allow the positive () terminal to contact the vehicle body:
Flames and sparks near open battery cells are dangerous. Hydrogen gas, produced during normal battery operation, could ignite and cause the battery to explode. An exploding battery can cause serious burns and injuries. Keep all flames including cigarettes and sparks away from open battery cells.
 Keep all flames and sparks away from open battery cells because hydrogen gas is produced from open battery cells while charging the battery or adding battery fluid:
Flames and sparks near open battery cells are dangerous. Hydrogen gas, produced during normal battery operation, could ignite and cause the battery to explode. An exploding battery can cause serious burns and injuries. Keep all flames including cigarettes and sparks away from open battery cells.

Battery Replacement
Contact an Authorized Mazda Dealer for battery replacement.
Replacing Interior Light Bulbs
The interior lights have either LEDs or normal bulbs.
LED type
-
Overhead lights/Front map lights
-
Rear map lights
-
Vanity mirror lights (Some Models)
-
Luggage compartment light
-
Ambient lights (Some Models)
The LED bulb cannot be replaced as a single unit because it is an integrated unit.
The LED bulb has to be replaced with the unit. If a replacement is necessary, consult an Authorized Mazda Dealer.
Bulb type
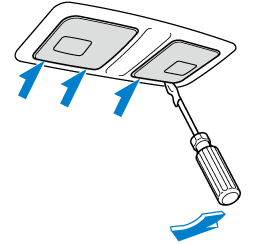
Overhead light/Front map lights, Rear map lights, Vanity mirror lights (Some Models)
-
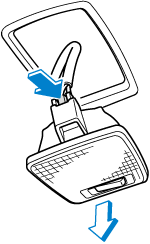
Wrap a flathead screwdriver with a soft cloth to prevent damage to the lens, and then remove the lens by carefully prying on the edge of the lens with a flathead screwdriver.
-
Disconnect the bulb by pulling it out.
Overhead light/Front map lights

Rear map lights
Vanity mirror lights (Some Models)
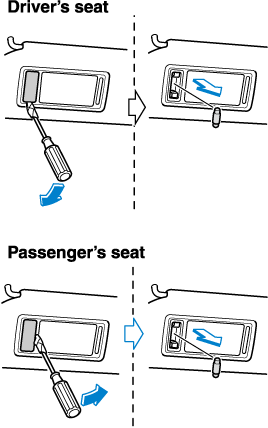
-
Install the new bulb in the reverse order of the removal procedure.
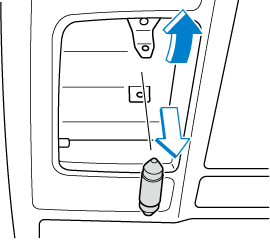
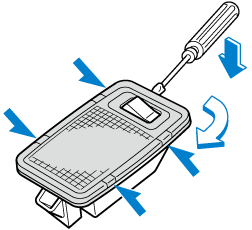
Luggage compartment light
-
Wrap a small flathead screwdriver with a soft cloth to prevent damage to the lens and remove the lens unit by carefully prying on the edge of the lens unit with the flathead screwdriver.

-
Disconnect the electrical connector from the bulb by pressing the tab on the connector with your finger and pulling the connector.
When replacing the bulb always disconnect the connector first. Otherwise, electric and electronic devices could be shorted.
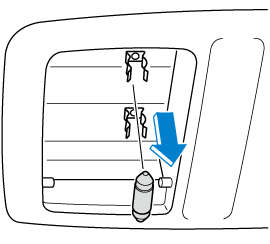
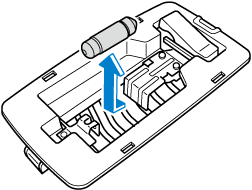
-
Insert the flathead screwdriver into the gap between the lens and the lens unit, and then slide the screwdriver to detach the lens.
-
Disconnect the bulb by pulling it out.
-
Install the new bulb in the reverse order of the removal procedure.
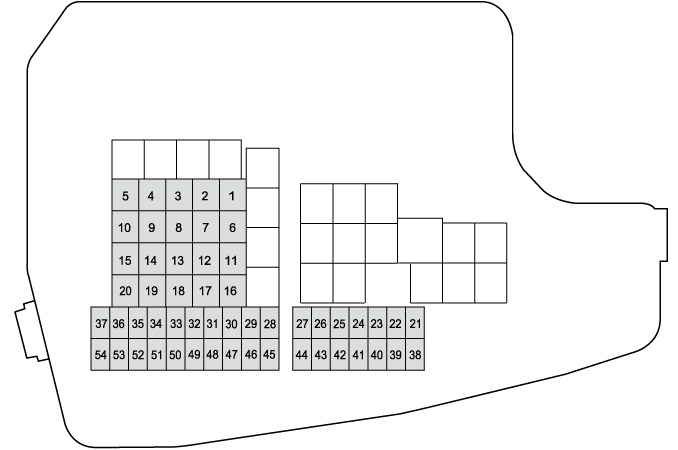
Fuse Panel Description
Fuse block (Engine compartment)
|
DESCRIPTION |
FUSE RATING |
PROTECTED COMPONENT |
|
|---|---|---|---|
|
1 |
CABIN.+B |
50 A |
For protection of various circuits |
|
2 |
IG2 |
30 A |
For protection of various circuits |
|
3 |
INJECTOR ENG.SUB |
30 A |
Engine control system (Some Models) |
|
4 |
SCR1 EVVT |
20 A |
Engine control system |
|
5 |
P.WINDOW1 |
30 A |
― |
|
6 |
R.HEATER |
20 A |
― |
|
7 |
ADD FAN DE |
40 A |
Cooling fan (Some Models) |
|
8 |
WIPER.DEI |
20 A |
Windshield wiper de-icer (Some Models) |
|
9 |
DEFOG |
30 A |
Rear window defogger |
|
10 |
DCDC DE |
40 A |
― |
|
11 |
EPB R |
20 A |
Electric parking brake (EPB) (RH) |
|
12 |
EPB L |
20 A |
Electric parking brake (EPB) (LH) |
|
13 |
AUDIO DCDC REG |
30 A |
Audio system |
|
14 |
FAN GE |
30 A |
Cooling fan (Some Models) |
|
15 |
ENG.MAIN |
40 A |
Engine control system |
|
16 |
ABS/DSC M |
50 A |
ABS, Dynamic stability control system |
|
17 |
FAN DE |
40 A |
Cooling fan (Some Models) |
|
18 |
WIPER |
20 A |
Front window wiper and washer |
|
19 |
HEATER |
40 A |
Air conditioner |
|
20 |
ADD FAN GE |
30 A |
Cooling fan (Some Models) |
|
21 |
ENGINE.IG1 |
7.5 A |
Engine control system |
|
22 |
C/U IG1 |
15 A |
For protection of various circuits |
|
23 |
AUDIO2 |
7.5 A |
Audio system |
|
24 |
METER2 |
7.5 A |
― |
|
25 |
ENGINE3 |
15 A |
Engine control system |
|
26 |
ENGINE2 |
15 A |
Engine control system |
|
27 |
ENGINE1 |
15 A |
Engine control system (Some Models) |
|
28 |
AT |
15 A |
Transaxle control system, Ignition switch |
|
29 |
H/CLEAN |
20 A |
― |
|
30 |
A/C |
7.5 A |
Air conditioner |
|
31 |
AT PUMP |
15 A |
― |
|
32 |
HORN |
15 A |
Horn |
|
33 |
R.WIPER |
15 A |
Rear window wiper |
|
34 |
H/L HI |
20 A |
Headlight high beam |
|
35 |
ST.HEATER |
15 A |
Heated steering wheel (Some Models) |
|
36 |
FOG |
15 A |
Fog lights (Some Models) |
|
37 |
ENG.+B |
7.5 A |
Engine control system |
|
38 |
H/L LOW L |
15 A |
Headlight low beam (LH) |
|
39 |
ENGINE4 |
15 A |
Engine control system (Some Models) |
|
40 |
INTERIOR1 |
15 A |
For protection of various circuits |
|
41 |
METER1 |
10 A |
Instrument cluster |
|
42 |
SRS1 |
7.5 A |
Air bag |
|
43 |
AUDIO1 |
15 A |
Audio system |
|
44 |
BOSE |
25 A |
Bose Sound System-equipped model (Some Models) |
|
45 |
ABS/DSC S |
30 A |
ABS, Dynamic stability control system |
|
46 |
FUEL PUMP |
15 A |
Fuel system (Some Models) |
|
47 |
FUEL WARM |
25 A |
Fuel warmer (Some Models) |
|
48 |
TAIL |
15 A |
Taillights, License plate lights, Parking lights |
|
49 |
SCR2 FUEL PUMP2 |
25 A |
Engine control system (Some Models) |
|
50 |
HAZARD |
25 A |
Hazard warning flashers, Turn signal lights, Parking lights |
|
51 |
H/L LOW R |
15 A |
Headlight low beam (RH) |
|
52 |
OUTLET |
25 A |
Accessory sockets |
|
53 |
STOP |
10 A |
Brake lights |
|
54 |
ROOM |
25 A |
For protection of various circuit |
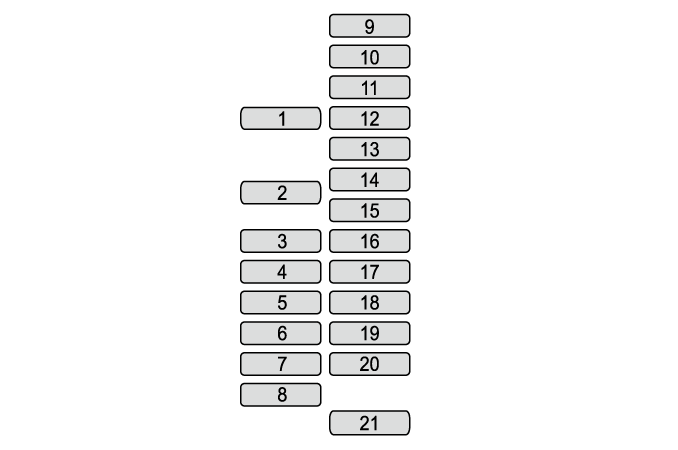
Fuse block (Left side)
|
DESCRIPTION |
FUSE RATING |
PROTECTED COMPONENT |
|
|---|---|---|---|
|
1 |
P.SEAT D |
30 A |
Power seat (Some Models) |
|
2 |
P.WINDOW3 |
30 A |
Power windows |
|
3 |
R.OUTLET3 |
15 A |
Accessory sockets |
|
4 |
P.WINDOW2 |
25 A |
Power windows |
|
5 |
ESCL |
15 A |
Trailer hitch (Some Models) |
|
6 |
D.LOCK |
25 A |
Power door locks |
|
7 |
SEAT WARM |
20 A |
Seat warmer (Some Models) |
|
8 |
SUNROOF |
10 A |
Moonroof (Some Models) |
|
9 |
F.OUTLET |
15 A |
Accessory sockets |
|
10 |
MIRROR |
7.5 A |
Power control mirror |
|
11 |
R.OUTLET1 |
15 A |
― |
|
12 |
SCR3 |
15 A |
Engine control system (Some Models) |
|
13 |
SCR4 |
15 A |
Engine control system (Some Models) |
|
14 |
R.OUTLET2 |
15 A |
Accessory sockets |
|
15 |
USB |
7.5 A |
USB power outlet (Some Models) |
|
16 |
PLG |
20 A |
Power liftgate (Some Models) |
|
17 |
M.DEF |
7.5 A |
Mirror defogger (Some Models) |
|
18 |
R.SEAT W |
20 A |
Rear seat warmer (Some Models) |
|
19 |
INTERIOR2 |
15 A |
For protection of various circuit |
|
20 |
AT IND |
7.5 A |
AT shift indicator |
|
21 |
P.SEAT P |
30 A |
Power seat (Some Models) |
