Interior Equipment
Sunvisors
When you need a sunvisor, lower it for use in front or swing it to the side.

Side Extension Sunvisors (Some Models)
The visor extender extends the sunvisor's range of sun shading.
To use, pull it out.
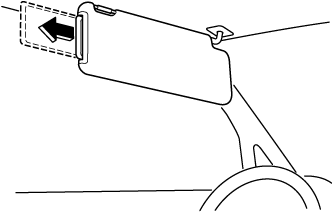
When moving the sunvisor, retract the visor extender to its original position. Otherwise, the visor extender could hit the rearview mirror.


Interior Lights
-
Do not leave the lights on for long periods while the engine is turned off. Otherwise the battery power could be depleted.
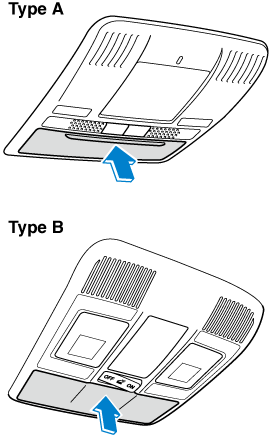
Overhead Lights
Type A
|
Switch Position |
Overhead Lights |
|---|---|
 |
Light off |
 |
|
 |
Light on |
Front
Center

Rear
The rear overhead light and the center map lights also turn on and off when the front overhead light switch is operated.
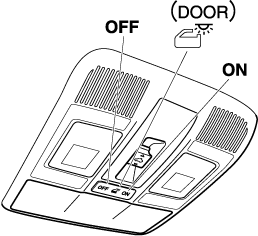
Type B
|
Switch |
Overhead Lights |
|---|---|
|
|
The DOOR OFF switch can be switched between the DOOR position and DOOR OFF position. DOOR position
DOOR OFF position
|
|
|
Press the switch to turn it on. Press the switch again to turn off the lights. |
 (DOOR OFF)
Front
Center
Rear
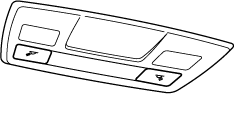
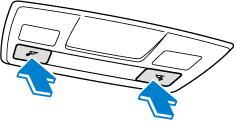
Front Map Lights
Type A
When the overhead light switch is in the door or off position, press the lens to illuminate the front map lights, and then press the lens again to turn them off.
The front map lights will not turn off even if the lens is pressed in the following cases:
-
The overhead light switch is in the ON position.
-
The overhead light switch is in the door position with the door open.
-
The illuminated entry system is on.
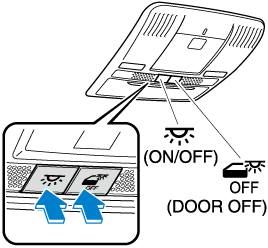
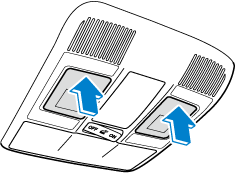
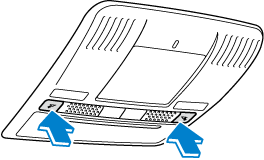
Type B
Press the switch to illuminate the front map lights, and then press the switch again to turn them off.
The front map lights will not turn off even if the switch is pressed in the following cases:
-
The overhead lights turn on by operating the overhead ON/OFF switch (
 ).
). -
The overhead lights turn on in conjunction with a door opening/closing.
-
The illuminated entry system is on.
Center Map Lights
Type A
When the overhead light switch is in the door or off position, press the lens to illuminate a center map light, and then press the lens again to turn it off.
-
Once the center map lights have been turned off, they will turn on and off depending on the position to which the overhead light is switched.
-
The center map lights will not turn off even if the lens is pressed in the following cases:
-
The overhead light switch is ON.
-
The overhead light switch is in the door position with the door open.
-
The illuminated entry system is on.
-
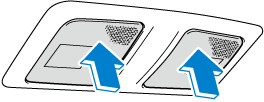
Type B
Press the switch to illuminate the center map lights, and then press the switch again to turn them off.
-
Once the center map lights have been turned off, they will turn on and off in conjunction with the overhead light operation.
-
The center map lights will not turn off even if the switch is pressed in the following cases:
-
The overhead lights turn on by operating the overhead ON/OFF switch (
). -
The overhead lights turn on in conjunction with a door opening/closing.
-
The illuminated entry system is on.
-
Luggage Compartment Lights
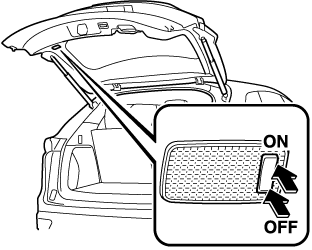
|
Switch Position |
Luggage Compartment Light |
|---|---|
|
Light off |
|
Light on when the liftgate is open |
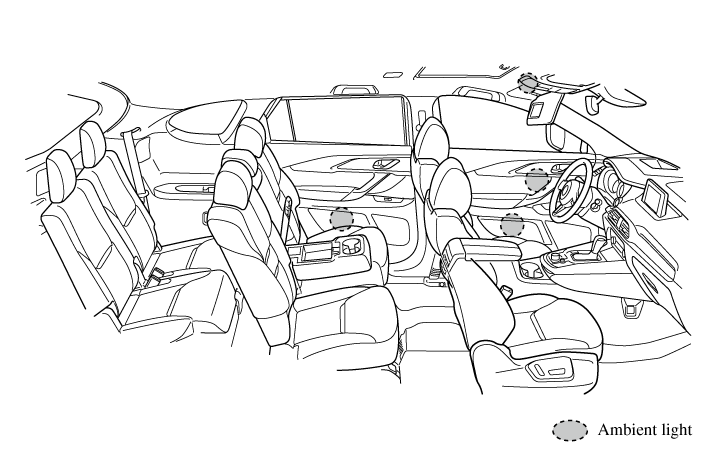
Ambient Light (Some Models)
The ambient lights continuously turn on when the ignition is switched ON.
The ambient lights dim when the parking lights or headlights are turned on.
-
The ambient lights turn on or off in conjunction with the illuminated entry system when the ignition is switched OFF.
-
The ambient light illumination level can be changed while the parking lights or headlights are turned on.
Refer to the Settings section in the Mazda Connect Owner's Manual.
Illuminated Entry System
The overhead lights turn on when any of the following operations is done with the overhead light switch in the DOOR position.
The ambient lights turn on regardless of the overhead light switch position.
-
The driver's door is unlocked with the ignition is switched OFF.
-
The ignition is switched OFF with all doors closed.
-
The illumination time differs depending on the operation.
-
Battery saver
If an interior light is left on with the ignition switched OFF, the light turns off automatically after a certain period of time has passed to prevent battery depletion.
-
The operation of the illuminated entry system can be changed.
Refer to the Settings section in the Mazda Connect Owner's Manual.
-
(Type B)
The illumination entry system does not operate in conjunction with the overhead lights when the overhead lights are turned on using the overhead light ON/OFF switch.
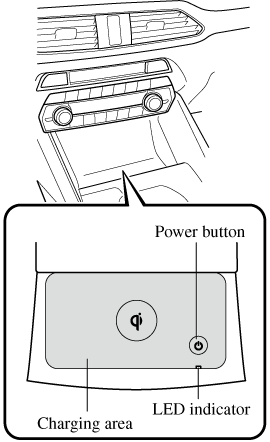
Wireless Charger (Qi) (Some Models)
You can charge mobile devices such as Smartphones which comply with the Qi Wireless Charging standard.
Only use mobile devices that have a maximum power consumption of 5 W, or 15 W or below. The maximum power consumption differs depending on the mobile device.
Radio waves from the Wireless Charger (Qi) may affect the operation of medical devices such as implanted-type cardiac pacemakers or defibrillators.
-
Before using the Wireless Charger (Qi) near people who use medical devices, ask the medical device manufacturer or your physician if radio waves from the Wireless Charger (Qi) will affect the device.
-
The Wireless Charger (Qi) can be disabled to prevent it from affecting medical devices. Consult an Authorized Mazda Dealer for details.
Heed the following cautions. Otherwise, the Wireless Charger (Qi) may malfunction or be damaged, which could cause a fire, burns due to heat generation, or an accident such as electrical shock.
-
Do not install, remove, disassemble, or change the wiring of the Wireless Charger (Qi). If the Wireless Charger (Qi) needs to be installed or removed, consult an Authorized Mazda Dealer.
-
Do not use the Wireless Charger (Qi) when it is malfunctioning. In addition, if smoke, abnormal noise, or abnormal smell is emitted from the Wireless Charger (Qi), stop the vehicle in a safe place, switch the ignition OFF, and consult an Authorized Mazda Dealer.
-
When using the Wireless Charger (Qi) to store items on, turn off the Wireless Charger (Qi).
-
Do not place any metal object between the charging area and the mobile device. Also, do not apply items such as a metallic sticker to the Wireless Charger (Qi).
-
When charging, do not place any item other than the mobile device to be charged on the Wireless Charger (Qi). In addition, do not place any metal object, IC card, coin, or magnetic item near the charging area.
-
Remove dust or dirt from the charging area before use.
-
Do not apply strong force or impact to the Wireless Charger (Qi) or get it wet.
-
Use only mobile devices which support the Wireless Charger (Qi).
How to use
-
Start the engine.
-
The power for the Wireless Charger (Qi) turns on and the LED indicator turns on.
-
The power can be turned on/off by pressing the power button on the Wireless Charger (Qi) for about 3 seconds.
-
When the power is turned off, the LED indicator turns off.
-
-
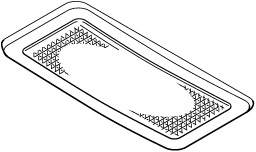
Place a device compliant with the Qi Wireless Charging standard in the center of the charging area on the tray.
-
The LED indicator turns on in amber or green when charging starts.
-
For details on the LED indicator, refer to the following LED indicator table.
-
Charging starts when all the doors and liftgate are closed.
-
The function to reduce noise on the radio operates if the power button is pressed for about 1 second during charging. Use it when noise occurs on the radio due to interference by the Wireless Charger (Qi). Press the power button again for about 1 second to cancel the function.
-
LED indicator
The status of the Wireless Charger (Qi) can be checked using the LED indicator.
|
Status |
Illumination/flash pattern |
|---|---|
|
OFF |
Does not turn on |
|
Stand-by (charging is possible) |
Turns on in white |
|
Normal charging |
Turns on in amber |
|
Fast charging*1 |
Turns on in green |
|
Normal charging (charging efficiency is low) |
Flashes in amber |
|
Fast charging*1 (charging efficiency is low) |
Flashes in green |
|
Stand-by (charging is not possible) |
Flashes in white |
|
Charging is stopped due to high temperature or foreign matter detected |
Flashes in red |
|
Charging is stopped due to internal problem or malfunction |
Turns on in red |
-
Some mobile devices can switch between normal charging and fast charging.
-
While a mobile device is placed on the charging area, keep the vehicle key away from the Wireless Charger (Qi). The vehicle key may not be detected due to radio wave interference by the Wireless Charger (Qi).
-
Charging may not operate normally under the following conditions:
-
The mobile device is fully charged.
-
There is foreign matter between the mobile device and the charging area.
-
The temperature of the mobile device is high.
-
The mobile device is placed with the charging side facing upward.
-
The mobile device is placed in a position extremely deviating from the center of the charging area.
-
Your vehicle is in an area where strong radio waves or electrical noise occur such as near a television tower, power plant, or airport.
-
The Near Field Communication (NFC) function setting of the mobile device is on (depends on the model of the mobile device).
-
-
Keep the following items away from the charging area. Otherwise the data stored on the mobile device could be erased or the device could malfunction.
-
Magnetic items such as magnets, magnetic cards, and magnetic recording media.
-
High precision devices such as wristwatches.
-
-
Before using the Wireless Charger (Qi), make sure to back up the data stored on the mobile device. The data on the mobile device could be deleted.
-
Do not wipe the Wireless Charger (Qi) using oil, alcohol, or thinner, or spray hairspray or insecticide onto it. Otherwise, it could cause damage or cracking.
-
Do not leave mobile devices in the cabin. The temperature inside the cabin may become very hot, causing the devices to malfunction.
-
A mobile device larger than the charging area cannot be charged. In addition, even if the mobile device is in the charging area, the charging efficiency may decrease or charging may not be possible depending on where the mobile device is placed.
-
If the function to reduce noise on the radio is used, fast charging may be disabled depending on the mobile device being charged.
-
If the LED indicator is flashing in amber or green, the charging efficiency is low. Check that there is no foreign matter between the mobile device and the charging area, and position the mobile device near the center of the charging area.
-
Depending on the mobile device case or accessories used, the mobile device may not charge, or the charging efficiency may be reduced resulting in a longer charging time. If charging does not start even when a mobile device is placed on the charging area, remove the mobile device case or any accessories.
-
While the keyless entry is operating, charging may stop temporarily, however, this does not indicate a problem.
-
During charging, the Wireless Charger (Qi) and the mobile device become warm, however, this does not indicate a problem.
-
If the mobile device temperature rises during charging, charging may stop due to the protection function of the device. If that happens, wait until the mobile device cools down sufficiently and then recharge it.
-
When using the Wireless Charger (Qi), applications using the Near Field Communication (NFC) function may activate, but this does not indicate a problem with the Wireless Charger (Qi).
Trademarks
“Qi” and the Qi symbol are trademarks or registered trademarks of the Wireless Power Consortium (WPC).

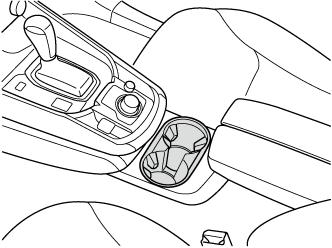
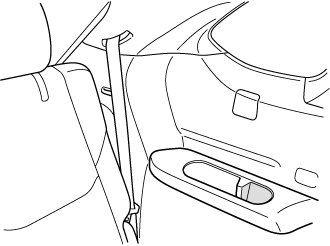
Cup Holder
Never use a cup holder to hold hot liquids while the vehicle is moving:
Using a cup holder to hold hot liquids while the vehicle is moving is dangerous. If the contents spill, you could be scalded.
Do not put anything other than cups or drink cans in cup holders:
Putting objects other than cups or drink cans in a cup holder is dangerous.
During sudden braking or maneuvering, occupants could be hit and injured, or objects could be thrown around the vehicle, causing interference with the driver and the possibility of an accident. Only use a cup holder for cups or drink cans.
Front
Rear
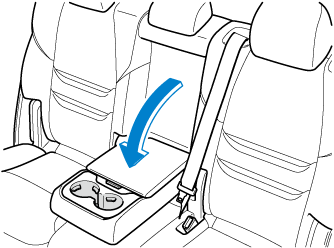
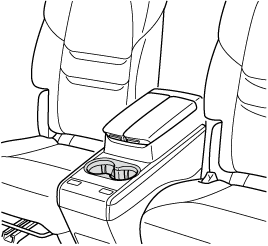
Second-row seat
Cup holders are located in the armrest/second-row seat console.
6:4 split adjustable-type bench seat type
Captain seat and second-row seat console type
Captain seat and walk through type
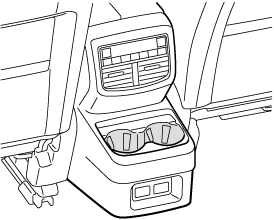
Third-row seat
Cup holders are located in the third-row seat side trims.
Bottle Holder
Bottle holders are on the inside of the doors.
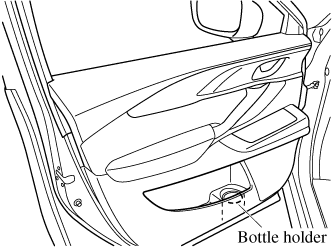
Do not use the bottle holders for containers without caps. The contents may spill when opening/closing the door or while driving the vehicle.
Storage Compartments
Keep storage boxes closed when driving:
Driving with the storage boxes open is dangerous. To reduce the possibility of injury in an accident or a sudden stop, keep the storage boxes closed when driving.
When loading cargo, make sure that it is completely secured:
If the cargo is not completely secured, it may move or collapse while driving or during sudden braking, resulting in injury or an accident.
Do not put articles in storage spaces with no lid:
Putting articles in storage spaces with no lid is dangerous as they could be thrown around the cabin if the vehicle is suddenly accelerated and cause injury depending on how the article is stored.
Do not leave lighters or eyeglasses in the storage boxes while parked under the sun. A lighter could explode or the plastic material in eyeglasses could deform and crack from high temperature.
Overhead Console
This console box is designed to store eyeglasses or other accessories.
Push and release to open.
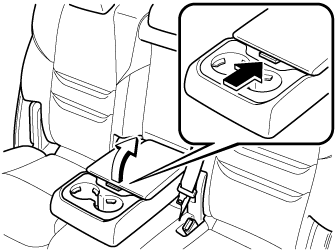
Center Console
To open, push the button.
Front
Rear (Some Models)
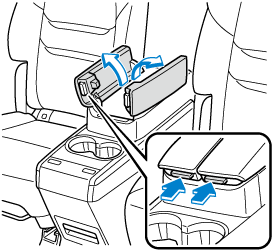
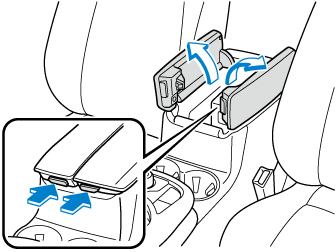
(Second-row Seat Console Box with Armrest) Storage Box (Some Models)
Store the armrests when the storage box is not in use. Otherwise, your foot might get caught when changing seats and fall down resulting in injury.
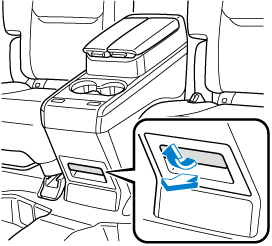
Armrest Box (Some Models)
To open, push the button and pull up the lid.
Luggage Compartment
Cargo Securing Loops
Use the loops in the luggage compartment to secure cargo with a rope or net. The tensile strength of the loops is 196 N (20 kgf, 44 lbf). Do not apply excessive force to the loops as it will damage them.
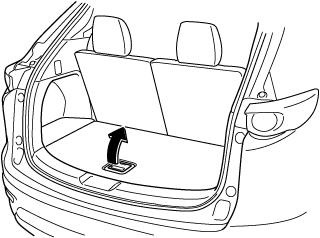
Cargo Sub-Compartment
Center cargo sub-compartment (Some Models)
Raise the luggage board to put small items in the cargo sub-compartment.
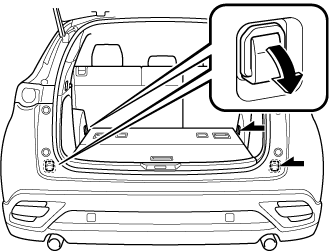
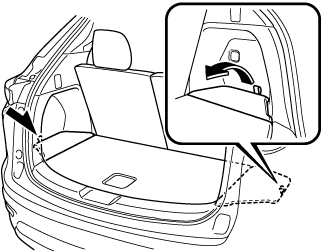
Side cargo sub-compartment
Open the cover to put small items in the cargo sub-compartment.
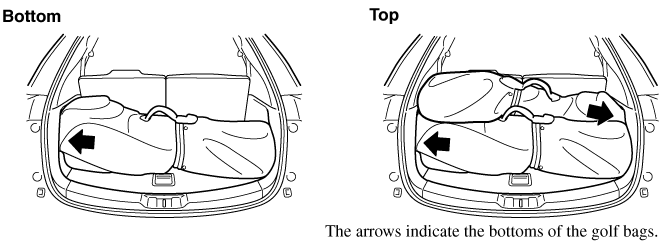
Loading golf bags
(Some golf bags may not fit using the following methods depending on their sizes.)
Up to two golf bags can be carried in the luggage compartment.
Bottom: Place the first golf bag in the luggage compartment with the bottoms pointed to the left.
Top: Place the second golf bag with its bottom pointed to the right in the luggage compartment.
Shopping Bag Hook

Sunshade (Rear Door Window) (Some Models)
The sunshades are equipped to the windows on both sides of the second-row seats.
Hold the tab and pull the sunshade upward and hook the slots.
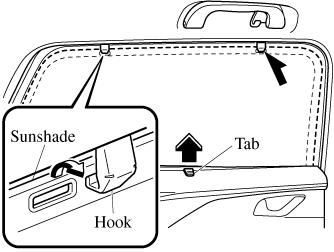
To return the sunshade to its original position, unhook the sunshade and retract it slowly.
-
Securely hook the sunshade. Otherwise, the sunshade may retract suddenly resulting in injury such as fingers get pinched.
-
Use the sunshades only when the windows are fully closed. Using a sunshade while a window is open could cause is to unhook and flap around inside the cabin where it can hit someone sitting near the window, resulting in injury.