


Audio Set


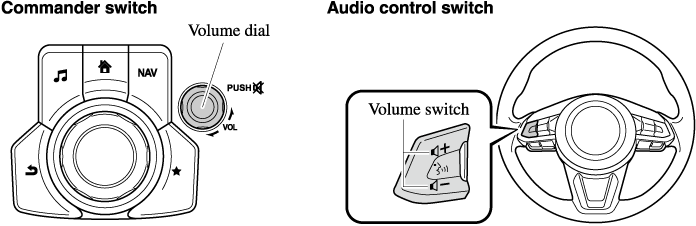
Commander switch operation
For safety reasons, some operations are disabled while the vehicle is being driven.


Volume dial operation

Press the volume dial to switch the audio MUTE on and off.
Turn the volume dial to adjust the volume. The volume increases by turning the dial clockwise, and decreases by turning it counterclockwise.
Switches around commander knob

The following operations can be done by pressing the switches around the commander knob.
 : Displays the home screen.
 : Displays the Entertainment screen.
 : Displays the Navigation screen (Only navigation-equipped vehicles). For operation of the Navigation screen, refer to the navigation system manual. If the SD card for the navigation system is not inserted, the compass indicating the direction in which the vehicle is moving is displayed.
 : Displays the Favorites screen. Long-press to store particular items in Favorites. (Radio, phonebook and destination of the navigation system can be programmed.)
 : Returns to previous screen.
Commander knob operation

(Selection of icons on screen)
-
Tilt or turn the commander knob and move the cursor to the desired icon.
-
Press the commander knob and select the icon.
Long-press operation of the commander knob is also possible for some functions.
Touch panel operation
Do not press the screen strongly or press it with a sharp-pointed object. Otherwise, the screen could be damaged.
For safety reasons, operation of the center display is disabled while the vehicle is being driven. However, items not displayed in gray can be operated using the commander switch while the vehicle is being driven.

Touch & Tap
-
Touch or tap on the item indicated on the screen.
-
The operation is launched and the next item is displayed.

Slide (USB audio only)
-
Touch the setting item displaying a slider bar.
-
Touch the slider with your finger and move to the desired level.

Swipe
-
Touch the screen with your finger and move up or down.
-
Items which were not displayed can be displayed.

Return to previous screen
-
Touch the
 .
.
Displaying the home screen
-
Touch the
.
Volume/Display/Sound Controls
Volume adjustment
Turn the commander switch volume dial. The volume switch on the steering switch can also be pressed.
Radio Broadcast Data System (RBDS) (Some Models)
Radio text information display
Radio text information sent from a broadcasting station is displayed in the center display.
Radio text information is a function of FM radio only. There is no text function on AM radio. Text information is not displayed in the following:
-
During
 reception
 -
Not an RBDS broadcast
-
RBDS broadcast, but radio text is not transmitted from the radio station
Genre Seek
Some FM stations transmit Genre codes (Program type like Rock, News, and so on). This code enables alternative stations transmitting the same Genre code to be found quickly.
(To scan for Genre Seek:)
-
Select the
 icon while in the FM mode.
 -
Select
 to open the genre list.
 -
Select the genre type you want to select.
-
Select the
 ,
,  icon.
icon.
 icon.
icon.
Ex.)
89.3 is currently being received. With Rock selected as the Genre, the radio stations broadcasting Rock are at the following frequencies.
98.3*1, 98.7, 104.3*1, 107.1
-
Radio stations with good reception
The frequency changes as follows each time is pressed.
89.3→98.3→104.3→98.3
-
Only one Genre can be selected.
-
It may not be possible to receive any station even if the Genre Seek function is used.
-
If a program in the selected genre is not broadcast to a region, reception is not possible even if the Genre Seek function is used.
-
The Genre Seek function searches for genre code (program type) which FM analog broadcasts transmit.
specialty programs (HD2-HD8) cannot be searched because they are not FM analog broadcasts. -
If radio stations which are selected by scanning using the Genre Seek function are
broadcasting stations, they are changed from analog broadcasts to broadcasts after a few seconds if the reception conditions are good. The genre is displayed after the switch, however, the genre for FM analog broadcasts may differ.
HD Radio
What is HD Radio™ Technology and how does it work?
HD Radio™ Technology is the digital evolution of analog AM/FM radio. Your radio product has a special receiver which allows it to receive digital broadcasts (where available) in addition to the analog broadcasts it already receives. Digital broadcasts have better sound quality than analog broadcasts as digital broadcasts provide free, crystal clear audio. For more information, and a guide to available radio stations and programming, please visit www.hdradio.com.
Benefits of HD Radio™ Technology
(Information)
The song title, artist name, album name and genre will appear on the screen when available by the radio station.
(Multicast)
On the FM radio frequency most digital stations have “multiple” or supplemental programs on each FM station.
Listening to HD Radio™ Technology
If  icon turns on by selecting a radio station which is an broadcasting station, the analog broadcast is switched to an broadcast automatically after a few seconds and then received.
If the broadcast is stopped and changed to an analog broadcast, press down to turn off .
Multicast channel selection (FM)
If multi-cast channels are available for an broadcast currently being received, the multi-cast channel list is displayed. Select the desired radio station.
-
If an analog broadcast is received once and
is received while HD1 is selected, the audio unit switches to the station automatically. -
When the
icon is illuminated, there could be a noticeable difference in sound quality and volume when a change from digital to analog signals occurs. If the sound quality and volume become noticeably diminished or cut off, select the icon to turn off ( icon is not illuminated). -
Once an analog broadcast is received when HD1 is selected from the Favorite channels, it is switched to
automatically. If the radio reception conditions are poor, or HD is off, switching to broadcasts is not possible. -
When an HD specialty channel (HD2 to HD8) is selected from the Favorite channels, “Signal Lost” is displayed and no audio is output until
is received. If the radio reception conditions are poor, “Signal Lost” continues to be displayed. -
If the
icon is not illuminated, information such as song titles of the station are received, however, the audio output is analog.
iTunes Tagging (for Apple devices with USB use only)
By tagging a song currently being aired, the song can later be purchased from the iTunes Store. One hundred tags can be stored. A maximum of 100 tags (for 100 songs) can be stored for later downloading.
-
Select the
 icon. The tag is stored in the audio unit.
 -
Connect the device via the vehicle's USB. Any stored tag(s) will be sent automatically to the connected device.
-
Once at home or after parking the vehicle safely, log onto the iTunes Store with your device. Your previously tagged song(s) can now be easily purchased.
-
Both AM and FM
can be used. -
Because iTunes tagging only supports purchases from the iTunes Store, direct downloading of music from the vehicle's audio unit is not possible.
-
If the available memory for the connected device is insufficient, the tag is not sent.
-
If an error occurs while the tag is being sent, reconnect the device.
Operating the Satellite Radio (Some Models)
SiriusXM® operation
Select the  icon on the home screen to display the Entertainment screen. When
  is selected, the following icons are indicated in the bottom part of the center display.
|
Icon |
Function |
|---|---|
 |
Displays the Entertainment menu. Use to switch to a different audio source. |
 |
Displays the channel list of the current category. |
 |
Displays the favorites list. Long-press to store the channel currently being aired. Refer to Operating the Radio (Search). |
 |
Plays each channel in the current channel list for 6 seconds. Select again to continue receiving the channel. The function can be selected when the Tune Scan™ setting is turned off. |
 |
Each channel programmed to Smart Favorite is played for 6 seconds. The function can be selected when all of the following conditions are met.
|
 |
Displays in red while a station in a TuneMix™ channel is being broadcast. The TuneMix™ broadcast ends when the icon is pressed. |
 |
(During TuneMix™ broadcast/Tune Scan™ operation) Returns to the beginning of the previous song. |
 |
Plays a radio. When selected again, playback is temporarily stopped. |
 |
(During TuneMix™ broadcast/Tune Scan™ operation) Advances to the beginning of the next song. |
 |
(When in a mode other than TuneMix™/Tune Scan™) Plays the previous channel. |
 |
(When in a mode other than TuneMix™/Tune Scan™) Plays the next channel. |
 |
Displays the setting screen. |
 |
Displays sound settings to adjust audio quality level. Refer to Volume/Display/Sound Controls (Search). |
Selection from channel list
Receivable channels can be displayed on the channel list screen. You can easily select the channel you want to listen from the list. Each category can be also displayed.
-
Select the
 icon to display the channel list.
 -
Select a desired channel.
(Select from category list)
-
Select the
icon to display the channel list. -
Select
 to display the category list.
 -
Select a desired category.
Creating TuneMix™ Channel
The music channels programmed to Smart Favorite can be programmed to the TuneMix™ Channel.
-
Smart Favorite can be programmed by selecting
 on the SiriusXM Settings screen.
 -
The TuneMix™ Channel cannot be created unless two or more SiriusXM music channels have been programmed to Smart Favorite.
-
Select the
icon to display the channel list. -
Select the
 tab.
tab. -
Select
 .
. -
Select
 .
. -
Select the desired music channel to the TuneMix™ Channel.
-
Select
to register the TuneMix™ Channel.
How to use AUX mode
Playback
-
Select the
icon on the home screen to display the Entertainment screen. -
Select
 to switch to the AUX mode. The following icons are displayed in the lower part of the center display.
|
Icon |
Function |
|---|---|
|
Displays the Entertainment menu. Use to switch to a different audio source. |
|
Displays sound settings to adjust audio quality level. Refer to Volume/Display/Sound Controls (Search). |
-
If a device is not connected to the auxiliary jack, the mode does not switch to the AUX mode.
-
Adjust the audio volume using the portable audio device, commander switch, or audio control switch.
-
Audio adjustments can also be made using the portable audio device's volume setting.
-
If the connection plug is pulled out from the auxiliary jack while in AUX mode, noise may occur.
Gracenote® Database
When a USB device is connected to this unit and the audio is played, the album name, artist name, genre and title information are automatically displayed if there is a match in the vehicle's database compilation to the music being played. The information stored in this device uses database information in the Gracenote® music recognition service.
For information related to the most recent Gracenote® database which can be used and how to install it, go to the Mazda Hands Free Website:
Introduction
Gracenote, the Gracenote logo and logotype are either a registered trademark or a trademark of Gracenote, Inc. in the United States and/or other countries.

Gracenote® End User License Agreement
This application or device contains software from Gracenote, Inc. of Emeryville, California (“Gracenote”). The software from Gracenote (the “Gracenote Software”) enables this application to perform disc and/or file identification and obtain music-related information, including name, artist, track, and title information (“Gracenote Data”) from online servers or embedded databases (collectively, “Gracenote Servers”) and to perform other functions. You may use Gracenote Data only by means of the intended End-User functions of this application or device.
You agree that you will use Gracenote Data, the Gracenote Software, and Gracenote Servers for your own personal non-commercial use only. You agree not to assign, copy, transfer or transmit the Gracenote Software or any Gracenote Data to any third party. YOU AGREE NOT TO USE OR EXPLOIT GRACENOTE DATA, THE GRACENOTE SOFTWARE, OR GRACENOTE SERVERS, EXCEPT AS EXPRESSLY PERMITTED HEREIN.
You agree that your non-exclusive license to use the Gracenote Data, the Gracenote Software, and Gracenote Servers will terminate if you violate these restrictions. If your license terminates, you agree to cease any and all use of the Gracenote Data, the Gracenote Software, and Gracenote Servers. Gracenote reserves all rights in Gracenote Data, the Gracenote Software, and the Gracenote Servers, including all ownership rights. Under no circumstances will Gracenote become liable for any payment to you for any information that you provide. You agree that Gracenote, Inc. may enforce its rights under this Agreement against you directly in its own name.
The Gracenote service uses a unique identifier to track queries for statistical purposes. The purpose of a randomly assigned numeric identifier is to allow the Gracenote service to count queries without knowing anything about who you are. For more information, see the web page for the Gracenote Privacy Policy for the Gracenote service.
The Gracenote Software and each item of Gracenote Data are licensed to you “AS IS.”
Gracenote makes no representations or warranties, express or implied, regarding the accuracy of any Gracenote Data from in the Gracenote Servers. Gracenote reserves the right to delete data from the Gracenote Servers or to change data categories for any cause that Gracenote deems sufficient. No warranty is made that the Gracenote Software or Gracenote Servers are error-free or that functioning of Gracenote Software or Gracenote Servers will be uninterrupted. Gracenote is not obligated to provide you with new enhanced or additional data types or categories that Gracenote may provide in the future and is free to discontinue its services at any time.
GRACENOTE DISCLAIMS ALL WARRANTIES EXPRESS OR IMPLIED, INCLUDING, BUT NOT LIMITED TO, IMPLIED WARRANTIES OF MERCHANTABILITY, FITNESS FOR A PARTICULAR PURPOSE, TITLE, AND NON-INFRINGEMENT. GRACENOTE DOES NOT WARRANT THE RESULTS THAT WILL BE OBTAINED BY YOUR USE OF THE GRACENOTE SOFTWARE OR ANY GRACENOTE SERVER. IN NO CASE WILL GRACENOTE BE LIABLE FOR ANY CONSEQUENTIAL OR INCIDENTAL DAMAGES OR FOR ANY LOST PROFITS OR LOST REVENUES.
© Gracenote, Inc. 2009
Updating the database
The Gracenote® media database can be updated using USB device.
-
Connect a USB device containing the software for updating Gracenote®.
-
Select the
 icon on the home screen to display the Settings screen.
 -
Select the
 tab and select
  .
. -
Select
 . The list of the update package stored in the USB device and the version are displayed.
 -
Select the package to use the update.
-
Select
 .
.
Bluetooth® Preparation
Device selection
If several devices have been paired, the Bluetooth® unit links the device last paired. If you would like to link a different paired device, it is necessary to change the link. The order of device priority after the link has been changed is maintained even when the ignition is switched off.
Connecting other devices
-
Select the
icon on the home screen to display the Settings screen. -
Select the
 tab.
tab. -
Select
 .
. -
Turn the Bluetooth® setting on.
-
Select the name of the device you would like to connect.
-
 selection
Connects both devices as hands-free and Bluetooth® audio.
 selection
Connects as a hands-free device.
 selection
Connects as Bluetooth® audio.
The following functions can be used for the Hands-free or audio.
-
Hands-free: Phone calls and E-mail/SMS
-
Audio: Bluetooth® audio, Pandora®, Aha™, Stitcher™ radio
Disconnecting a device
-
Select the
icon on the home screen to display the Settings screen. -
Select the
tab. -
Select
. -
Turn the Bluetooth® setting on.
-
Select the device name which is currently connected.
-
Select
 .
.
Changing PIN code
PIN code (4 digits) can be changed.
-
Select the
icon on the home screen to display the Settings screen. -
Select the
tab. -
Select
. -
Select
 .
. -
Select
 .
. -
Input the new PIN code to be set.
-
Select
 .
.
Available Language
The Bluetooth® Hands-Free System applies to the following languages:
-
English
-
Spanish
-
French
Refer to Settings (Search).
Playback
Select the icon on the home screen to display the Entertainment screen. When  is selected, the following icons are displayed at the bottom of the center display. The displayed icon differs depending on the selected station.
In addition, icons other than the following icons may be displayed.
|
Icon |
Function |
|---|---|
|
Displays the Entertainment menu. Use to switch to a different audio source. |
|
Displays the main menu. Use to switch to other stations. |
 |
Displays the content list. Use to switch to other desired content on the station. |
 |
Like*1 Evaluates the current content as “Like”. |
 |
Dislike*1 Evaluates the current content as “Dislike”. |
 |
Reverses for 15 seconds. |
 |
Map (vehicles with navigation system) Displays the destination searched by the location based services on the navigation system. |
 |
Call A call can be made to the telephone number of a shop searched using the Location Based Services. Available when a device is connected as a Hands-Free. |
|
Returns to the previous content. |
|
Pauses playback of the content. When selected again, playback resumes. |
|
Goes to the next content. |
 |
Fast-forwards for 30 seconds. |
|
Displays sound settings to adjust audio quality level. Refer to Volume/Display/Sound Controls (Search). |
-
Some stations may use alternate variations of Like and Dislike, based on station type or provider.
Main menu
Select the icon.

Switch the tab and select the station category.
|
Tab |
Function |
|---|---|
|
Presets |
Displays the preset station list set on the device. Select the preset station name to play the station content. |
|
Nearby |
Select the desired station. Guidance is provided to the searched destination near the vehicle's position. You can designate desired categories previously set using the filter setting on your device. |
The available Location Based Services may differ because the services depend on the content provided by Aha™.
Example of use (Location Based Services)
-
Select the desired station from the “Nearby” tab on the main menu.
The destination name or address playback starts in the order of the destination name list.

-
When the
 icon is selected, the currently displayed destination is displayed on the navigation system (vehicles with navigation system).
 -
When the
 icon is selected, a phone call is placed to the currently displayed destination.
 -
Select the
 icon to display the content list.
Selection of other destinations from the list can be made.

Making a Call
 icon on the home screen to display the Communication screen.
 to display the contact list.
 .
. or
or  to switch to the device operation.
 .
. to display the favorites list.
 .
. or
or  .
. .
. .
. .
. .
. .
. is pressed, the dial pad is displayed.
 to input +.
 to delete the currently input value.
 or hang-up button within 10 seconds.
Basic Operation Method
Activating Voice Recognition
Press the talk button.
Ending Voice Recognition
Use one of the following methods:
-
Press the hang-up button.
-
Say, “Cancel”.
-
Operate the commander switch or the center display (only when vehicle is stopped).
Skipping Voice Guidance (for faster operation)
Press and release the talk button.
Troubleshooting for Voice Recognition
If you do not understand an operation method while in the voice recognition mode, say “Tutorial” or “Help”.
Commands useable anytime during voice recognition
“Go Back” and “Cancel” are commands which can be used at anytime during voice recognition.
Returning to previous operation
To return to the previous operation, say, “Go Back” while in voice recognition mode.
Cancel
To put the Bluetooth® Hands-Free system in standby mode, say, “Cancel” while in voice recognition mode.
To prevent a deterioration in the voice recognition rate and voice quality, the following points should be observed:
-
The voice recognition cannot be performed while voice guidance or the beep sound is operating. Wait until the voice guidance or the beep sound is finished before saying your commands.
-
Phone related commands are available only when your phone is connected via Bluetooth®. Make sure your phone is connected via Bluetooth® before you operate phone related voice commands.
-
Music play commands, such as Play Artist and Play Album can be used only in USB audio mode.
-
Do not speak too slowly or loudly (no loud voice).
-
Speak clearly, without pausing between words or numbers.
-
Dialects or different wording other than hands-free prompts cannot be recognized by voice recognition. Speak in the wording specified by the voice commands.
-
It is not necessary to face the microphone or approach it. Speak the voice commands while maintaining a safe driving position.
-
Close the windows and/or the moonroof to reduce loud noises from outside the vehicle, or turn down the airflow of the climate control system while Bluetooth® Hands-Free is being used.
-
Make sure the vents are not directing air up towards the microphone.
