Switches and Controls
Headlights
Turn the headlight switch to turn the headlights and other exterior lights on or off.
When the taillights, parking lights, license plate lights, and the side-marker lights are turned on, the lights-on indicator light in the instrument cluster turns on.

-
If the light switch is left on, the lights will automatically switch off approximately 30 seconds after switching the ignition off.
The time setting can be changed.
Refer to the Settings section in the Mazda Connect Owner's Manual.
-
To prevent discharging the battery, do not leave the lights on while the engine is off unless safety requires them.


Without auto-light control
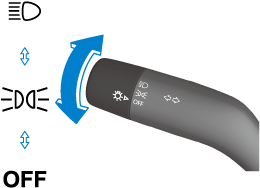
|
Ignition Position |
ACC or OFF |
ON |
||||||
|---|---|---|---|---|---|---|---|---|
|
Switch Position |
OFF |
 |
 |
OFF |
|
|
||
|
Headlights |
Off |
Off |
Off*1 |
Off |
Off |
On |
||
|
Daytime running lights |
Off |
Off |
Off |
On*2 |
On*2*3 |
Off |
||
|
Taillights Parking lights License plate lights Side-marker lights |
Off |
On*1 |
On*1 |
Off |
On |
On |
||
-
The lights are turned on for the specified period by the auto headlight off function.
-
When the light switch is switched to a different position from the OFF,
position while the vehicle is stopped, the daytime running lights turn off. When starting to drive the vehicle, the daytime running lights turn on again. -
When the light switch is switched to the OFF position, and then to the
position again, the daytime running lights turn off directly after starting the engine. The daytime running lights turn on when you begin driving the vehicle.
With auto-light control
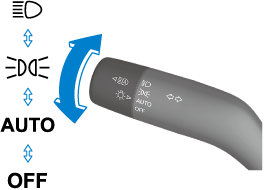
|
Ignition Position |
ACC or OFF |
ON |
||||||
|---|---|---|---|---|---|---|---|---|
|
Switch Position |
OFF*1 |
AUTO |
|
|
OFF*1 |
AUTO |
|
|
|
Headlights |
Off |
Off*2 |
Off |
Off*2 |
Auto*3*5 |
Auto*4*5 |
On |
|
|
Daytime running lights |
Off |
Off |
Off |
Off |
Off |
|||
|
Taillights Parking lights License plate lights Side-marker lights |
Off |
Off*2 |
On*2 |
On*2 |
On |
|||
-
The light switch returns to the AUTO position automatically.
-
The lights are turned on continuously if the ignition is switched from ON to any other position with the lights turned on. The lights are turned on for the specified period by the auto headlight off function.
-
During the daytime, the daytime running lights turn on automatically. During the nighttime, the headlights, parking lights, taillights, license plate lights, and the side-marker lights turn on automatically.
-
During the daytime, the daytime running lights, parking lights, taillights, license plate lights, and the side-marker lights turn on automatically. During the nighttime, the headlights, parking lights, taillights, license plate lights, and the side-marker lights turn on automatically.
-
When the light switch is switched to the OFF position while the vehicle is stopped, all of the lights that are turned on turn off. When the light switch is switched from a position other than
to the position while the vehicle is stopped, the running lights or the headlights turn off. When starting to drive the vehicle, the lights that are turned off turn on again.
Auto-light control (Some Models)
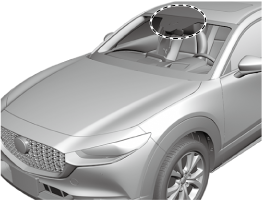
When the headlight switch is in a position other than and the ignition is switched ON, the light sensor senses the surrounding lightness or darkness and automatically turns the headlights and other exterior lights on or off.
-
Do not shade the light sensor by adhering a sticker or a label on the windshield. Otherwise the light sensor will not operate correctly.
-
The light sensor also works as a rain sensor for the auto-wiper control. Keep hands and scrapers clear of the windshield when the wiper lever is in the AUTO position and the ignition is switched ON as fingers could be pinched or the wipers and wiper blades could be damaged when the wipers activate automatically. If you are going to clean the windshield, be sure the wipers are turned off completely when it is particularly tempting to leave the engine running. This is particularly important when clearing ice and snow.
-
The headlights and other exterior lights may not turn off immediately even if the surrounding area becomes well-lit because the light sensor determines that it is night time if the surrounding area is continuously dark for several minutes such as inside long tunnels, traffic jams inside tunnels, or in indoor parking lots.
-
If the headlight switch and the windshield wiper switch are in AUTO, and the wipers are operated at low or high speed by the auto wiper control for several seconds, bad weather conditions are determined and the headlights may be turned on.
-
The sensitivity of the auto-light control may be changed.
Refer to the Settings section in the Mazda Connect Owner's Manual.
Headlight High-Low Beam
The headlights switch between high and low beams by moving the lever forward or backward.

-
High beam
-
Low beam
When the headlight high-beams are on, the headlight high-beam indicator light is turned on.

Lane-Change Signals
Move the lever halfway toward the direction of the lane change―until the indicator flashes― and hold it there. It will return to the off position when released.
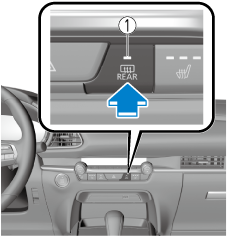
Rear Window Wiper and Washer
The ignition must be switched ON to use the wiper.
Rear Window Wiper
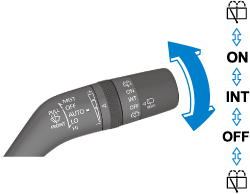
Turn the wiper on by turning the rear wiper/washer switch.
|
Switch Position |
Wiper operation |
|---|---|
 |
Spray washer fluid and operate the rear wiper |
|
ON |
Normal |
|
INT |
Intermittent |
|
OFF |
Stop |
|
Spray washer fluid and operate the rear wiper |
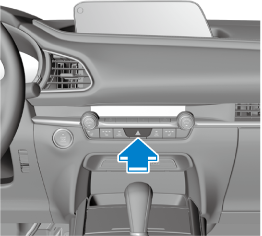
Rear Window Defogger
The rear window defogger clears fog from the rear window.
The ignition must be switched ON to use the defogger.
Press the switch to turn on the rear window defogger. The rear window defogger operates for about 15 minutes and then turns off automatically.
The indicator light illuminates when the defogger is operating.
To turn off the rear window defogger before the 15 minutes has elapsed, press the switch again.
-
Indicator light
-
Do not use sharp instruments or window cleaners with abrasives to clean the inside of the rear window surface. They may damage the defogger grid inside the window.
-
This defogger is not designed for melting snow. If there is an accumulation of snow on the rear window, remove it before using the defogger.
-
The rear window defogger operation time can be changed from 15 minutes to continuous operation. When the operation time has been switched to continuous operation, by pressing the switch, the rear window defogger will continue to operate until the ignition is switched OFF.
Refer to the Settings section in the Mazda Connect Owner's Manual.
Windshield Wiper De-icer (Some Models)
The thermal filaments at the following positions heat up and facilitate the removal of snow accumulated on the windshield.
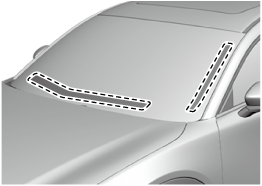
The windshield wiper de-icer operates in conjunction with the rear window defogger.
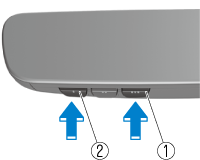
To turn on the windshield wiper de-icer, switch the ignition ON and press the rear window defogger switch (Search).
-
Indicator light
Mirror Defogger (Some Models)
Hazard Warning Flasher
The hazard warning lights should always be used when you stop on or near a roadway in an emergency.
The hazard warning lights warn other drivers that your vehicle is a traffic hazard and that they must take extreme caution when near it.

Depress the hazard warning flasher and all the turn signals will flash. The hazard warning indicator lights in the instrument cluster flash simultaneously.
-
The turn signals do not work when the hazard warning lights are on.
-
Check local regulations about the use of hazard warning lights while the vehicle is being towed to verify that it is not in violation of the law.
HomeLink Wireless Control System (Some Models)
Gate operator/Canadian Programming
Canadian radio-frequency laws require transmitter signals to “time-out” (or quit) after several seconds of transmission ― which may not be long enough for HomeLink to pick up the signal during programming. Similar to this Canadian law, some U.S. gate operators are designed to “time-out” in the same manner.
If you live in Canada or are having difficulties programming a gate operator by using the programming procedures (regardless of where you live), replace Step 3 of Programming the HomeLink System with the following:
If programming a garage door opener or gate operator, it is advised to unplug the device during the “cycling” process to prevent possible overheating.
While the indicator light is flashing in amber, press the button on the hand-held transmitter for 2 seconds and release it repeatedly until the indicator light changes from amber to green.
Go back to Step 4 of Programming the HomeLink System to complete the procedure.
Erasing Programmed HomeLink Buttons
-
All of the programmed HomeLink buttons are reset. Individual buttons cannot be reset, however, individual buttons can be reprogrammed. For individual button reprogramming, refer to Reprogramming the HomeLink System (Search).
-
Verify that the programming has been erased if you resell the vehicle.
-
Press the two outer HomeLink buttons continuously at the same time until the indicator light flashes.
-
HomeLink button 3
-
HomeLink button 1
-
-
Stop pressing the HomeLink buttons.