


Instrument Cluster and Display
Instrument Cluster and Display
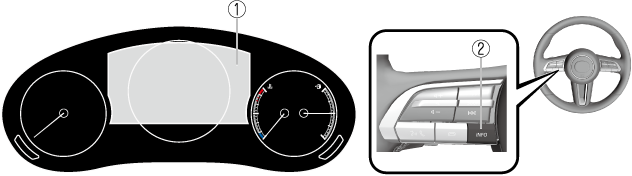
Instrument Cluster

Tachometer
The tachometer shows engine speed in thousands of revolutions per minute (rpm).
Do not run the engine with the tachometer needle in the RED ZONE.
This may cause severe engine damage.

-
STRIPED ZONE*1
-
RED ZONE*1
-
The range varies depending on the type of gauge.


When the tachometer needle enters the STRIPED ZONE, this indicates to the driver that the gears should be shifted before entering the RED ZONE.
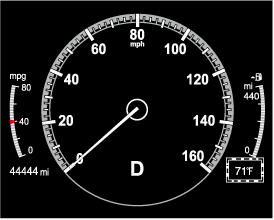
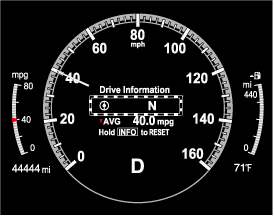
Multi-information Display
-
Multi-information Display
-
INFO switch
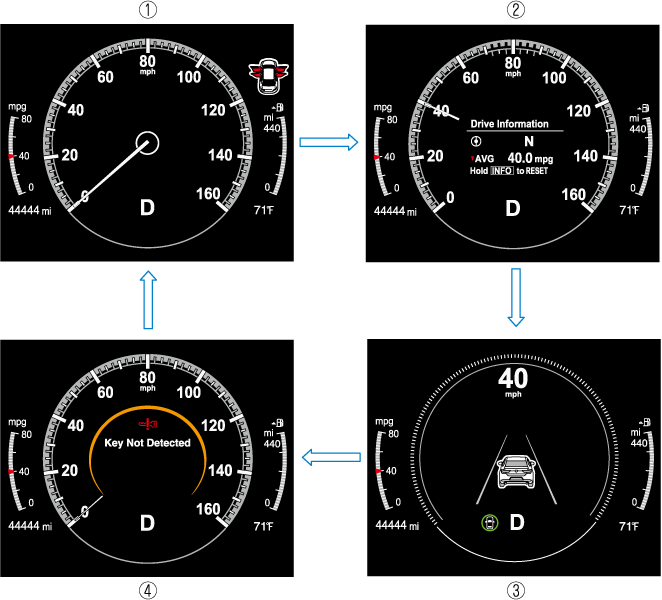
The multi-information display indicates the following information.
-
Speedometer
-
Odometer
-
Trip meter
-
Outside temperature
-
Distance-to-empty
-
Average fuel economy
-
Current fuel economy
-
Deceleration Regeneration Charge Display (M Hybrid)
-
i-ACTIVSENSE Display
-
Compass Display
-
Door-Ajar/Trunk lid-Ajar/Liftgate-Ajar Warning Indication*1
-
Message Display
-
Displayed when opening door/trunk lid/liftgate.
The screen content changes each time the INFO switch is pressed.
-
Basic display
-
Drive information display
-
i-ACTIVSENSE display
-
Message display*1
-
Displayed only when a warning occurs.
The type of display for the fuel economy and the maximum driving distance can be changed.
Refer to the Settings section in the Mazda Connect Owner's Manual.
Engine Coolant Temperature Gauge
Displays the engine coolant temperature. The blue range of the gauge indicates that the engine coolant temperature is low, and the red range of the gauge indicates that the engine coolant temperature is high and overheating.
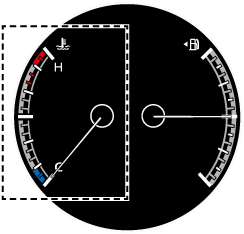
When the engine coolant temperature gauge needle is in the red range, the engine coolant temperature is extremely high. Drive slowly to reduce engine load. If the engine coolant temperature gauge needle is in the red range, there is the possibility of overheating. Park the vehicle in a safe place immediately and take appropriate measures.
Refer to Overheating (Search).
-
If the engine or engine coolant temperature is high or low, the engine output may be restricted to protect the engine.
Fuel Gauge
The fuel gauge shows approximately how much fuel is remaining in the tank when the ignition is switched ON. We recommend keeping the tank over 1/4 full.

-
Full
-
1/4 Full
-
Empty
If the low fuel warning light illuminates or the fuel level is very low, refuel as soon as possible.
If inconsistency in engine performance or stalling occurs due to low fuel level conditions, refuel the vehicle as soon as possible and add at least 10 L (2.7 US gal, 2.2 Imp gal) of fuel.
Refer to Low Fuel Warning Indication/Warning Light (Search).
-
After refueling, it may require some time for the indicator to stabilize. In addition, the indicator may deviate while driving on a slope or curve since the fuel moves in the tank.
-
The direction of the arrow (
 ) indicates that the fuel-filler lid is on the left side of the vehicle.
Dashboard Illumination
(Without auto-light control)
When the lights are turned on with the ignition switched ON, the brightness of the dashboard illumination is dimmed.
(With auto-light control)
When the lights are turned on with the ignition switched ON, the brightness of the dashboard illumination is dimmed. However, when the light sensor detects that the surrounding area is bright such as when the lights are turned on in the daytime, the dashboard illumination does not dim.
-
(With auto-light control)
When the ignition is switched ON in the early evening or at dusk, the dashboard illumination is dimmed for several seconds until the light sensor detects the brightness of the surrounding area, however, the dimming may cancel after the brightness is detected.
-
When the lights are turned on, the lights-on indicator light in the instrument cluster turns on.
Refer to Headlights (Search).
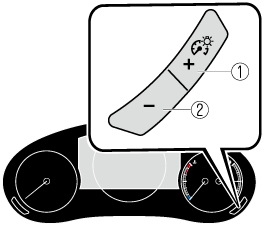
The brightness of the instrument panel and dashboard illuminations can be adjusted by pressing the dashboard illumination switch while the dashboard illumination is dimmed.
-
The brightness increases by pressing the + switch.
-
The brightness decreases by pressing the - switch. If you press the - switch while the instrument cluster is at maximum dimness, a sound is activated to notify you that the current dimmer setting is at maximum dimness.
-
Bright
-
Dim
Function for canceling illumination dimmer
The illumination dimmer can be canceled by pressing the + switch while the instrument cluster is at maximum dimness and while the ignition is switched ON. If you press the + switch again while the illumination dimmer is canceled, a sound is activated to notify you that it is canceled. If the instrument cluster's visibility is reduced due to glare from surrounding brightness, cancel the illumination dimmer.
-
When the illumination dimmer is canceled, the instrument cluster cannot be dimmed even if the lights are turned on.
-
When the illumination dimmer is canceled, the screen in the center display switches to constant display of the daytime screen.
Outside Temperature Display
Compass Display
The direction the vehicle is moving is displayed in one of eight directions while the vehicle is being driven.
|
Display |
Direction |
|---|---|
|
N |
North |
|
S |
South |
|
E |
East |
|
W |
West |
|
NE |
Northeast |
|
NW |
Northwest |
|
SE |
Southeast |
|
SW |
Southwest |
