


Instrument Cluster and Display
Instrument Cluster
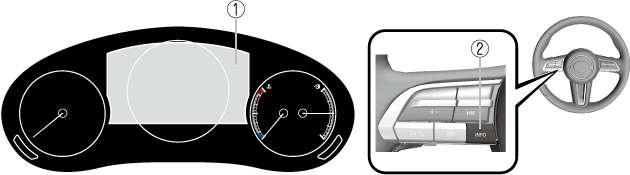
Instrument Cluster

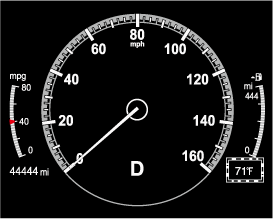
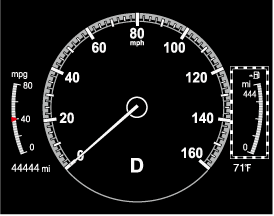
Speedometer
The speedometer indicates the speed of the vehicle.
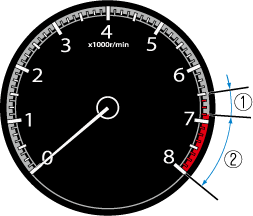
Tachometer
The tachometer shows engine speed in thousands of revolutions per minute (rpm).
Do not run the engine with the tachometer needle in the RED ZONE.
This may cause severe engine damage.
-
STRIPED ZONE*1
-
RED ZONE*1
-
The range varies depending on the type of gauge.


When the tachometer needle enters the STRIPED ZONE, this indicates to the driver that the gears should be shifted before entering the RED ZONE.
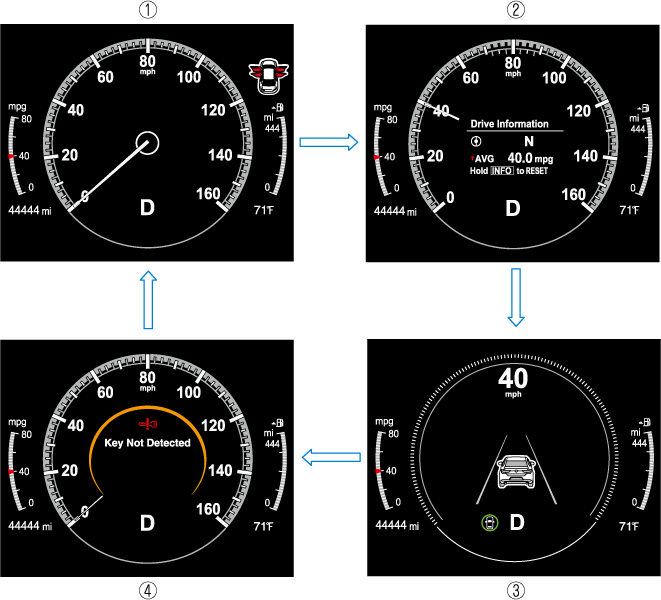
Multi-information Display
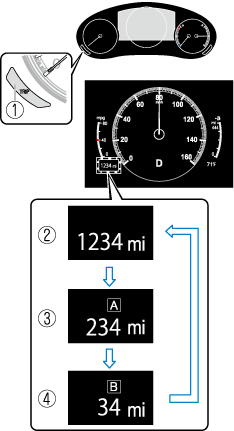
Odometer, Trip Meter and Trip Meter Selector
You can switch between the odometer and trip meter display using the TRIP switch.
-
TRIP switch
-
Odometer display
-
Trip meter A display
-
Trip meter B display
Odometer
The odometer records the total distance the vehicle has been driven.
Trip meter
The driving distance for a specified interval is indicated. Two types (TRIP A, TRIP B) of interval distance can be measured.
For instance, trip meter A can record the distance from the point of origin, and trip meter B can record the distance from where the fuel tank is filled.
When trip meter A is selected, TRIP A will be displayed. When trip meter B is selected, TRIP B will be displayed.
The trip meter can be reset by pressing the TRIP switch for 1.5 seconds or more while the trip meter is displayed.
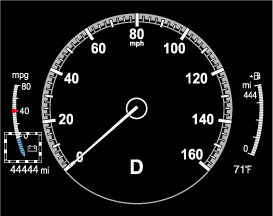
Engine Coolant Temperature Gauge
Displays the engine coolant temperature. The blue range of the gauge indicates that the engine coolant temperature is low, and the red range of the gauge indicates that the engine coolant temperature is high and overheating.
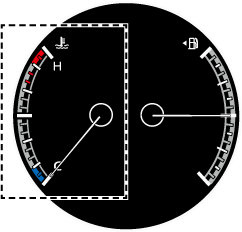
When the engine coolant temperature gauge needle is in the red range, the engine coolant temperature is extremely high. Drive slowly to reduce engine load. If the engine coolant temperature gauge needle is in the red range, there is the possibility of overheating. Park the vehicle in a safe place immediately and take appropriate measures.
Refer to Overheating (Search).
-
If the engine or engine coolant temperature is high or low, the engine output may be restricted to protect the engine.
Fuel Gauge
The fuel gauge shows approximately how much fuel is remaining in the tank when the ignition is switched ON. We recommend keeping the tank over 1/4 full.
-
Full
-
1/4 Full
-
Empty
If the low fuel warning light illuminates or the fuel level is very low, refuel as soon as possible.
If inconsistency in engine performance or stalling occurs due to low fuel level conditions, refuel the vehicle as soon as possible and add at least 10 L (2.7 US gal, 2.2 Imp gal) of fuel.
Refer to Low Fuel Warning Indication/Warning Light (Search).
-
After refueling, it may require some time for the indicator to stabilize. In addition, the indicator may deviate while driving on a slope or curve since the fuel moves in the tank.
-
The direction of the arrow (
 ) indicates that the fuel-filler lid is on the left side of the vehicle.
Dashboard Illumination
(Without auto-light control)
When the lights are turned on with the ignition switched ON, the brightness of the dashboard illumination is dimmed.
(With auto-light control)
When the lights are turned on with the ignition switched ON, the brightness of the dashboard illumination is dimmed. However, when the light sensor detects that the surrounding area is bright such as when the lights are turned on in the daytime, the dashboard illumination does not dim.
-
(With auto-light control)
When the ignition is switched ON in the early evening or at dusk, the dashboard illumination is dimmed for several seconds until the light sensor detects the brightness of the surrounding area, however, the dimming may cancel after the brightness is detected.
-
When the lights are turned on, the lights-on indicator light in the instrument cluster turns on.
Refer to Headlights (Search).
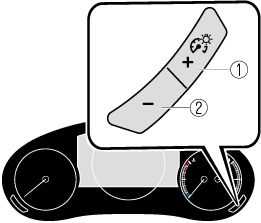
The brightness of the instrument panel and dashboard illuminations can be adjusted by pressing the dashboard illumination switch while the dashboard illumination is dimmed.
-
The brightness increases by pressing the + switch.
-
The brightness decreases by pressing the - switch. If you press the - switch while the instrument cluster is at maximum dimness, a sound is activated to notify you that the current dimmer setting is at maximum dimness.
-
Bright
-
Dim
Function for canceling illumination dimmer
The illumination dimmer can be canceled by pressing the + switch while the instrument cluster is at maximum dimness and while the ignition is switched ON. If you press the + switch again while the illumination dimmer is canceled, a sound is activated to notify you that it is canceled. If the instrument cluster's visibility is reduced due to glare from surrounding brightness, cancel the illumination dimmer.
-
When the illumination dimmer is canceled, the instrument cluster cannot be dimmed even if the lights are turned on.
-
When the illumination dimmer is canceled, the screen in the center display switches to constant display of the daytime screen.
Outside Temperature Display
When the ignition is switched ON, the outside temperature is displayed.
-
Under the following conditions, the outside temperature display may differ from the actual outside temperature depending on the surroundings and vehicle conditions:
-
Significantly cold or hot temperatures.
-
Sudden changes in outside temperature.
-
The vehicle is parked.
-
The vehicle is driven at low speeds.
-
Changing the Temperature Unit of the Outside Temperature Display
The outside temperature unit can be switched between Celsius and Fahrenheit.
Settings can be changed by operating the center display screen.
Refer to the Settings section in the Mazda Connect Owner's Manual.
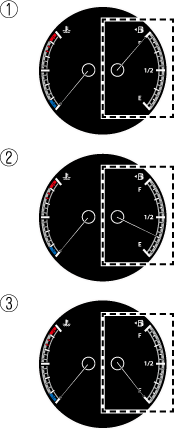
Distance-to-empty
This displays the approximate distance you can travel on the remaining fuel based on the fuel economy.
The distance-to-empty will be calculated and displayed every second.
-
Even though the distance-to-empty display may indicate a sufficient amount of remaining driving distance before refueling is required, refuel as soon as possible if the fuel level is very low or the low fuel warning light illuminates.
-
The display will not change unless you add more than approximately 9 L (2.3 US gal, 1.9 Imp gal) of fuel.
-
The distance-to-empty is the approximate remaining distance the vehicle can be driven until all the graduation marks in the fuel gauge indicating the remaining fuel supply disappear.
-
If there is no past fuel economy information such as after first purchasing your vehicle or the information is deleted when the battery cables are disconnected, the actual distance-to empty/range may differ from the amount indicated.
Average Fuel Economy
This mode displays the average fuel economy by calculating the total traveled distance and the total fuel consumption since the vehicle was purchased or the past data was reset. The average fuel economy is calculated and displayed every 30 seconds.
The average fuel economy is also displayed by a red arrow in the instantaneous fuel economy display.

The average fuel economy can be reset by pressing the INFO switch for 1.5 seconds or more. After the data is cleared, the fuel consumption is recalculated and the - - - L/100 km (- - - mpg) for the 30 seconds prior to it being displayed is indicated.
Deceleration Regeneration Charge Display (M Hybrid)
This displays the status of the charging produced by deceleration regeneration.
Refer to M Hybrid (Search).
Message Display
A message such as the system operation status, a malfunction, or an abnormality is indicated.
Warning/indicator light in instrument cluster turns on/flashes or symbol is indicated on display at same time as message
Check the information regarding the warning/indicator light or indicated symbol.
Refer to If a Warning Indication/Warning Lights (Search).
Refer to If a Indication/Indicator Lights (Search).
Message only is indicated on display
Follow the instructions indicated on the display. For the display content, refer to the next page.
Refer to If a Message Indicated on Multi-information Display (Search).
Warning/Indicator Lights
Instrument Cluster varies depending on model and specifications.
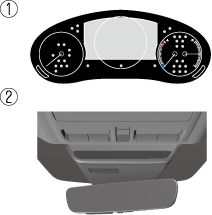
-
Instrument Cluster
-
Front Center of Headliner
Warning lights will appear in any of the highlighted areas
Warning Indication/Warning Lights
These lights turn on or flash to notify the user of the system operation status or a system malfunction.
|
Signal |
Warning |
Refer to |
|---|---|---|
 |
Brake System Warning Indication/Warning Light*1 |
(Search) |
 |
ABS Warning Indication/Warning Light*1 |
Electronic Brake Force Distribution System Warning (Search) |
|
ABS warning (Search) |
||
 |
Charging System Warning Indication/Warning Light*1 |
(Search) |
 |
Engine Oil Warning Indication/Warning Light*1 |
(Search) |
 |
High Engine Coolant Temperature Warning Indication |
(Search) |
 |
Power Steering Malfunction Indication/Indicator Light*1 |
(Search) |
 |
Master Warning Indication |
(Search) |
 |
Brake Control System Warning Indication/Warning Light*1 |
(Search) |
 |
Brake Override Warning Indication |
(Search) |
 |
Check Engine Indication/Light*1 |
(Search) |
 (Amber) |
i-stop Warning Indication/Warning Light*1 (Some Models) |
(Search) |
 |
Automatic Transmission Warning Indication/Warning Light*1 (Some Models) |
(Search) |
 |
AWD Warning Indication/Warning Light*1 (Some Models) |
(Search) |
 |
Air Bag/Front Seat Belt Pretensioner System Warning Indication/Warning Light*1 |
(Search) |
 |
Tire Pressure Monitoring System (TPMS) Warning Indication/Warning Light*1 |
Flashing (Search) |
|
Turns on (Search) |
||
 (Red) |
KEY Warning Indication/Warning Light*1 |
(Search) |
 (Amber) |
High Beam Control System (HBC) Warning Indication/Warning Light*1 (Some Models) |
(Search) |
 |
i-ACTIVSENSE Warning Indication/Warning Light*1 |
(Search) |
 |
Exterior Light Warning Indication/Warning Light*1 |
(Search) |
 |
Low Fuel Warning Indication/Warning Light |
(Search) |
 |
Check Fuel Cap Warning Indication/Warning Light*1 |
(Search) |
 |
Engine Oil Level Warning Indication/Warning Light*1 |
(Search) |
 |
Seat Belt Warning Indication/Warning Light (Front seat) |
(Search) |
 (Red) |
Seat Belt Warning Light (Rear seat) |
(Search) |
 |
Low Washer Fluid Level Warning Indication/Warning Light (Some Models) |
(Search) |
 |
Door-Ajar Warning Indication |
(Search) |
 |
Trunk lid-Ajar Warning Indication (Some Models) |
(Search) |
 |
Liftgate-Ajar Warning Indication (Some Models) |
(Search) |
 |
Door-Ajar Warning Light |
(Search) |
-
The light turns on when the ignition is switched on for an operation check, and turns off a few seconds later or when the engine is started. If the light does not turn on or remains turned on, have the vehicle inspected at an Authorized Mazda Dealer.
Wrench Indication/Indicator Light

The wrench indication/indicator light is displayed/turns on under the following conditions.
-
When the preset maintenance period has arrived.
Refer to the Information section in the Mazda Connect Owner's Manual.
-
When the maintenance period arrives, have your vehicle inspected by an Authorized Mazda Dealer as soon as possible. If maintenance is neglected, a decrease in vehicle performance may occur which could cause damage. Have your vehicle inspected before the maintenance period arrives.
-
If the vehicle continues to be driven after the engine oil replacement period has passed, it could cause damage to the engine. Replace the engine oil before the maintenance period arrives.
-
-
The wrench indication/indicator light may display/turn on earlier than the preset period depending on vehicle usage conditions.
-
Whenever the engine oil is replaced, a reset of the vehicle engine control unit is necessary.
Refer to the Information section in the Mazda Connect Owner's Manual.