Owner Maintenance
Inspecting Engine Oil Level
-
If the engine oil level warning indication/warning light turns on, add 1 L (0.26 US gal, 0.22 Imp gal) of engine oil.


-
Be sure the vehicle is on a level surface.
-
Warm up the engine to normal operating temperature.
-
Turn it off and wait at least 5 minutes for the oil to return to the oil pan.
-
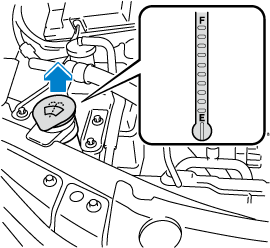
Pull out the dipstick, wipe it clean, and reinsert it fully.

-
MAX
-
OK
-
MIN
-
-
Pull it out again and examine the level.
The level is normal if it is between the MIN and MAX marks.
If it is near or below MIN, add enough oil to bring the level to MAX.
-
Make sure the O-ring on the dipstick is positioned properly before reinserting the dipstick.
-
Reinsert the dipstick fully.
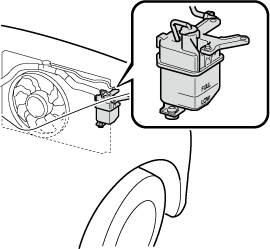
Inspecting Coolant Level
Do not use a match or live flame in the engine compartment. DO NOT ADD COOLANT WHEN THE ENGINE IS HOT:
A hot engine is dangerous. If the engine has been running, parts of the engine compartment can become very hot. You could be burned. Carefully inspect the engine coolant in the coolant reservoir, but do not open it.
 Pull over to a safe location, then switch the ignition off and make sure the fan is not running before attempting to work near the cooling fan:
Working near the cooling fan when it is running is dangerous. The fan could continue running indefinitely even if the engine has stopped and the engine compartment temperature is high. You could be hit by the fan and seriously injured.
 Do not remove either cooling system cap when the engine and radiator are hot:
When the engine and radiator are hot, scalding coolant and steam may shoot out under pressure and cause serious injury.
Inspect the antifreeze protection and coolant level in the coolant reservoir at least once a year―at the beginning of the winter season―and before traveling where temperatures may drop below freezing.
Inspect the condition and connections of all cooling system and heater hoses.
Replace any that are swollen or deteriorated.
The coolant should be at full in the radiator and between the FULL and LOW marks on the coolant reservoir when the engine is cool.
SKYACTIV-G 2.0 and SKYACTIV-G 2.5
SKYACTIV-G 2.5T
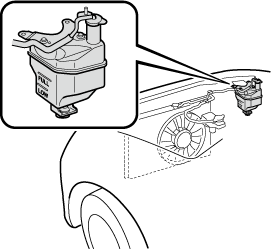
If it is at or near LOW, add enough coolant to the coolant reservoir to provide freezing and corrosion protection and to bring the level to FULL.
Securely tighten the coolant reservoir tank cap after adding coolant.
-
Radiator coolant will damage paint.
Rinse it off quickly if spilled.
-
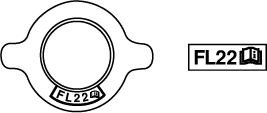
If the “FL22” mark is shown on or near the cooling system cap, use of FL-22 is recommended when replacing engine coolant. Using engine coolant other than FL-22 may cause serious damage to the engine and cooling system.
If the coolant reservoir is empty or new coolant is required frequently, consult an Authorized Mazda Dealer.
Brake/Clutch Fluid
Inspecting Brake/Clutch Fluid Level
If the brake/clutch fluid level is low, have the brakes inspected:
A low brake/clutch fluid level is dangerous.
A low level could indicate brake lining wear or a brake system leak which could cause the brakes to fail and lead to an accident.
The brakes and clutch draw fluid from the same reservoir.
Inspect the fluid level in the reservoir regularly. It should be kept between the MAX and MIN lines.
The level normally drops with accumulated distance, a condition associated with wear of brake and clutch linings. If it is excessively low, have the brake/clutch system inspected by an Authorized Mazda Dealer.

Inspecting Washer Fluid Level
Use only windshield washer fluid or plain water in the reservoir:
Using radiator antifreeze as washer fluid is dangerous. If sprayed on the windshield, it will dirty the windshield, affect your visibility, and could result in an accident.
Using Washer Fluid Without Anti-freeze Protection in Cold Weather:
Operating your vehicle in temperatures below 4 °C (40 °F) using washer fluid without anti-freeze protection is dangerous as it could cause impaired windshield vision and result in an accident. In cold weather, always use washer fluid with anti-freeze protection.
State or local regulations may restrict the use of volatile organic compounds (VOCs), which are commonly used as anti-freeze agents in washer fluid. A washer fluid with limited VOC content should be used only if it provides adequate freeze resistance for all regions and climates in which the vehicle will be operated.
Add washer fluid under any of the following conditions.
-
The top of the fluid level is low.
-
The Low Washer Fluid Level Warning Indication/Warning Light (if equipped) turns on.
-
The top of the fluid level is lower than E (if equipped).
Use plain water if washer fluid is unavailable.
But use only washer fluid in cold weather to prevent it from freezing.
Body Lubrication
Body Lubrication
All moving points of the body, such as door and hood hinges and locks, should be lubricated each time the engine oil is changed. Use a non-freezing lubricant on locks during cold weather.
Make sure the hood's secondary latch keeps the hood from opening when the primary latch is released.
Wiper Blades
-
Hot waxes applied by automatic car washers have been known to affect the wiper's ability to clean windows.
-
An operation malfunction may occur or the wiper effectiveness may be reduced if a water-repellent coating is used.
-
To prevent damage to the wiper blades, do not use gasoline, kerosene, paint thinner, or other solvents on or near them.
-
When the wiper lever is in the AUTO position and the ignition is switched ON, the wipers may move automatically in the following cases:
-
If the windshield above the rain sensor is touched.
-
If the windshield above the rain sensor is wiped with a cloth.
-
If the windshield is struck with a hand or other object.
-
If the rain sensor is struck with a hand or other object from inside the vehicle.
Be careful not to pinch hands or fingers as it may cause injury, or damage the wipers. When washing or servicing the vehicle, make sure the wiper lever is in the OFF position.
-
-
Before lifting the windshield wiper blades off the windshield, always follow the procedure for moving the windshield wiper blades. Otherwise, a wiper blade, wiper arm, or the hood could be damaged.
Refer to the Replacing Windshield Wiper Blades (Search) section for the procedure on how to move the windshield wiper blades to the service position.
Contamination of either the windshield or the blades with foreign matter can reduce wiper effectiveness. Common sources are insects, tree sap, and hot wax treatments used by some commercial car washes.
If the blades are not wiping properly, clean the window and blades with a good cleaner or mild detergent; then rinse thoroughly with clean water. Repeat if necessary.
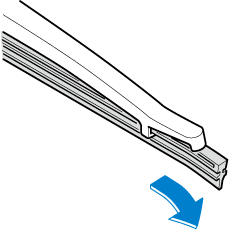
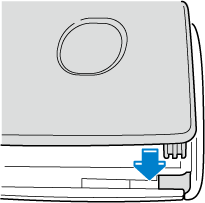
Replacing Rear Window Wiper Blade (5-Door)
When the wiper no longer cleans well, the blade is probably worn or cracked.
Replace it.
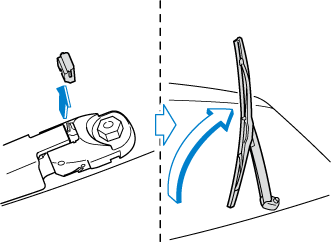
To prevent damage to the wiper arm and other components, do not move the wiper by hand.
-
Remove the cover.
-
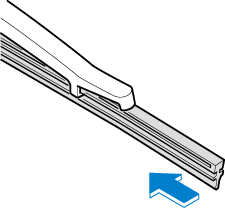
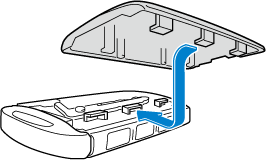
Remove the stopper and raise the wiper arm.
-
Firmly rotate the wiper blade to the right until it unlocks, then remove the blade.
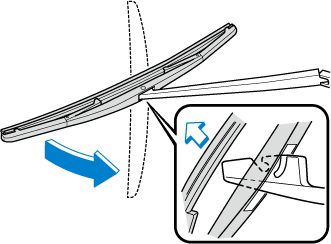
To prevent damage to the rear window, do not let the wiper arm fall on it.
-
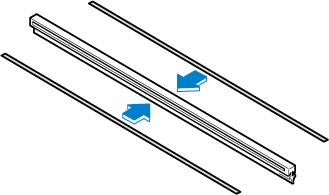
Pull down the blade rubber and slide it out of the blade holder.
-
Remove the metal stiffeners from the blade rubber and install them in the new blade.
-
Carefully insert the new blade rubber.
Then install the blade assembly in the reverse order of removal.
Battery
Battery
Wash hands after handling the battery and related accessories:
Battery posts, terminals and related accessories contain lead and lead compounds, chemicals known to the State of California to cause cancer and reproductive harm.
 Read the following precautions carefully before using the battery or inspecting to ensure safe and correct handling:
 Always wear eye protection when working near the battery:
Working without eye protection is dangerous. Battery fluid contains SULFURIC ACID which could cause blindness if splashed into your eyes. Also, hydrogen gas produced during normal battery operation, could ignite and cause the battery to explode.
 Wear eye protection and protective gloves to prevent contact with battery fluid:
Spilled battery fluid is dangerous.
Battery fluid contains SULFURIC ACID which could cause serious injuries if it gets in eyes, or on the skin or clothing. If this happens, immediately flush your eyes with water for 15 minutes or wash your skin thoroughly and get medical attention.
 Always keep batteries out of the reach of children:
Allowing children to play near batteries is dangerous. Battery fluid could cause serious injuries if it gets in the eyes or on the skin.
 Keep flames and sparks away from open battery cells and do not allow metal tools to contact the positive (+) or negative (-) terminal of the battery when working near a battery. Do not allow the positive (+) terminal to contact the vehicle body:
Flames and sparks near open battery cells are dangerous. Hydrogen gas, produced during normal battery operation, could ignite and cause the battery to explode. An exploding battery can cause serious burns and injuries. Keep all flames including cigarettes and sparks away from open battery cells.
 Keep all flames and sparks away from open battery cells because hydrogen gas is produced from open battery cells while charging the battery or adding battery fluid:
Flames and sparks near open battery cells are dangerous. Hydrogen gas, produced during normal battery operation, could ignite and cause the battery to explode. An exploding battery can cause serious burns and injuries. Keep all flames including cigarettes and sparks away from open battery cells.
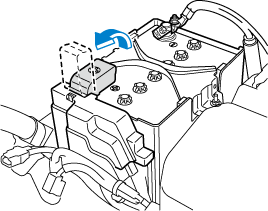
Battery Maintenance
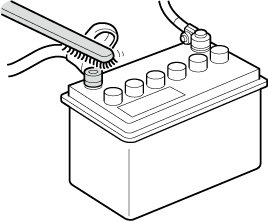
To get the best service from a battery:
-
Keep it securely mounted.
-
Keep the top clean and dry.
-
Keep terminals and connections clean, tight, and coated with petroleum jelly or terminal grease.
-
Rinse off spilled electrolyte immediately with a solution of water and baking soda.
-
If the vehicle will not be used for an extended time, disconnect the battery cables and charge the battery every 6 weeks.
Battery Replacement
Contact an Authorized Mazda Dealer for battery replacement.
Key Battery Replacement
Key Battery Replacement
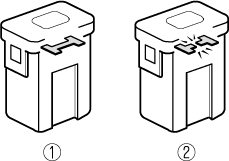
If the buttons on the transmitter are inoperable and the operation indicator light does not flash, the battery may be dead.
Replace with a new battery before the transmitter becomes unusable.
-
Make sure the battery is installed correctly. Battery leakage could occur if it is not installed correctly.
-
When replacing the battery, be careful not to touch any of the internal circuitry and electrical terminals, bend the electrical terminals, or get dirt in the transmitter as the transmitter could be damaged.
-
There is the danger of explosion if the battery is not correctly replaced.
-
Dispose of used batteries according to the following instructions.
-
Insulate the plus and minus terminals of the battery using cellophane or equivalent tape.
-
Never disassemble.
-
Never throw the battery into fire or water.
-
Never deform or crush.
-
-
Replace only with the same type battery (CR2032 or equivalent).
The following conditions indicate that the battery power is low:
-
A message, “Low Key Fob Battery. Replace Battery” is displayed on the multi-information display when the ignition is switched OFF.
-
The system does not operate and the operation indicator light on the transmitter does not flash when the buttons are pressed.
-
The system's operational range is reduced.
Incorrect battery replacement operation may damage the key. Replacing the battery at an Authorized Mazda Dealer is recommended. If replacing the battery by yourself, follow the instruction.
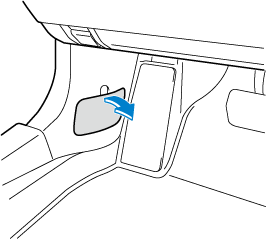
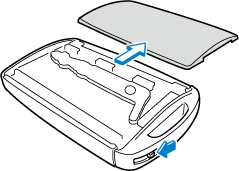
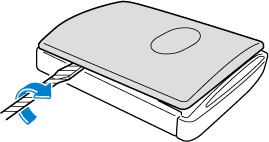
Replacing the key battery
-
Remove the lower cover while sliding the knob in the direction of the arrow.
-
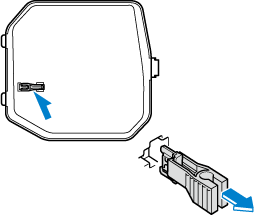
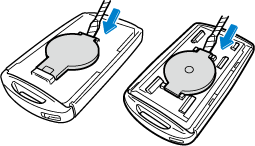
Press in the tab to unlock the upper cover.
-
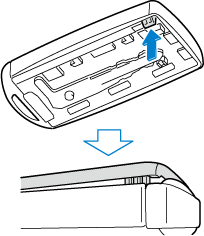
Insert a tape-wrapped flathead screwdriver into the gap and slide it in the direction of the arrow.
-
Twist the flathead screwdriver in the direction of the arrow and remove the upper cover.
-
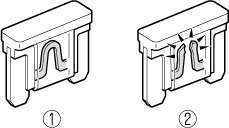
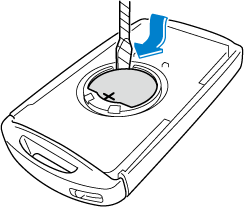
Remove the cap using the tape-wrapped flathead screwdriver.
-
Remove the battery using tape-wrapped flathead screwdriver.
-
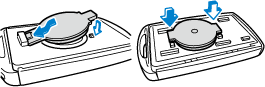
Insert a new battery into the transmitter so that the positive pole is facing up.
-
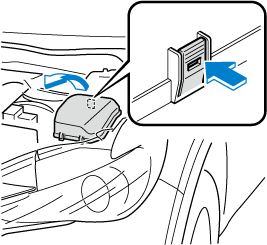
Install the cap.
-
Install the upper cover.
-
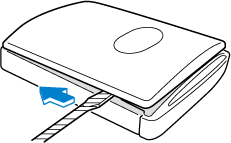
Insert the tabs of the lower cover into the slots of the transmitter and install the lower cover.
Tires
Tires
For reasons of proper performance, safety, and better fuel economy, always maintain recommended tire inflation pressures and stay within the recommended load limits and weight distribution.
Using Different Tire Types:
Driving your vehicle with different types of tires is dangerous. It could cause poor handling and poor braking; leading to loss of control.
Except for the limited use of the temporary spare tire, use only the same type tires (radial, bias-belted, bias-type) on all four wheels.
Using Wrong-Sized Tires:
Using any other tire size than what is specified for the vehicle (Search) is dangerous. It could seriously affect ride, handling, ground clearance, tire clearance, and speedometer calibration. This could cause you to have an accident. Use only tires that are the correct size specified for the vehicle.
Tire Inflation Pressure
Always inflate the tires to the correct pressure:
Overinflation or underinflation of tires is dangerous. Adverse handling or unexpected tire failure could result in a serious accident.
Refer to Tires (Search).
Use only a Mazda-genuine tire valve cap:
Use of a non-genuine part is dangerous as the correct tire air pressure cannot be maintained if the tire valve becomes damaged. If the vehicle is driven under this condition, the tire air pressure will decrease which could result in a serious accident. Do not use any part for the tire valve cap that is not a Mazda-genuine part.
Inspect all tire pressures monthly (including the spare) when the tires are cold. Maintain recommended pressures for the best ride, handling, and minimum tire wear.
Refer to the specification charts (Search).
-
Always check tire pressure when tires are cold.
-
Warm tires normally exceed recommended pressures. Do not release air from warm tires to adjust the pressure.
-
Underinflation can cause reduced fuel economy, uneven and accelerated tire wear, and poor sealing of the tire bead, which will deform the wheel and cause separation of tire from rim.
-
Overinflation can produce a harsh ride, uneven and accelerated tire wear, and a greater possibility of damage from road hazards.
Keep your tire pressure at the correct levels. If one frequently needs inflating, have it inspected.
Tire Rotation
Rotate tires periodically:
Irregular tire wear is dangerous. To equalize tread wear for maintaining good performance in handling and braking, rotate the tires periodically or sooner if irregular wear develops.
Please refer to Scheduled maintenance for your tire rotation interval.
During rotation, inspect them for correct balance.
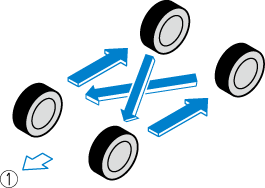
-
Forward
Do not include (TEMPORARY USE ONLY) spare tire in rotation.
Also, inspect them for uneven wear and damage. Abnormal wear is usually caused by one or a combination of the following:
-
Incorrect tire pressure
-
Improper wheel alignment
-
Out-of-balance wheel
-
Severe braking
After rotation, inflate all tire pressures to specification (Search) and inspect the lug nuts for tightness.
Rotate unidirectional tires and radial tires that have an asymmetrical tread pattern or studs only from front to rear, not from side to side. Tire performance will be reduced if rotated from side to side.
Replacing a Tire
Always use tires that are in good condition:
Driving with worn tires is dangerous. Reduced braking, steering, and traction could result in an accident.
Replace all four tires at the same time:
Replacing just one tire is dangerous. It could cause poor handling and poor braking resulting in loss of vehicle control. Mazda strongly recommends that you replace all four tires at the same time.
If a tire wears evenly, a wear indicator will appear as a solid band across the tread.
Replace the tire when this happens.
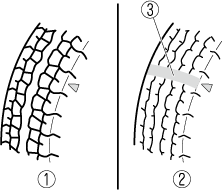
-
New tread
-
Worn tread
-
Tread wear indicator
You should replace the tire before the band crosses the entire tread.
Tires degrade over time, even when they are not being used on the road. It is recommended that tires generally be replaced when they are 6 years or older. Heat caused by hot climates or frequent high loading conditions can accelerate the aging process. You should replace the spare tire when you replace the other road tires due to the aging of the spare tire. The period in which the tire was manufactured (both week and year) is indicated by a 4-digit number.
Refer to Tire Labeling (Search).
Temporary Spare Tire
Inspect the temporary spare tire at least monthly to make sure it is properly inflated and stored.
The temporary spare tire condition gradually deteriorates even if it has not been used.
The temporary spare tire is easier to handle because of its construction which is lighter and smaller than a conventional tire. This tire should be used only for an emergency and only for a short distance.
Use the temporary spare tire only until the conventional tire is repaired, which should be as soon as possible.
Refer to Tires (Search).
-
Do not use your temporary spare tire rim with a snow tire or a conventional tire. Neither will properly fit and could damage both tire and rim.
-
The temporary spare tire has a tread life of less than 5,000 km (3,000 miles). The tread life may be shorter depending on driving conditions.
-
The temporary spare tire is for limited use, however, if the tread wear solid-band indicator appears, replace the tire with the same type of temporary spare (Search).
Tires degrade over time, even when they are not being used on the road. It is recommended that tires generally be replaced when they are 6 years or older. Heat caused by hot climates or frequent high loading conditions can accelerate the aging process. You should replace the spare tire when you replace the other road tires due to the aging of the spare tire. The period in which the tire was manufactured (both week and year) is indicated by a 4-digit number.
Refer to Tire Labeling (Search).
Replacing a Wheel
Always use wheels of the correct size on your vehicle:
Using a wrong-sized wheel is dangerous. Braking and handling could be affected, leading to loss of control and an accident.
A wrong-sized wheel may adversely affect:
-
Tire fit
-
Wheel and bearing life
-
Ground clearance
-
Snow-chain clearance
-
Speedometer calibration
-
Headlight aim
-
Bumper height
-
Tire Pressure Monitoring System
-
When replacing a wheel, make sure the new one is the same as the original factory wheel in diameter, rim width, and offset (inset/outset).
-
For details, contact an Authorized Mazda Dealer.
Proper tire balancing provides the best riding comfort and helps reduce tread wear. Out-of-balance tires can cause vibration and uneven wear, such as cupping and flat spots.
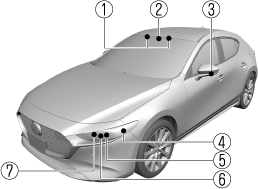
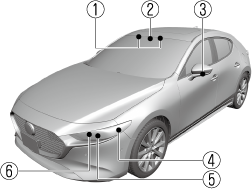
Light Bulbs
Light Bulbs
Front
Type A
-
Vanity mirror lights (Some Models)
-
Overhead lights/ Front map lights
-
Side turn signal lights (Some Models)
-
Front side-marker lights
-
Parking lights
-
Headlights (High/Low beam)/ Daytime running lights
-
Front turn signal lights
Type B
-
Vanity mirror lights (Some Models)
-
Overhead lights/ Front map lights
-
Side turn signal lights (Some Models)
-
Parking lights/Front side-marker lights
-
Headlights (High/Low beam)/ Daytime running lights
-
Front turn signal lights
Rear
4–Door
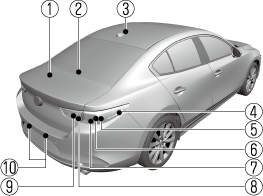
-
Trunk light
-
High-mount brake light
-
Overhead light (Rear)
-
Rear side-marker lights
-
Brake lights/Taillights (Some Models)
-
Rear turn signal lights
-
Brake lights/Taillights
-
Taillights (Some Models)
-
Reverse lights
-
License plate lights
5–Door
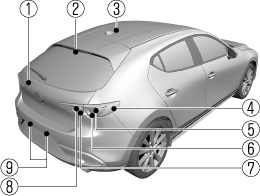
-
Luggage compartment light
-
High-mount brake light
-
Overhead light (Rear)
-
Rear side-marker lights
-
Rear turn signal lights
-
Brake lights/Taillights
-
Taillights (Some Models)
-
Reverse lights
-
License plate lights
When removing the lens or lamp unit using a flathead screwdriver, make sure that the flathead screwdriver does not contact the interior terminal. If the flathead screwdriver contacts the terminal, a short circuit may occur.
-
When replacing a bulb, contact an Authorized Mazda Dealer if necessary.
-
Use the protective cover and carton for the replacement bulb to dispose of the old bulb promptly and out of the reach of children.
-
For details regarding the installation positions of the interior lights, refer to the following:
Replacing Exterior Light Bulbs
The exterior lights have either LEDs or normal bulbs.
Only the bulb for a parking lights/front side-marker lights (type B) can be replaced.
LED type
-
Headlights
-
Daytime running lights
-
Parking lights (Type A)
-
Front turn signal lights
-
Front side-marker lights (Type A)
-
Side turn signal lights (Some Models)
-
High-mount brake light
-
Rear turn signal lights
-
Rear side-marker lights
-
Brake lights
-
Taillights
-
Reverse lights
-
License plate lights
The LED bulb cannot be replaced as a single unit because it is an integrated unit.
The LED bulb has to be replaced with the unit. We recommend an Authorized Mazda Dealer when the replacement is necessary.
Bulb type
Parking lights/Front side-marker lights (Type B)
-
Make sure the ignition is switched off, and the headlight switch is off.
-
If you are changing the left bulb, start the engine, turn the steering wheel all the way to the right, and turn off engine. If you are changing the right bulb, turn the steering wheel to the left.
-
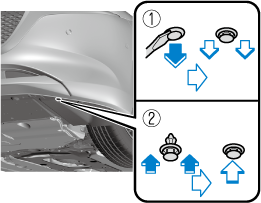
Pull the center of each plastic retainer and remove the retainers.

-
Removal
-
Installation
-
-
Pull the center of each plastic retainer and remove the retainers.
-
Removal
-
Installation
-
-
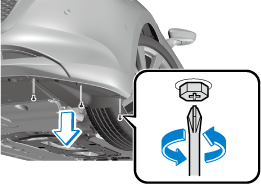
Turn the screw counterclockwise and remove it, and then partially peel back the mudguard.
-
Turn the socket and bulb assembly counterclockwise and remove it.
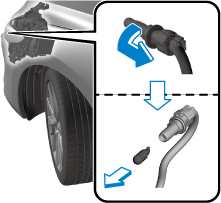
-
Disconnect the bulb from the socket.
-
Install the new bulb in the reverse order of the removal procedure.
Replacing Interior Light Bulbs
Overhead lights/Front map lights, Overhead light (Rear), Vanity mirror lights (Some Models), Luggage compartment light (5–Door)
The LED bulb cannot be replaced as a single unit because it is an integrated unit.
The LED bulb has to be replaced with the unit. We recommend an Authorized Mazda Dealer when the replacement is necessary.
Trunk light (4–Door)
-
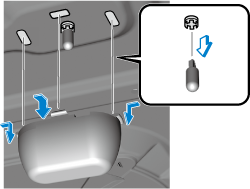
Press both sides of the lens cap to remove it.
-
Disconnect the bulb by pulling it out.
-
Install the new bulb in the reverse order of the removal procedure.