

Owner Maintenance


Closing the Hood
-
Check under the hood area to make certain all filler caps are in place and all loose items (e.g. tools, oil containers, etc.) have been removed.
-
Lift the hood, grasp the padded area on the support rod, and secure the support rod in the clip. Verify that the support rod is secured in the clip before closing the hood.

-
Lower the hood slowly to a height of about 20 cm (7.9 in) above its closed position and then let it drop.
When closing the hood, do not push it excessively such as by applying your weight. Otherwise, the hood could be deformed.


Engine Oil
Changing the engine oil should be performed by an Authorized Mazda Dealer.
Refer to Introduction (Search) for owner's responsibility in protecting your investment.
Inspecting Engine Oil Level
-
Be sure the vehicle is on a level surface.
-
Warm up the engine to normal operating temperature.
-
Turn it off and wait at least 5 minutes for the oil to return to the oil pan.
-
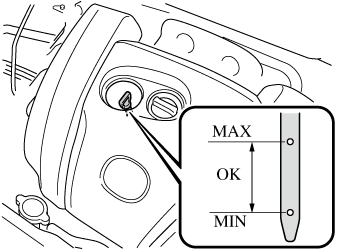
Pull out the dipstick, wipe it clean, and reinsert it fully.
-
Pull it out again and examine the level.
The level is normal if it is between the MIN and MAX marks.
If it is near or below MIN, add enough oil to bring the level to MAX.
-
Make sure the O-ring on the dipstick is positioned properly before reinserting the dipstick.
-
Reinsert the dipstick fully.
Inspecting Washer Fluid Level

Replacing Windshield Wiper Blades
When the wipers no longer clean well, the blades are probably worn or cracked.
Replace them.
To prevent damage to the wiper arms and other components, do not try to sweep the wiper arm by hand.
When raising both windshield wiper arms, raise the driver's side wiper arm first. When lowering the wiper arms, slowly lower the wiper arm from the passenger's side first while supporting it with your hand. Forcefully lowering the wiper arms could damage the wiper arm and blade, and may scratch or crack the windshield.
-
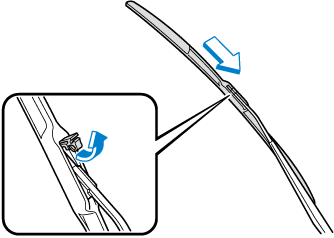
Raise the wiper arm.
-
Open the clip and slide the blade assembly in the direction of the arrow.
-
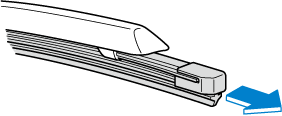
Tilt the blade assembly and remove it from the arm.

To prevent damage to the windshield let the wiper arm down easily, do not let it slap down on the windshield.
-
Pull down the blade rubber and slide it out of blade holder.
-
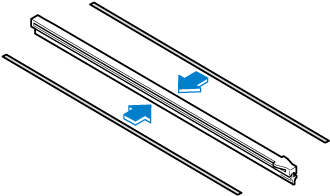
Remove the metal stiffeners from each blade rubber and install them in the new blade.
-
Do not bend or discard the stiffeners. You need to use them again.
-
If the metal stiffeners are switched, the blade's wiping efficiency could be reduced.
So do not use the driver's side metal stiffeners on the passenger's side, or vice versa.
-
Be sure to reinstall the metal stiffeners in the new blade rubber so that the curve is the same as it was in the old blade rubber.
-
-
Carefully insert the new blade rubber. Then install the blade assembly in the reverse order of removal.

