


i-ACTIVSENSE
Camera and Sensors
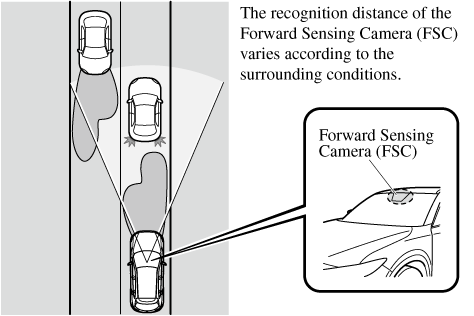
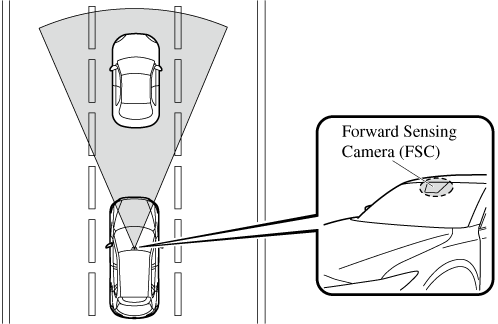
Forward Sensing Camera (FSC)
The Forward Sensing Camera (FSC) detects lane indications and recognizes headlights, taillights and city lights during nighttime driving. In addition, it also detects the vehicle ahead, pedestrians, or obstructions. The following systems also use the Forward Sensing Camera (FSC).
-
High Beam Control System (HBC)
-
Driver Attention Alert (DAA)
-
Lane-keep Assist System (LAS) & Lane Departure Warning System (LDWS)
-
Traffic Jam Assist (TJA)
-
Traffic Sign Recognition System (TSR)
-
Advanced Smart City Brake Support (Advanced SCBS)
-
Smart City Brake Support [Forward] (SCBS F)
-
Smart Brake Support (SBS)
-
Mazda Radar Cruise Control with Stop & Go function (MRCC with Stop & Go function)
The Forward Sensing Camera (FSC) is installed at the top of the windshield near the rearview mirror.
Refer to Forward Sensing Camera (FSC) (Search).
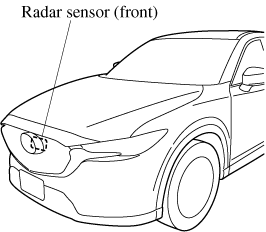
Radar sensor (front)
The radar sensor (front) functions by detecting the radio waves reflected off a vehicle ahead sent from the radar sensor. The following systems also use the radar sensor (front).
-
Mazda Radar Cruise Control with Stop & Go function (MRCC with Stop & Go function)
-
Distance Recognition Support System (DRSS)
-
Traffic Jam Assist (TJA)
-
Smart Brake Support (SBS)
The radar sensor (front) is mounted behind the radiator grille.
Refer to Radar Sensor (Front) (Search).
Radar sensors (rear)
The radar sensors (rear) function by detecting the radio waves reflected off a vehicle approaching from the rear or an obstruction sent from the radar sensors. The following systems also use the radar sensors (rear).
-
Blind Spot Monitoring (BSM)
-
Rear Cross Traffic Alert (RCTA)
The radar sensors (rear) are installed inside the rear bumper, one each on the left and right sides.
Refer to Radar Sensors (Rear) (Search).
Ultrasonic sensors (rear)
The ultrasonic sensors (rear) function by detecting the ultrasonic waves reflected off obstructions at the rear sent from the ultrasonic sensors. The following systems also use the ultrasonic sensors (rear).
-
Smart City Brake Support [Reverse] (SCBS R)
The ultrasonic sensors (rear) are mounted in the rear bumper.
Refer to Ultrasonic Sensors (Rear) (Search).
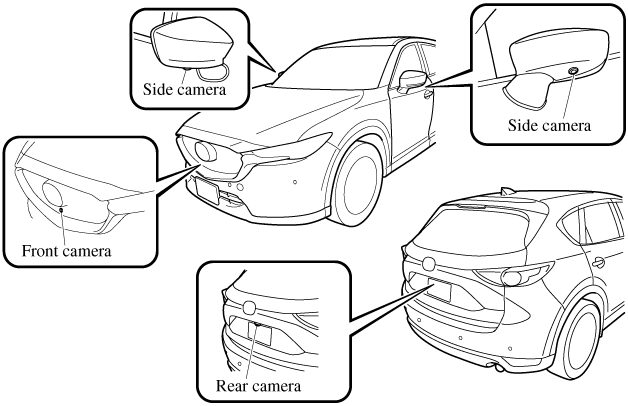
Front camera/side cameras/rear view camera
The front camera, side cameras, and rear camera shoot images of the area surrounding the vehicle. The 360° View Monitor uses each camera.
Cameras are installed to the front bumper, door mirrors, and liftgate.
Refer to Front Camera/Side Cameras/Rear Camera (Search).
Adaptive Front Lighting System (AFS) (Some Models)
The adaptive front lighting system (AFS) automatically adjusts the headlight beams to the left or right in conjunction with the operation of the steering wheel after the headlights have been turned on.
A system malfunction or operation conditions are indicated by a warning.
Refer to Contact Authorized Mazda Dealer and Have Vehicle Inspected (Search).
The Adaptive Front Lighting System (AFS) function can be switched to operable/inoperable using the personalization function.
Refer to the Settings section in the Mazda Connect Owner's Manual.


High Beam Control System (HBC) (Some Models)
The HBC determines the conditions in front of the vehicle using the Forward Sensing Camera (FSC) while driving in darkness to automatically switch the headlights between high and low beams.
Refer to Forward Sensing Camera (FSC) (Search).
While driving the vehicle at a speed of about 30 km/h (19 mph) or more, the headlights are switched to high beams when there are no vehicles ahead or approaching in the opposite direction.
The system switches the headlights to low beams when one of the following occurs:
-
The system detects a vehicle or the headlights/lights of a vehicle approaching in the opposite direction.
-
The vehicle is driven on roads lined with streetlamps or on roads in well-lit cities and towns.
-
The vehicle is driven at less than about 20 km/h (12 mph).
The warning light turns on when the system has a malfunction.
Refer to Contact Authorized Mazda Dealer and Have Vehicle Inspected (Search).
-
Do not adjust the vehicle height, modify the headlight units, or remove the camera, otherwise the system will not operate normally.
-
Do not rely excessively on the HBC and drive the vehicle while paying sufficient attention to safety. Switch the headlights between the high beams and low beams manually if necessary.
The timing in which the system switches the headlights changes under the following conditions. If the system does not switch the headlights appropriately, manually switch between high and low beams according to the visibility as well as road and traffic conditions.
-
When there are sources of light in the area such as streetlamps, illuminated signboards, and traffic signals.
-
When there are reflective objects in the surrounding area such as reflective plates and signs.
-
When visibility is reduced under rain, snow and foggy conditions.
-
When driving on roads with sharp turn or hilly terrain.
-
When the headlights/rear lamps of vehicles in front of you or in the opposite lane are dim or not illuminated.
-
When there is sufficient darkness such as at dawn or dusk.
-
When the luggage compartment is loaded with heavy objects or the rear passenger seats are occupied.
-
When visibility is reduced due to a vehicle in front of you spraying water from its tires onto your windshield.
To Operate the System
The HBC operates to switch the headlights automatically between high and low beams after the ignition is switched ON and the headlight switch is in the AUTO and high beam position.
The HBC determines that it is dark based on the brightness of the surrounding area. At the same time, the HBC indicator light (green) in the instrument cluster illuminates.

-
When the vehicle speed is about 30 km/h (19 mph) or more, the headlights automatically switch to high beams when there are no vehicles ahead or approaching in the opposite direction.
When the vehicle speed is less than about 20 km/h (12 mph), the HBC switches the headlights to low beams.
-
The low beams may not switch to high beams when cornering.
-
Operation of the HBC function can be disabled. Refer to the Settings section in the Mazda Connect Owner's Manual.
Manual Switching
Switching to low beams
Shift the lever to the low beam position.
The HBC indicator light (green) turns off.
Switching to high beams
Turn the headlight switch to the  position.
The HBC indicator light (green) turns off and the is illuminated.
Blind Spot Monitoring (BSM) Warning Indicator Light/Display Indicator/Blind Spot Monitoring (BSM) Warning Beep
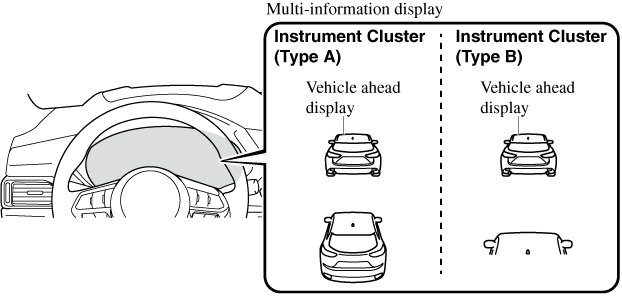
The BSM or Rear Cross Traffic Alert (RCTA) system notifies the driver of the presence of vehicles in adjacent lanes or at the rear of the vehicle using the BSM warning indicator light, the warning sound and the display indicator (vehicles with instrument cluster (Type A/B) and active driving display) (BSM) while the systems are operational.
BSM warning indicator lights
The BSM warning indicator lights are equipped on the left and right door mirrors. The warning indicator lights turn on when a vehicle approaching from the rear in an adjacent lane is detected.
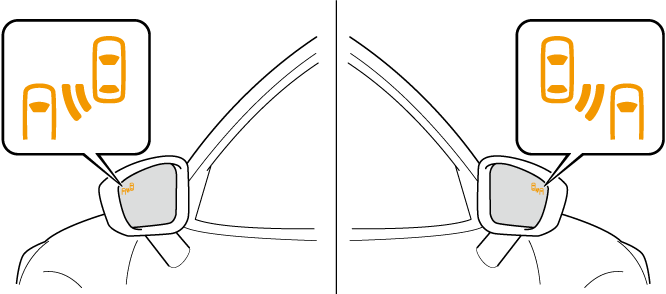
When the ignition is switched ON, the warning indicator light turns on momentarily and then turns off after a few seconds.
Forward driving (BSM operation)
The BSM detects vehicles approaching from the rear and turns on the BSM warning indicator lights equipped on the door mirrors according to the conditions. Additionally, while a BSM warning indicator light is illuminated, if the turn signal lever is operated to signal a turn in the direction in which the BSM warning indicator light is illuminated, the BSM warning indicator light flashes.
Reverse driving (Rear Cross Traffic Alert (RCTA) system operation)
The Rear Cross Traffic Alert (RCTA) system detects a vehicle approaching from the rear of the vehicle and flashes the BSM warning indicator lights.
Function for cancelling illumination dimmer
If the BSM warning indicator lights turn on when the parking lights are turned on, the brightness of the BSM warning indicator lights is dimmed.
If the BSM warning indicator lights are difficult to see due to glare from surrounding brightness when traveling on snow-covered roads or under foggy conditions, press the dimmer cancellation button to cancel the dimmer and increase the brightness of BSM warning indicator lights when they turn on.
Refer to Dashboard Illumination (Search), (Search), (Search).
Display indicator (Vehicles with multi-information display and active driving display)
The detected approaching vehicle and warning are displayed in the multi-information display and active driving display when the vehicle is moving forward (BSM operational).
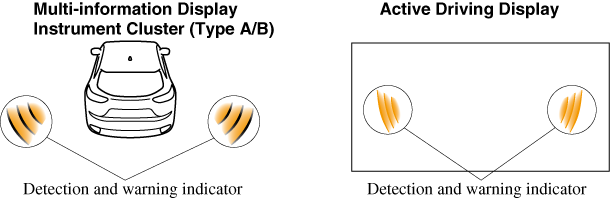
The detected direction is displayed with a detection indicator (white) when an approaching vehicle is detected. In addition, if the turn signal lever is operated to signal a lane change while the vehicle is detected, the display changes the color (amber) of the warning indicator.
BSM warning beep
The BSM warning beep is activated simultaneously with the flashing of a BSM warning indicator light.
Canceling Operation of Blind Spot Monitoring (BSM)
The BSM system can be set to inoperable.
Refer to the Settings section in the Mazda Connect Owner's Manual.
When the BSM is set to inoperable, the BSM and Rear Cross Traffic Alert (RCTA) systems are turned off and the BSM OFF indicator light in the instrument cluster turns on.

When the ignition is switched OFF, the system status before it was turned off is maintained. For example, if the ignition is switched OFF while the BSM and Rear Cross Traffic Alert (RCTA) systems are operational, the BSM and Rear Cross Traffic Alert (RCTA) systems remain operational the next time the ignition is switched ON.
Traffic Sign Display Indication
The following traffic signs are displayed on the active driving display.
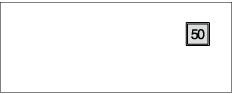
Speed limit signs
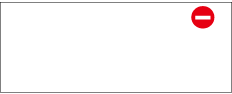
Do not enter signs
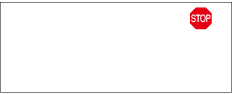
Stop signs
Speed limit signs
-
When the vehicle speed is about 1 km/h (0.6 mph) or faster, the speed limit sign is displayed when any one of the following conditions are met.
-
The Forward Sensing Camera (FSC) recognizes a speed limit sign as a sign targeted for your vehicle and the vehicle passes it.
-
The speed limit sign stored in the navigation system is read (if the Forward Sensing Camera (FSC) does not recognize a speed limit sign).
-
-
In the following cases, display of the speed limit sign stops.
-
The Forward Sensing Camera (FSC) recognizes the speed limit sign and the vehicle is driven for a certain distance after passing the sign.
-
Each sensor determines that the vehicle has changed direction of travel.
-
The Forward Sensing Camera (FSC) recognizes a new speed limit sign which differs from the previous one (displays the new speed limit sign).
-
The speed limit sign stored in the navigation system is not read within a certain period of time (if the Forward Sensing Camera (FSC) does not recognize a speed limit sign, the speed limit sign stored in the navigation system is displayed).
-
The vehicle speed exceeds the displayed speed limit sign by 30 km/h (19 mph) or more after a certain period of time has elapsed since the speed limit sign was displayed. (Except when there is information for the speed limit sign in the navigation system)
-
Do not enter signs
-
A do not enter sign is displayed when all of the following conditions are met.
-
The vehicle speed is about 60 km/h (37 mph) or slower.
-
The Forward Sensing Camera (FSC) recognizes a do not enter sign as a sign targeted for your vehicle and the vehicle passes it.
-
-
When the Forward Sensing Camera (FSC) recognizes the do not enter sign and a certain period of time has elapsed since the vehicle passed the sign, display of the do not enter sign stops.
Stop sign
-
A stop sign is displayed when all of the following conditions are met:
-
The vehicle speed is about 30 km/h (19 mph) or slower.
-
The Forward Sensing Camera (FSC) recognizes a stop sign as a sign targeted for your vehicle.
-
-
When a certain period of time has elapsed since the stop sign was displayed, display of the stop sign stops.
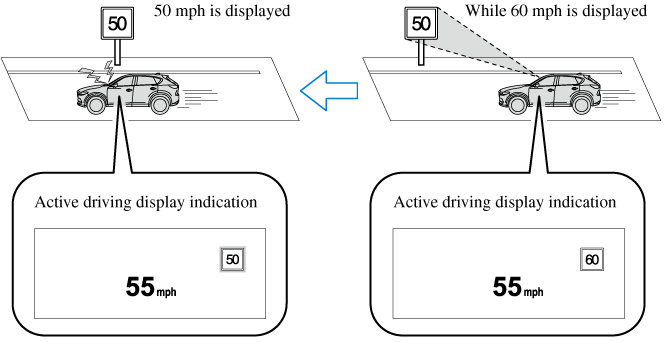
Excessive Speed Warning
If the vehicle speed exceeds the speed limit sign displayed in the active driving display, the area around the speed limit sign flashes 3 times in amber and the warning sound is activated 3 times at the same time. If the vehicle speed continues to exceed the displayed speed limit sign, the indication stops flashing and remains on. Check the surrounding conditions and adjust the vehicle speed to the legal speed using the appropriate operation such as depressing the brake pedal.
The excessive speed warning is initially set to inoperable. If you want to activate the excessive speed warning, change the setting in the personalization features. In addition, the warning pattern and the warning activation timing differ depending on the setting contents.
Refer to the Settings section in the Mazda Connect Owner's Manual.
Warning pattern
-
Off: The excessive speed warning is not activated.
-
Visual: The area around the speed limit sign displayed in the display flashes 3 times in amber, and if the vehicle speed continues to exceed the displayed speed limit sign, the indication stops flashing and remains on.
-
Audio & Visual: The area around the speed limit sign displayed in the display flashes 3 times in amber and the warning sound is activated 3 times at the same time. If the vehicle speed continues to exceed the displayed speed limit sign, the indication stops flashing and remains on.
Warning activation timing
-
 0: If the vehicle speed exceeds the speed limit sign displayed in the display, the excessive speed warning is activated.
 -
5: If the vehicle speed exceeds the speed limit sign displayed in the display by 5 km/h (3 mph), the excessive speed warning is activated.
-
10: If the vehicle speed exceeds the speed limit sign displayed in the display by 10 km/h (5 mph), the excessive speed warning is activated.
-
In the following cases, the excessive speed warning stops operating.
-
The vehicle speed is less than the speed of the displayed speed limit sign. (If the activation timing for the excessive speed warning is changed in the personalization features, the excessive speed warning stops operating when the vehicle speed is less than the changed vehicle speed.
-
A speed limit sign indication has been updated and the vehicle speed is lower than the updated indication.
-
Display of the speed limit sign stops.
-
-
The warning indication is displayed at the same time the excessive speed warning sound is activated if the vehicle speed exceeds the speed indicated on the speed limit sign.
Refer to Warning Sound is Activated (Search).
-
If the Forward Sensing Camera (FSC) incorrectly recognizes the actual speed limit sign at a lower speed, the excessive speed alarm is activated even if the vehicle is driven at the legal speed.
Indication on Display
The DRSS operation status is indicated in the multi-information display. Regarding malfunctions, check the vehicle conditions or have it inspected by an Authorized Mazda Dealer according to the content of the displayed message.
-
When the ignition is switched off, the operation status before the system was turned off is maintained. For example, if the ignition is switched off with the DRSS operable, the system will be operable when the ignition is switched ON the next time.
Distance-between-vehicles guide lines*1
|
Indication on display |
Distance between vehicles guide lines (During travel at about 40 km/h (25 mph) |
Distance between vehicles guide lines (During travel at about 80 km/h (50 mph) |
|
|---|---|---|---|
|
Multi-information display |
|||
|
Instrument cluster (Type A) |
Instrument cluster (Type B) |
||
 |
 |
About 25 m (82 ft) |
About 50 m (164 ft) |
 |
 |
About 20 m (66 ft) |
About 40 m (131 ft) |
 |
 |
About 15 m (49 ft) |
About 30 m (98 ft) |
 |
 |
About 10 m (33 ft) |
About 20 m (66 ft) |
 Illuminated in amber |
 Illuminated in amber |
About 10 m (32 ft) or less |
About 20 m (65 ft) or less |
-
The distance between vehicles differs depending on vehicle speed.
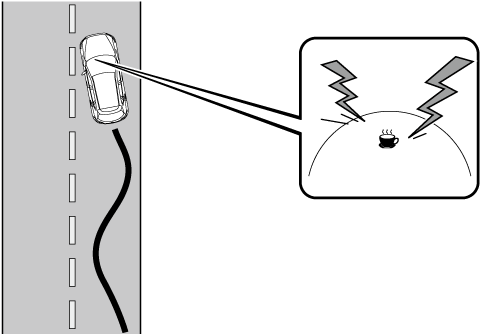
Driver Attention Alert (DAA) (Some Models)
The DAA is a system which detects driver fatigue and decreased attentiveness, and encourages the driver to take a rest.
When the vehicle is driven inside traffic lane lines at about 65 to 140 km/h (40 to 87 mph), the DAA estimates the amount of accumulated fatigue and decreased attentiveness of the driver based on the information from the Forward Sensing Camera (FSC) and other vehicle information, and encourages the driver to take a rest using an indication on the multi-information display and a warning sound.
Use the DAA on expressways or highways.
Refer to Forward Sensing Camera (FSC) (Search).
Do not rely completely on DAA and always drive carefully:
The DAA detects driver fatigue and decreased attentiveness and encourages the driver to take a rest, however, it is not designed to prevent the vehicle from straying. If you rely too much on the DAA it could lead to an accident. Drive carefully and operate the steering wheel appropriately.
In addition, the system may not be able to detect driver fatigue and decreased attentiveness correctly depending on the traffic and driving conditions. The driver must take sufficient rest in consideration of safer driving.
-
The DAA operates when all of the following conditions are met.
-
The vehicle speed is about 65 to 140 km/h (40 to 87 mph).
-
The system detects white (yellow) lane lines.
-
The system has completed learning of the driver’s driving data.
-
-
The DAA does not operate under the following conditions.
-
The vehicle speed is less than about 65 km/h (40 mph).
-
The vehicle speed exceeds about 140 km/h (87 mph)
-
The vehicle is making a sharp turn.
-
The vehicle is changing lanes.
-
The system cannot detect white (yellow) lane lines.
-
-
The DAA may not operate normally under the following conditions.
-
White (yellow) lane lines are less visible because of dirt or fading/patchiness.
-
The vehicle is jolted or swayed continuously by strong winds or rough roads.
-
The vehicle is driven aggressively.
-
When making frequent lane changes.
-
-
The DAA detects driver fatigue and decreased attentiveness based on the driving data when the vehicle is driven at about 65 to 140 km/h (40 to 87 mph) for about 20 minutes. The driving data will be reset under the following conditions.
-
The vehicle is stopped for 15 minutes or longer.
-
The vehicle is driven at less than about 65 km/h (40 mph) for about 30 minutes.
-
The ignition is switched off.
-
-
After the DAA has displayed the first message encouraging rest, it does not display the next one until 45 minutes have passed.
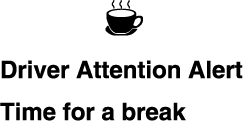
Driver Attention Alert (DAA) Display (White)
When the system detects driver fatigue or decreased attentiveness, it activates the warning sound and displays an alert in the multi-information display.
Canceling Driver Attention Alert (DAA)
The DAA can be set to not activate.
Refer to the Settings section in the Mazda Connect Owner's Manual.
Close Proximity Warning
If your vehicle rapidly closes in on the vehicle ahead because the vehicle ahead applies the brakes suddenly while you are traveling in headway control, the warning sound activates and the brake warning is indicated in the display. Always verify the safety of the surrounding area and depress the brake pedal while keeping a safer distance from the vehicle ahead. Additionally, keep a safer distance from the vehicles behind you.

In the following cases, the warnings and brakes may not operate even if your vehicle starts closing in on the vehicle ahead.
-
You are driving your vehicle at the same speed as the vehicle ahead.
-
Directly after the MRCC with Stop & Go function system has been set.
-
Directly after the accelerator pedal is released.
-
Another vehicle cuts into the driving lane.
Setting the System
The MRCC with Stop & Go function system operates when all of the following conditions are met.
-
Vehicle speed is 0 km/h (0 mph) to 145 km/h (90 mph)
-
The MRCC with Stop & Go function is turned on.
-
The brake pedal is not depressed.
-
The parking brake is released (Electric Parking Brake (EPB) indicator light is turned off).
-
There is no problem with the DSC.
-
All the doors are closed.
-
The driver's seat belt is fastened.
-
The selector lever is in the drive (D) position or manual (M) position (manual mode).
-
In the following cases, the MRCC with Stop & Go function system is canceled when the vehicle is traveling at 30 km/h (20 mph) or less and “Mazda Radar Cruise Control disabled under 30 km/h (20 mph)” is displayed in the multi-information display.
-
The Forward Sensing Camera (FSC) cannot detect target objects (There is problem with the Forward Sensing Camera (FSC) or windshield is dirty).
-
There is a problem with the stop hold control function.
-
There is a problem with the Electric Parking Brake (EPB).
-
-
It may not be possible to set the MRCC with Stop & Go function system directly after starting the engine, while the DSC operation is being checked.
Turning on the system
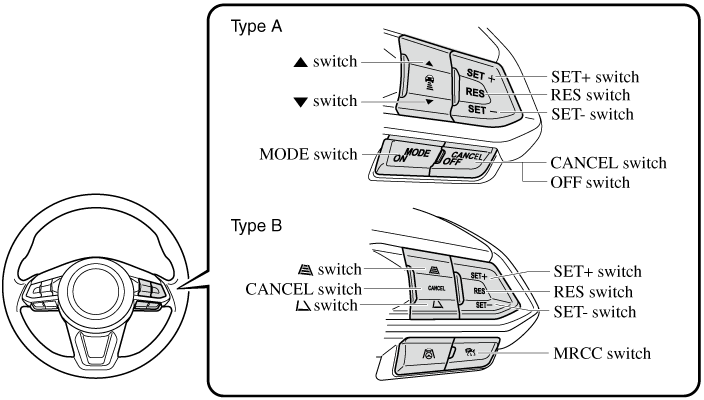
Steering wheel (Type A)
When the MODE switch is pressed once, the MRCC with Stop & Go function system turns on, and the MRCC with Stop & Go function main indication (white) turns on and the vehicle speed and the distance between the vehicles while in headway control can be set.
Steering wheel (Type B)
When the MRCC switch is pressed once, the MRCC with Stop & Go function system turns on, and the MRCC with Stop & Go function main indication (white) turns on and the vehicle speed and the distance between the vehicles while in headway control can be set.
In addition, the MRCC with Stop & Go function system display indication is displayed on the multi-information display and the active driving display at the same time.
-
If the ignition is switched off while the MRCC with Stop & Go function system is operating, the system will be operable when the ignition is switched ON the next time.
-
The MRCC with Stop & Go function can switch to the cruise control function.
Refer to Cruise Control Function (Search).
How to set the speed
-
Adjust the vehicle speed to the desired setting using the accelerator pedal.
-
Headway control begins when the SET
 or SET
 switch is pressed.
The set speed and the inter-vehicle distance display filled with white lines is displayed. The MRCC with Stop & Go function main indication (white) switches to the MRCC with Stop & Go function set indication (green) at the same time.
|
Travel status |
Indication on multi-information display |
Indication on active driving display |
|
|---|---|---|---|
|
Type A |
Type B |
||
|
During travel at constant speed |
 |
 |
 |
|
During travel under headway control |
 |
 |
 |
-
If a vehicle ahead is detected while traveling at a constant speed, the vehicle-ahead indication is displayed and headway control is performed. Additionally, when a vehicle ahead is no longer detected, the vehicle-ahead indication turns off and the system switches back to travel at constant speed.
-
The lowest possible speed which can be set on the MRCC with Stop & Go function system is 30 km/h (19 mph).
-
Headway control is not possible if the vehicle ahead is driving faster than your vehicle's set speed. Adjust the system to the desired vehicle speed using the accelerator pedal.
How to set the distance-between-vehicles during headway control
Steering wheel (Type A)
The distance-between-vehicles is set to a shorter distance by pressing the  switch. The distance-between-vehicles is set to a longer distance by pressing the
  switch. The distance-between-vehicles can be set to 4 levels; Long, medium, short, and extremely short distance.
Steering wheel (Type B)
The distance-between-vehicles can be set to 4 levels; Long, medium, short, and extremely short distance.
The distance-between-vehicles is set to a shorter distance by pressing the  switch. The distance-between-vehicles is set to a longer distance by pressing the
  switch.
|
Distance-between-vehicles guideline (at 80 km/h (50 mph) vehicle speed) |
Indication on multi-information display |
Indication on active driving display*1 |
|
|---|---|---|---|
|
Type A |
Type B |
||
|
Long (about 50 m (164 ft)) |
 |
 |
 |
|
Medium (about 40 m (131 ft)) |
 |
 |
 |
|
Short (about 30 m (98 ft)) |
 |
 |
 |
|
Extremely short (about 25 m (82 ft)) |
 |
 |
 |
-
Displays a pop-up image in the active driving display only when the driver operates the switch.
-
The distance-between-vehicles differs depending on the vehicle speed, and the slower the vehicle speed, the shorter the distance.
-
When the ignition is switched to ACC or OFF and then the engine is started again, the system automatically sets the distance-between-vehicles to the previous setting.
How to change the set vehicle speed
To accelerate/decelerate using the SET switch
When you press the SET switch, the vehicle accelerates and when you press the SET switch, it decelerates.
|
Short press |
1 km/h (1 mph) |
|
Long press |
10 km/h (5 mph) |
For example, the set vehicle speed is changed by pressing the SET switch four times as follows:
The vehicle speed accelerates or decelerates by 4 km/h (4 mph).
To increase speed using accelerator pedal
Depress the accelerator pedal and press and release the SET switch or SET switch at the desired speed. If the switch is not operated, the system returns to the set speed after you release your foot from the accelerator pedal.
The warnings and brake control do not operate while the accelerator pedal is depressed.
-
The setting speed can be changed by operating the SET
switch or SET switch during stop hold control. -
When accelerating using the SET
switch while in headway control, the set vehicle speed can be adjusted but acceleration is not possible. If there is no longer a vehicle ahead, acceleration continues until reaching the set vehicle speed. For the set vehicle speed, check the set vehicle speed indication in the display. -
When depressing the accelerator pedal, the inter-vehicle distance indication in the display changes to the white-line indication.
Canceling the system
When the following operations are performed, the MRCC with Stop & Go function system is canceled, and the MRCC with Stop & Go function set indication (green) switches to the MRCC with Stop & Go function main indication (white) at the same time.
-
The CANCEL switch is pressed.
-
The brake pedal is depressed.
-
The parking brake is applied.
-
The selector lever is in the P (Park), N (Neutral), or R (Reverse) position.
Under the following conditions, the MRCC with Stop & Go function cancel indication is displayed in the multi-information display and a single beep sound is heard.
-
The DSC has operated.
-
The Smart Brake Support (SBS) has operated.
-
The Smart City Brake Support [Forward] (SCBS F) or Advanced Smart City Brake Support (Advanced SCBS) has operated.
-
When traveling on a downslope for a long period of time.
-
There is a problem with the system.
-
The engine has stalled.
-
Any of the doors is opened.
-
The driver's seat belt is unfastened.
-
The parking brake is automatically applied during stop hold control.
-
The radar sensor (front) cannot detect target objects (during rain, fog, snow or other inclement weather conditions, or when the radiator grille is dirty).
Resuming control
If the MRCC with Stop & Go function system is canceled, you can resume control at the previously set speed by pressing the RES switch and after all of the operation conditions have been met.
If the set speed is not indicated in the display, the control does not resume even if the RES switch is pressed.
Turning off the system
Steering wheel (Type A)
Press the CANCEL switch 2 times while the MRCC with Stop & Go function system is operating to switch off the system.
Steering wheel (Type B)
When the MRCC switch is pressed while the MRCC with Stop & Go function is operating, the MRCC with Stop & Go function turns off.
Cruise Control Function
While this function is operating, the headway control operation is canceled and only the cruise control function operates.
The vehicle speed can be set more than about 25 km/h (16 mph).
Use the cruise control function on expressways and other highways which do not require a lot of repeated acceleration and deceleration.
Do not use the cruise control function in the following locations:
Otherwise, it could lead to an accident.
-
Roads with sharp curves and where vehicle traffic is heavy and there is insufficient space between vehicles. (Driving under these conditions using the cruise control function is not possible)
-
Steep down slopes (Set speed may be exceeded because sufficient engine braking cannot be applied)
-
Slippery roads such as ice or snow-bound roads (Tires could spin causing you to lose vehicle control)
Always drive carefully:
The warnings and brake control will not operate after the headway control function is canceled and the system is switched to only the cruise control function. Depress the brake pedal to decelerate according to the surrounding conditions while keeping a safer distance from the vehicle ahead and always driving carefully.
Switching to cruise control function
Steering wheel (Type A)
When the MODE switch is pressed until the system switches to the cruise main indication (white) while the MRCC with Stop & Go function system is turned on, the system switches to the cruise control function.
Steering wheel (Type B)
Use Mazda Connect to switch to the cruise control function.
Refer to the Settings section in the Mazda Connect Owner's Manual.
When the system switches to the cruise control function, the indicator and multi-information display notify the driver as follows:
-
The MRCC with Stop & Go function set indication (green) or the MRCC with Stop & Go function main indication (white) is turned off, and the cruise main indication (white) is turned on.
-
A message is displayed in the multi-information display.
Always turn off the cruise control function when it is not in use:
Leaving the cruise control function turned on when it is not in use is dangerous as it could operate unexpectedly, resulting in an accident.
How to set the speed
Adjust the system to the desired vehicle speed using the accelerator pedal.
When the SET or SET switch is pressed, the cruise set indication (green) is turned on and cruise control begins.
-
The system may not be able to maintain the set speed constantly depending on driving conditions such as steep up or down slopes.
-
The speed will continue increasing while the SET
switch is pressed and held. The speed will continue decreasing while the SET switch is pressed and held.
How to increase the set speed
The set speed can be increased using the following operations:
To increase speed using the SET switch
Press and hold the SET switch and release the switch at the desired speed.
The set speed can be adjusted incrementally (1 km/h (1 mph) increments) by pressing the switch and releasing it immediately. For example, if the switch is pressed 4 times, the set speed increases by about 4 km/h (4 mph).
To increase speed using accelerator pedal
Depress the accelerator pedal and press the SET or SET switch at the desired speed.
If the switch is not operated, the system returns to the set speed after you release your foot from the accelerator pedal.
How to Decrease the Set Speed
Press the SET switch continuously and release the switch at the desired speed.
The set speed can be adjusted incrementally (1 km/h (1 mph) increments) by pressing the switch and releasing it immediately. For example, if the switch is pressed 4 times, the set vehicle speed decreases by about 4 km/h (4 mph).
Canceling the function
When the cruise control function is canceled and the RES switch is pressed while the vehicle speed is 25 km/h (16 mph) or faster, the speed returns to the original set speed.
Canceling using CANCEL switch
When the CANCEL switch is pressed once, the cruise control function is cancelled.
Automatically cancel
The cruise control function is canceled automatically in the following cases.
-
The brake pedal is depressed.
-
The parking brake is applied.
-
The selector lever is shifted to P or N position.
-
If the vehicle speed decreases by about 15 km/h (9.4 mph) or more than the set speed, the cruise control function may be canceled.
-
When the vehicle speed is less than 21 km/h (13 mph), the cruise control function is canceled. In this case, the vehicle speed will not return to the original set speed even if the vehicle is accelerated to 25 km/h (16 mph) or higher and the RES switch is pressed. Reset the cruise control function.
Automatic Brake Operation Display
The automatic brake operation display is indicated on the multi-information display after the Advanced SCBS is operated.

-
The collision warning beep sounds intermittently while the Advanced SCBS brake or brake assist (Advanced SCBS brake assist) is operating.
-
If the vehicle is stopped by the Advanced SCBS operation and the brake pedal is not depressed, the warning beep sounds 1 time after about 2 seconds and the Advanced SCBS brake is automatically released.
Smart City Brake Support [Forward] (SCBS F) (Some Models)
The SCBS F system alerts the driver of a possible collision using an indication in the display and a warning sound when the Forward Sensing Camera (FSC) detects a vehicle ahead and determines that a collision with a vehicle ahead is unavoidable while the vehicle is being driven at a vehicle speed of about 4 to 80 km/h (2 to 50 mph). In addition, the system reduces damage in the event of a collision by operating the brake control (Smart City Brake Support (SCBS) brake) when the system determines that a collision is unavoidable while the vehicle is being driven at a vehicle speed of about 4 to 30 km/h (2 to 18 mph). It may also be possible to avoid a collision if the relative speed between your vehicle and the vehicle in front of you is less than about 20 km/h (12 mph). In addition, when the driver depresses the brake pedal while the system is in the operation range at about 4 to 30 km/h (2 to 18 mph), the brakes are applied firmly and quickly to assist. (Brake Assist (Smart City Brake Support (SCBS) brake assist))
Do not rely completely on the SCBS F system:
-
The SCBS F system is only designed to reduce damage in the event of a collision. Over reliance on the system leading to the accelerator pedal or brake pedal being mistakenly operated could result in an accident.
-
The SCBS F is a system which operates in response to a vehicle ahead. The system may not be able to detect or react to 2-wheeled vehicles or pedestrians.
In the following cases, turn the system off to prevent a mis-operation:
-
The vehicle is being towed or when towing another vehicle.
-
The vehicle is on a chassis roller.
-
When driving on rough roads such as in areas of dense grass or off-road.
Refer to Stopping the Smart City Brake Support [Forward] (SCBS F) system Operation (Search) on how to turn off the SCBS F system.
-
The SCBS F system will operate under the following conditions.
-
The engine is running.
-
The Smart Brake Support/Smart City Brake Support (SBS/SCBS) system warning indication/warning light (amber) does not illuminate.
-
(Rear-end collision warning)
The vehicle speed is about 4 to 80 km/h (2 to 50 mph).
-
(Brake control (Smart City Brake Support (SCBS) brake))
The vehicle speed is about 4 to 30 km/h (2 to 18 mph).
-
The SCBS F system is not turned off.
-
-
Under the following conditions, the SCBS F system may not operate normally:
-
The SCBS F system will not operate if the driver is deliberately performing driving operations (accelerator pedal and steering wheel).
-
If there is the possibility of partial contact with a vehicle ahead.
-
The vehicle is driven on a slippery road surface such as wet roads or icy or snow-bound roads.
-
The braking performance is adversely affected due to cold temperatures or wet brakes.
-
The vehicle is driven at the same speed as the vehicle ahead.
-
The accelerator pedal is depressed.
-
The brake pedal is depressed.
-
The steering wheel is being operated.
-
The selector lever is being operated.
-
-
In the following cases, the Forward Sensing Camera (FSC) determines that there is a vehicle ahead and the SCBS F may operate.
-
Objects on the road at the entrance to a curve.
-
Vehicles passing in the opposite lane while making a curve.
-
Metal objects, bumps, or protruding objects on the road.
-
When passing through a toll gate.
-
When passing through low gates, narrow gates, car washing machines, or tunnels.
-
If you suddenly come close to a vehicle ahead.
-
2-wheeled vehicles, pedestrians, animals or standing trees.
-
Vehicle is driven with some of the tires having significant wear.
-
-
During the SCBS F brake control, the brake pedal may move rearward or become stiff. The brakes are operating, but continue to depress the brake pedal.
Radar Sensor (Front) (Some Models)
Your vehicle is equipped with a radar sensor (front).
The following systems also use the radar sensor (front).
-
Distance Recognition Support System (DRSS)
-
Mazda Radar Cruise Control with Stop & Go function (MRCC with Stop & Go function)
-
Smart Brake Support (SBS)
-
Traffic Jam Assist (TJA)
The radar sensor (front) functions by detecting the radio waves reflected off a vehicle ahead or an obstruction sent from the radar sensor.
The radar sensor (front) is mounted behind the front emblem.
If “Front Radar Sensor Blocked” is displayed in the multi-information display of the instrument cluster, clean the area around the radar sensor (front).
Heed the following precautions to assure correct operation of each system.
-
Do not adhere stickers (including transparent stickers) to the surface of the radiator grille and front emblem in and around the radar sensor (front), and do not replace the radiator grille and front emblem with any product that is not a genuine product designed for use with the radar sensor (front).
-
The radar sensor (front) includes a function for detecting soiling of the radar sensor's front surface and informing the driver, however, depending on the conditions, it may require time to detect or it may not detect plastic shopping bags, ice or snow. If this occurs, the system may not operate correctly, therefore always keep the radar sensor (front) clean.
-
Do not install a grille guard.
-
If the front part of the vehicle has been damaged in a vehicle accident, the position of the radar sensor (front) may have moved. Stop the system immediately and always have the vehicle inspected at an Authorized Mazda Dealer.
-
Do not use the front bumper to push other vehicles or obstructions such as when pulling out of a parking space. Otherwise, the radar sensor (front) could be hit and its position deviated.
-
Do not remove, disassemble, or modify the radar sensor (front).
-
For repairs, replacement or paint work around the radar sensor (front), consult an Authorized Mazda Dealer.
-
Do not modify the suspension. If the suspension are modified, the vehicle's posture could change and the radar sensor (front) may not be able to correctly detect a vehicle ahead or an obstruction.
-
Under the following conditions, the radar sensor (front) may not be able to detect vehicles ahead or obstructions correctly and each system may not operate normally.
-
The rear surface of a vehicle ahead does not reflect radio waves effectively, such as an unloaded trailer or an automobile with a loading platform covered by a soft top, vehicles with a hard plastic tailgate, and round-shaped vehicles.
-
Vehicles ahead with low vehicle height and thus less area for reflecting radio waves.
-
Visibility is reduced due to a vehicle ahead casting off water, snow, or sand from its tires and onto your windshield.
-
The luggage compartment is loaded with heavy objects or the rear passenger seats are occupied.
-
Ice, snow, or soiling is on the front surface of the front emblem.
-
During inclement weather such as rain, snow, or sand storms.
-
When driving near facilities or objects emitting strong radio waves.
-
-
Under the following conditions, the radar sensor (front) may not be able to detect vehicles ahead or obstructions.
-
The beginning and end of a curve.
-
Roads with continuous curves.
-
Narrow lane roads due to road construction or lane closures.
-
The vehicle ahead enters the radar sensor's blind spot.
-
The vehicle ahead is running abnormally due to accident or vehicle damage.
-
Roads with repeated up and down slopes
-
Driving on poor roads or unpaved roads.
-
The distance between your vehicle and the vehicle ahead is extremely short.
-
A vehicle suddenly comes close such as by cutting into the lane.
-
-
To prevent incorrect operation of the system, use tires of the same specified size, manufacturer, brand, and tread pattern on all four wheels. In addition, do not use tires with significantly different wear patterns or tire pressures on the same vehicle (Including the temporary spare tire).
-
If the battery power is weak, the system may not operate correctly.
-
When driving on roads with little traffic and few vehicles ahead or obstructions for the radar sensor (front) to detect, “Front Radar Sensor Blocked” may be temporarily displayed, however, this does not indicate a problem.
-
The radar sensors are regulated by the relevant radio wave laws of the country in which the vehicle is driven. If the vehicle is driven abroad, authorization from the country in which the vehicle is driven may be required.
Front Camera/Side Cameras/Rear Camera (Some Models)
Your vehicle is equipped with a front camera, side cameras, and a rear camera. The 360° View Monitor uses each camera.
The front camera, side cameras, and rear camera shoot images of the area surrounding the vehicle.
Each camera is installed to the following positions.