

Switches and Controls


Headlights
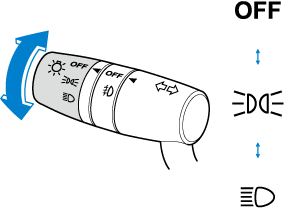
Turn the headlight switch to turn the headlights and other exterior lights on or off.
When the lights are turned on, the lights-on indicator light in the instrument cluster turns on.

-
If the light switch is left on, the lights will automatically switch off approximately 30 seconds after switching the ignition off.
The time setting can be changed.
Refer to the Settings section in the Mazda Connect Owner's Manual.
-
To prevent discharging the battery, do not leave the lights on while the engine is off unless safety requires them.


Without auto-light control
|
Switch Position |
OFF |
 |
 |
|||
|---|---|---|---|---|---|---|
|
Ignition Position |
ON |
ACC or OFF |
ON |
ACC or OFF |
ON |
ACC or OFF |
|
Headlights |
Off |
Off |
Off |
Off |
On |
On*2 |
|
Daytime running lights |
On*1 |
Off |
On*1 |
Off |
Off |
Off |
|
Taillights Parking lights License plate lights Side-marker lights |
Off |
Off |
On |
On*2 |
On |
On*2 |
-
The lights are turned on while the vehicle is driven.
-
The lights are turned on for the specified period by the auto headlight off function.
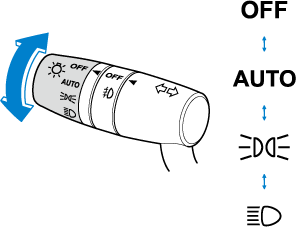
With auto-light control
(Except Canada)

|
Switch Position |
OFF |
AUTO |
|
|
||||
|---|---|---|---|---|---|---|---|---|
|
Ignition Position |
ON |
ACC or OFF |
ON |
ACC or OFF |
ON |
ACC or OFF |
ON |
ACC or OFF |
|
Headlights |
Off |
Off |
Auto*2 |
Auto*4 |
Off |
Off |
On |
On*4 |
|
Daytime running lights |
On*1 |
Off |
On*3 |
Off |
On*1 |
Off |
Off |
Off |
|
Taillights Parking lights License plate lights Side-marker lights |
Off |
Off |
Auto*2 |
Auto*4 |
On |
On*4 |
On |
On*4 |
-
The lights are turned on while the vehicle is driven.
-
The lights are turned on by the auto light function.
-
The lights are turned on while the vehicle is driven, and turned off when the headlights are turned on by the auto light function.
-
The lights are turned on for the specified period by the auto headlight off function.
(Canada)

|
Ignition Position |
ACC or OFF |
ON |
||||||
|---|---|---|---|---|---|---|---|---|
|
Switch Position |
OFF*1 |
AUTO |
|
|
OFF*1 |
AUTO |
|
|
|
Headlights |
Off |
Off |
Off |
Off |
Auto*2*4 |
Auto*3*4 |
On |
|
|
Daytime running lights |
Off |
Off |
Off |
Off |
Off |
|||
|
Taillights Parking lights License plate lights Side-marker lights |
Off |
On*5 |
On |
On*5 |
On |
|||
-
The light switch returns to the AUTO position automatically.
-
During the daytime, the daytime running lights turn on automatically. During the nighttime, the headlights, parking lights, taillights, and the license plate lights turn on automatically.
-
During the daytime, the daytime running lights, parking lights, taillights, and the license plate lights turn on automatically. During the nighttime, the headlights, parking lights, taillights, and the license plate lights turn on automatically.
-
When the light switch is switched to the OFF position while the vehicle is stopped, all of the lights that are turned on turn off. When the light switch is switched from a position other than
to the position while the vehicle is stopped, the daytime running lights or the headlights turn off. When starting to drive the vehicle, the lights that are turned off turn on again. -
The lights are turned on continuously if the ignition is switched from ON to any other position with the lights turned on. The lights are turned off when the driver's door is opened or 30 seconds have elapsed since the lights turned on.
Auto-light control (Some Models)
(Except Cnnada)
When the headlight switch is in the AUTO position and the ignition is switched ON, the light sensor senses the surrounding lightness or darkness and automatically turns the headlights and other exterior lights on or off.
(Canada)
When the headlight switch is in a position other than and the ignition is switched ON, the light sensor senses the surrounding lightness or darkness and automatically turns the headlights and other exterior lights on or off.
-
Do not shade the light sensor by adhering a sticker or a label on the windshield. Otherwise the light sensor will not operate correctly.

-
The light sensor also works as a rain sensor for the auto-wiper control. Keep hands and scrapers clear of the windshield when the wiper lever is in the AUTO position and the ignition is switched ON as fingers could be pinched or the wipers and wiper blades could be damaged when the wipers activate automatically. If you are going to clean the windshield, be sure the wipers are turned off completely when it is particularly tempting to leave the engine running. This is particularly important when clearing ice and snow.
-
The headlights and other exterior lights may not turn off immediately even if the surrounding area becomes well-lit because the light sensor determines that it is night time if the surrounding area is continuously dark for several minutes such as inside long tunnels, traffic jams inside tunnels, or in indoor parking lots.
In this case, the lights turn off if the light switch is turned to the OFF position.
-
If the headlight switch and the windshield wiper switch are in AUTO, and the wipers are operated at low or high speed by the auto wiper control for several seconds, bad weather conditions are determined and the headlights may be turned on.
-
The sensitivity of the auto-light control may be changed.
Refer to the Settings section in the Mazda Connect Owner's Manual.
Headlight Leveling
The number of passengers and weight of cargo in the luggage compartment change the angle of the headlights.
Auto type
The angle of the headlights will be automatically adjusted when turning on the headlights.
A system malfunction or operation conditions are indicated by a warning.
Refer to Contact Mazda Dealer and Have Vehicle Inspected (Search).
Manual type
The headlight leveling switch is used to adjust the angle of the headlights manually.
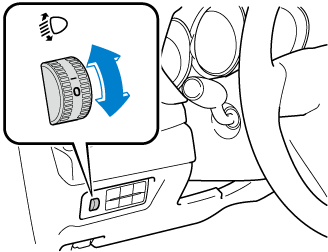
Select the proper headlight angle from the following chart.
|
Front seat |
Rear seat |
Load |
Switch Position |
|
|---|---|---|---|---|
|
Driver |
Passenger |
|||
|
× |
― |
― |
― |
0 |
|
× |
× |
― |
― |
0 |
|
× |
× |
× |
― |
1 |
|
× |
× |
× |
× |
1 |
|
× |
― |
― |
× |
1.5 |
×: Yes
―: No
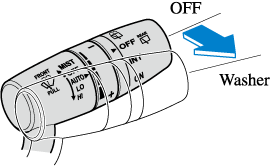
Three-Flash Turn Signal
After releasing the turn signal lever, the turn signal indicator flashes 3 times. The operation can be canceled by moving the lever in the direction opposite to which it was operated.
The three-flash turn signal function can be switched to operable/inoperable using the personalization function.
Refer to the Settings section in the Mazda Connect Owner's Manual.
Windshield Washer
Pull the lever toward you and hold it to spray washer fluid.
If the windshield washer is turned on when the windshield wipers are not operating, the windshield wipers operate a few times.
If the washer does not work, inspect the fluid level (Search). If the fluid level is normal, consult an Authorized Mazda Dealer.
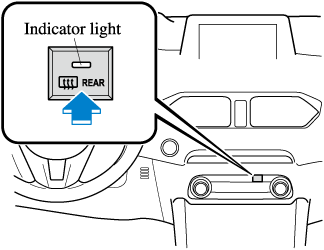
Rear Window Defogger
The rear window defogger clears fog from the rear window.
The ignition must be switched ON to use the defogger.
Press the switch to turn on the rear window defogger. The rear window defogger operates for about 15 minutes and then turns off automatically.
The indicator light illuminates when the defogger is operating.
To turn off the rear window defogger before the 15 minutes has elapsed, press the switch again.
Manual Climate Control System

Fully Automatic Climate Control System
-
Do not use sharp instruments or window cleaners with abrasives to clean the inside of the rear window surface. They may damage the defogger grid inside the window.
-
This defogger is not designed for melting snow. If there is an accumulation of snow on the rear window, remove it before using the defogger.
-
The rear window defogger setting can be changed. After changing the setting, the rear window defogger stops automatically after 15 minutes have elapsed and when the ambient temperature is high. When the ambient temperature is low, it continues to operate until the switch is pressed again.
Refer to the Settings section in the Mazda Connect Owner's Manual.
Mirror Defogger (Some Models)
Programming the HomeLink System
When programming a garage door opener or a gate, disconnect the power to these devices before performing programming. Continuous operation of the devices could damage the motor.
The HomeLink system provides 3 buttons which can be individually selected and programmed using the transmitters for current, on-market devices as follows:
-
Disconnect the power to the garage door opener or gate programmed to the hand-held transmitter.
-
Position the end of your hand-held transmitter 2.5―7.5 cm (1―3 inches) away from the HomeLink button you wish to program while keeping the indicator light in view.
-
Simultaneously press and hold both the chosen HomeLink and hand-held transmitter buttons. Do not release the buttons until step 3 has been completed.
Some gate operators and garage door openers may require you to replace this Programming Step 2 with procedures noted in the “Gate Operator/Canadian Programming” section.
-
After the HomeLink indicator light changes from a slow to a rapidly blinking light, release both the HomeLink and hand-held transmitter buttons.
If the HomeLink indicator light does not change to a rapidly blinking light, contact HomeLink at www.homelink.com or call 1-800-355-3515 for assistance.
-
Connect the power to the garage door opener or gate programmed to the hand-held transmitter.
-
Firmly press and hold the programmed HomeLink button for five seconds, and then release it. Perform this operation two times to activate the door or gate. If the door or gate does not activate, press and hold the just-trained HomeLink button and observe the indicator light.
If the indicator light stays on constantly, programming is complete and your device should activate when the HomeLink button is pressed and released.
To program the remaining two HomeLink buttons, begin with “Programming”― step 1
If the indicator light blinks rapidly for two seconds and then turns to a constant light, continue with “Programming” steps 7―9 to complete the programming of a rolling code equipped device (most commonly a garage door opener).
-
At the garage door opener receiver (motor-head unit) in the garage, locate the “learn” or “smart” button. This can usually be found where the hanging antenna wire is attached to the motor-head unit.
-
Firmly press and release the “learn” or “smart” button. (The name and color of the button may vary by manufacturer.)
-
Return to the vehicle and firmly press, hold for two seconds and release the programmed HomeLink button. Repeat the “press/hold/release” sequence a second time, and, depending on the brand of the garage door opener (or other rolling code equipped device), repeat this sequence a third time to complete the programming process.
HomeLink should now activate your rolling code equipped device.
To program the remaining two HomeLink buttons, begin with “Programming”― step 1
For questions or comments, please contact HomeLink at www.homelink.com or 1-800-355-3515.
Gate operator/Canadian Programming
Canadian radio-frequency laws require transmitter signals to “time-out” (or quit) after several seconds of transmission ― which may not be long enough for HomeLink to pick up the signal during programming. Similar to this Canadian law, some U.S. gate operators are designed to “time-out” in the same manner.
If you live in Canada or you are having difficulties programming a gate operator by using the “Programming” procedures (regardless of where you live), replace “Programming HomeLink” step 3 with the following:
If programming a garage door opener or gate operator, it is advised to unplug the device during the “cycling” process to prevent possible overheating.
Continue to press and hold the HomeLink button while you press and release ― every two seconds (“cycle”) your hand-held transmitter until the frequency signal has successfully been accepted by HomeLink. (The indicator light will flash slowly and then rapidly.)
Proceed with “Programming” step 4 to complete.
