


Audio Set


Basic Operation Method
-
The explanation of functions described in this manual may differ from the actual operation, and the shapes of screens and buttons and the letters and characters displayed may also differ from the actual appearance.
Additionally, depending on future software updates, the content may successively change without notice.
-
For additional information regarding Mazda Connect, please refer to the following Website.


Audio Set has 3 different human interfaces.
-
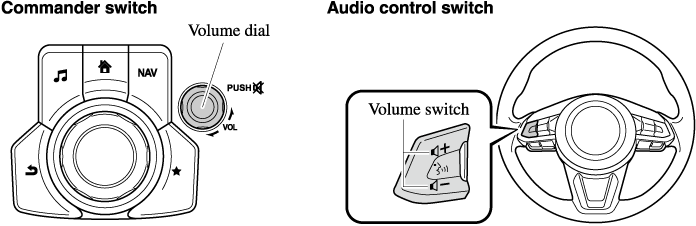
Commander switch
-
Touch panel
-
Voice recognition with steering switch and microphone
Refer to Voice Recognition (Search).
Commander switch operation
For safety reasons, some operations are disabled while the vehicle is being driven.

Volume dial operation

Press the volume dial to switch the audio MUTE on and off.
Turn the volume dial to adjust the volume. The volume increases by turning the dial clockwise, and decreases by turning it counterclockwise.
Switches around commander knob

The following operations can be done by pressing the switches around the commander knob.
 : Displays the home screen.
 : Displays the Entertainment screen.
 : Displays the Navigation screen (Only navigation-equipped vehicles). For operation of the Navigation screen, refer to the navigation system manual. If the SD card for the navigation system is not inserted, the compass indicating the direction in which the vehicle is moving is displayed.
 : Displays the Favorites screen. Long-press to store particular items in Favorites. (Radio, phonebook and destination of the navigation system can be programmed.)
 : Returns to previous screen.
Commander knob operation

(Selection of icons on screen)
-
Tilt or turn the commander knob and move the cursor to the desired icon.
-
Press the commander knob and select the icon.
Long-press operation of the commander knob is also possible for some functions.
Volume/Display/Sound Controls
Display setting
Select the  icon on the home screen to display the Settings screen.
Select the  tab to select the item you would like to change.
Display OFF/Clock
The center display can be turned off. Select  to turn the display off.
When  is selected the center display turns off and the clock is displayed.
The center display can be turned back on as follows:
-
Touch the center display.
-
Operate the commander switch.
Daytime/nighttime (System) screen setting
The daytime or nighttime screen can be selected.
 :
:
(With auto-light control)
Switches screen automatically according to parking lights illumination condition. However, when the light sensor detects that the surrounding area is bright such as when the parking lights are turned on in the daytime, the screen is switched to the daytime screen*1
(Without auto-light control)
Switches screen automatically according to parking lights illumination condition.*1
 : Daytime screen setting
 : Nighttime screen setting
-
The display is constantly on daytime screen when the illumination dimmer is cancelled.
Brightness adjustment
Adjust the center display brightness using the slider.
Contrast adjustment
Adjust the center display contrast using the slider.
Display setting reset
All of the screen setting values can be reset to their initial settings.
-
Select
 .
. -
Select
 .
.
Audio sound adjustment
Select the icon on the home screen to display the Settings screen.
Select the  tab to select the item you would like to change.
|
Indication |
Setting value |
|---|---|
|
Bass (Low pitch sound) |
|
|
Treble (Treble sound) |
|
|
Fade (Front/Rear volume balance) |
Front: Front speaker volume enhancement Rear: Rear speaker volume enhancement |
|
Balance (Left/right volume balance) |
Right: Right speaker volume enhancement Left: Left speaker volume enhancement |
|
Guidance Volume (Some Models) (Volume adjustment during route guidance on navigation screen) |
Left: Low volume Right: High volume |
|
ALC*1 (Automatic volume adjustment) |
Off―Adjustment at seven levels |
|
Bose® Centerpoint*2 (Automatic surround level adjustment) |
On/Off |
|
Bose® AudioPilot*2 (Automatic volume adjustment) |
On/Off |
|
Beep (Audio operation sound) |
On/Off |
 Side: Low pitch reduction
-
Standard audio
-
Bose® sound system
ALC (Automatic volume adjustment)
The automatic level control (ALC) is a feature that automatically adjusts audio volume and sound quality according to the vehicle speed. The volume increases in accordance with the increase in vehicle speed, and decreases as vehicle speed decreases.
Bose® Centerpoint (Automatic surround level adjustment)
Centerpoint®*3 lets vehicle owners enjoy a Bose® surround sound experience from their existing MP3s and satellite radio.
Specifically engineered to meet the unique demands of reproducing surround sound in a vehicle.
Converts stereo signals to multiple channels allowing greater precision when reproducing the sound.
An enhanced algorithm to simultaneously create a wider, more spacious sound field.
*3 Centerpoint® is a registered trademark of Bose Corporation.
Bose® AudioPilot (Automatic volume adjustment)
When driving, background noise can interfere with enjoying music.
AudioPilot®*4 noise compensation technology continuously adjusts the music to compensate for background noise and vehicle speed.
It reacts only to sustained noise sources and not intermittent ones, such as speed bumps.
An enhanced DSP algorithm allows faster and more effective compensation for unusual situations, such as driving on a very rough road or at high speeds.
*4 AudioPilot® is a registered trademark of Bose Corporation.
Operating the Radio
Radio ON
Select the  icon on the home screen to display the Entertainment screen. When selecting the desired radio, the following icons are indicated in the lower part of the center display.
AM/FM Radio
|
Icon |
Function |
|---|---|
 |
Displays the Entertainment menu. Use to switch to a different audio source. |
 |
Displays the station list. Select Select the desired frequency. |
 |
Displays the Favorites list. Long-press to store radio station currently being aired. |
 |
Switches the |
 |
You can search for receivable radio stations. Scanning stops at each station for about five seconds. Select again to continue receiving the radio station. |
 |
You can change the radio frequency manually. Rotate the commander knob, slide the screen, or touch the radio frequency. Press When |
 |
Launches the iTunes Tagging function (for Apple devices with USB use only). Can be used when the |
 |
Automatic radio station selection. When long-pressed, the radio frequency changes continually. It stops when you remove your hand from the icon or the commander knob. |
 |
|
 |
Displays sound settings to adjust audio quality level. Refer to Volume/Display/Sound Controls (Search). |
 to display the frequencies of up to ten radio stations on the auto memory preset list.
 or
or  to change the radio frequency one step at a time.
Favorites Radio
Selected stations can be registered for convenient operation. Up to 50 stations can be registered. The Favorites list is common to AM, FM, and satellite radio.
Registering to Favorites
Long-press the  icon to register the current radio station. The registration can also be performed using the following procedure.
-
Select the
icon to display the Favorites list. -
Select
 .
. -
Select
 .
. -
The station is added to the bottom of the Favorites list.
Selecting radio station from Favorites
-
Select the
icon to display the Favorites list. -
Select the radio frequency to tune in the radio station.
Deleting from Favorites
-
Select the
icon to display the Favorites list. -
Select
. -
Select
 .
. -
Select the radio frequency you want to delete.
-
Select
.
Changing Favorites list order
-
Select the
icon to display the Favorites list. -
Select
. -
Select
 .
. -
Select a radio frequency. The selected radio station can be moved.
-
Slide the radio station or move it using the commander switch, then select
 .
.
Radio Broadcast Data System (RBDS) (Some Models)
Radio text information display
Radio text information sent from a broadcasting station is displayed in the center display.
Radio text information is a function of FM radio only. There is no text function on AM radio. Text information is not displayed in the following:
-
During
 reception
 -
Not an RBDS broadcast
-
RBDS broadcast, but radio text is not transmitted from the radio station
Genre Seek
Some FM stations transmit Genre codes (Program type like Rock, News, and so on). This code enables alternative stations transmitting the same Genre code to be found quickly.
(To scan for Genre Seek:)
-
Select the
 icon while in the FM mode.
 -
Select
 to open the genre list.
 -
Select the genre type you want to select.
-
Select the
 ,
,  icon.
icon.
 icon.
icon.
Ex.)
89.3 is currently being received. With Rock selected as the Genre, the radio stations broadcasting Rock are at the following frequencies.
98.3*1, 98.7, 104.3*1, 107.1
-
Radio stations with good reception
The frequency changes as follows each time is pressed.
89.3→98.3→104.3→98.3
-
Only one Genre can be selected.
-
It may not be possible to receive any station even if the Genre Seek function is used.
-
If a program in the selected genre is not broadcast to a region, reception is not possible even if the Genre Seek function is used.
-
The Genre Seek function searches for genre code (program type) which FM analog broadcasts transmit.
specialty programs (HD2-HD8) cannot be searched because they are not FM analog broadcasts. -
If radio stations which are selected by scanning using the Genre Seek function are
broadcasting stations, they are changed from analog broadcasts to broadcasts after a few seconds if the reception conditions are good. The genre is displayed after the switch, however, the genre for FM analog broadcasts may differ.
HD Radio
What is HD Radio™ Technology and how does it work?
HD Radio™ Technology is the digital evolution of analog AM/FM radio. Your radio product has a special receiver which allows it to receive digital broadcasts (where available) in addition to the analog broadcasts it already receives. Digital broadcasts have better sound quality than analog broadcasts as digital broadcasts provide free, crystal clear audio. For more information, and a guide to available radio stations and programming, please visit www.hdradio.com.
Benefits of HD Radio™ Technology
(Information)
The song title, artist name, album name and genre will appear on the screen when available by the radio station.
(Multicast)
On the FM radio frequency most digital stations have “multiple” or supplemental programs on each FM station.
Listening to HD Radio™ Technology
If  icon turns on by selecting a radio station which is an broadcasting station, the analog broadcast is switched to an broadcast automatically after a few seconds and then received.
If the broadcast is stopped and changed to an analog broadcast, press down to turn off .
Multicast channel selection (FM)
If multi-cast channels are available for an broadcast currently being received, the multi-cast channel list is displayed. Select the desired radio station.
-
If an analog broadcast is received once and
is received while HD1 is selected, the audio unit switches to the station automatically. -
When the
icon is illuminated, there could be a noticeable difference in sound quality and volume when a change from digital to analog signals occurs. If the sound quality and volume become noticeably diminished or cut off, select the icon to turn off ( icon is not illuminated). -
Once an analog broadcast is received when HD1 is selected from the Favorite channels, it is switched to
automatically. If the radio reception conditions are poor, or HD is off, switching to broadcasts is not possible. -
When an HD specialty channel (HD2 to HD8) is selected from the Favorite channels, “Signal Lost” is displayed and no audio is output until
is received. If the radio reception conditions are poor, “Signal Lost” continues to be displayed. -
If the
icon is not illuminated, information such as song titles of the station are received, however, the audio output is analog.
iTunes Tagging (for Apple devices with USB use only)
By tagging a song currently being aired, the song can later be purchased from the iTunes Store. One hundred tags can be stored. A maximum of 100 tags (for 100 songs) can be stored for later downloading.
-
Select the
 icon. The tag is stored in the audio unit.
 -
Connect the device via the vehicle's USB. Any stored tag(s) will be sent automatically to the connected device.
-
Once at home or after parking the vehicle safely, log onto the iTunes Store with your device. Your previously tagged song(s) can now be easily purchased.
-
Both AM and FM
can be used. -
Because iTunes tagging only supports purchases from the iTunes Store, direct downloading of music from the vehicle's audio unit is not possible.
-
If the available memory for the connected device is insufficient, the tag is not sent.
-
If an error occurs while the tag is being sent, reconnect the device.
Operating the Satellite Radio (Some Models)
What is satellite radio?
SiriusXM® All Access Subscription.

Hopefully, you're already loving SiriusXM in your new Mazda. But don't stop there — you can also listen on the app and online. All Access is the very best subscription package – with the most channels and the most flexibility. With All Access, you get every channel available on satellite radio, plus you can listen on the app and online — so you can enjoy SiriusXM wherever you are. Here's what's included:
-Over 150 satellite channels to enjoy in your car, coast-to-coast, 24/7.
-All kinds of commercial-free music, plus every major sport, world-class news and the biggest names in talk & entertainment.
-All of our premium programming, including Howard Stern, every NFL, MLB®, and NBA game, NHL® games, every NASCAR® race, 24/7 talk channels dedicated to the biggest leagues, and much more.
All SiriusXM services require a subscription, sold separately or as a package by SiriusXM Radio Inc. (or, in Canada, SiriusXM Canada Inc.), after any trial subscription which may be included with your vehicle purchase or lease. To subscribe after your trial subscription, call 1-877-447-0011 (U.S.A.) or 1-877-438-9677 (Canada).
It is prohibited to copy, decompile, disassemble, reverse engineer, hack, manipulate, or otherwise make available any technology or software incorporated in receivers compatible with the SiriusXM satellite radio service or that support the SiriusXM website, the online service or any of its content. Furthermore, the AMBE® voice compression software included in this product is protected by intellectual property rights including patent rights, copyrights, and trade secrets of Digital Voice Systems, Inc. The SiriusXM Service may include traffic, weather and other content and emergency alert information and data. Such information and data is not for “safety for life”, but is merely supplemental and advisory in nature and, therefore, cannot be relied upon as safety critical. Neither SiriusXM nor Mazda is responsible for any errors in accuracies in the SiriusXM data services or its use in applications. The SiriusXM content is subject to change without notice.
Displaying the Radio ID
When channel 0 is selected, the radio ID is displayed. Use the PREVIOUS or NEXT channel buttons to select channel 0.
SiriusXM® operation
Select the icon on the home screen to display the Entertainment screen. When  is selected, the following icons are indicated in the bottom part of the center display.
|
Icon |
Function |
|---|---|
|
Displays the Entertainment menu. Use to switch to a different audio source. |
 |
Displays the channel list of the current category. |
|
Displays the favorites list. Long-press to store the channel currently being aired. Refer to Operating the Radio (Search). |
|
Plays each channel in the current channel list for 6 seconds. Select again to continue receiving the channel. The function can be selected when the Tune Scan™ setting is turned off. |
 |
Each channel programmed to Smart Favorite is played for 6 seconds. The function can be selected when all of the following conditions are met.
|
 |
Displays in red while a station in a TuneMix™ channel is being broadcast. The TuneMix™ broadcast ends when the icon is pressed. |
|
(During TuneMix™ broadcast/Tune Scan™ operation) Returns to the beginning of the previous song. |
 |
Plays a radio. When selected again, playback is temporarily stopped. |
|
(During TuneMix™ broadcast/Tune Scan™ operation) Advances to the beginning of the next song. |
 |
(When in a mode other than TuneMix™/Tune Scan™) Plays the previous channel. |
 |
(When in a mode other than TuneMix™/Tune Scan™) Plays the next channel. |
 |
Displays the setting screen. |
|
Displays sound settings to adjust audio quality level. Refer to Volume/Display/Sound Controls (Search). |
Selection from channel list
Receivable channels can be displayed on the channel list screen. You can easily select the channel you want to listen from the list. Each category can be also displayed.
-
Select the
 icon to display the channel list.
 -
Select a desired channel.
(Select from category list)
-
Select the
icon to display the channel list. -
Select
 to display the category list.
 -
Select a desired category.
Creating TuneMix™ Channel
The music channels programmed to Smart Favorite can be programmed to the TuneMix™ Channel.
-
Smart Favorite can be programmed by selecting
 on the SiriusXM Settings screen.
 -
The TuneMix™ Channel cannot be created unless two or more SiriusXM music channels have been programmed to Smart Favorite.
-
Select the
icon to display the channel list. -
Select the
 tab.
tab. -
Select
 .
. -
Select
 .
. -
Select the desired music channel to the TuneMix™ Channel.
-
Select
 to register the TuneMix™ Channel.
Parental lock
If a channel is locked, the channel is muted.
To use the parental lock function, the PIN code must be initialized first.
By using the session lock, the parental lock can be enabled or disabled during the current drive cycle (from when the ignition is switched on to switched off). When the session lock is on, the parental lock is available. When the session lock is off, the parental lock is temporarily canceled.
When canceling the parental lock or session lock, or when changing the PIN code, PIN code input is required.
PIN code reset
If the registered code has been forgotten, reset the code to the default [0000] code.
-
Select the
 icon.
icon. -
Select
 .
. -
Select
 .
. -
Input the default code [0000] using the number buttons.
-
Select
 .
. -
Input the new PIN code using the number buttons.
-
Select
.
How to use SiriusXM Travel Link®
SiriusXM Travel Link®
Properly equipped Mazda vehicles will also get the following SiriusXM infotainment services : Traffic, Weather, Sports Scores, Fuel Prices, and more. For a list of available features in your vehicle, visit SiriusXM.com/infotainment and get the most out of your driving experience.
Switching to SiriusXM Travel Link®
-
Select
 on the home screen to display the Applications screen.
 -
Select
 .
. -
Select the item you want to display.
|
Item |
Function |
|---|---|
|
Traffic Plus*1 |
Displays continuously updated traffic information on the navigation screen in real time. |
|
Weather Forecast |
Displays the weather forecast. |
|
Weather Radar*1 |
Displays items such as weather radar, severe storms, and hurricane/tropical storm information on the navigation screen. |
|
Weather Alerts |
Displays weather information, warnings, and security alerts. |
|
Fuel Prices |
Displays information for fuel stations near your vehicle's current position. |
|
Sports |
Displays a list of each genre list and the game schedules and match results for teams selected from the list. |
-
With Car navigation system
How to use AUX mode
Playback
-
Select the
icon on the home screen to display the Entertainment screen. -
Select
 to switch to the AUX mode. The following icons are displayed in the lower part of the center display.
|
Icon |
Function |
|---|---|
|
Displays the Entertainment menu. Use to switch to a different audio source. |
|
Displays sound settings to adjust audio quality level. Refer to Volume/Display/Sound Controls (Search). |
-
If a device is not connected to the auxiliary jack, the mode does not switch to the AUX mode.
-
Adjust the audio volume using the portable audio device, commander switch, or audio control switch.
-
Audio adjustments can also be made using the portable audio device's volume setting.
-
If the connection plug is pulled out from the auxiliary jack while in AUX mode, noise may occur.
Playback
-
Select the
icon on the home screen to display the Entertainment screen. -
Select
 or
or  to switch the USB mode. The following icons are displayed in the lower part of the center display.
|
Icon |
Function |
|---|---|
|
Displays the Entertainment menu. Use to switch to a different audio source. |
|
Category list is displayed. |
 |
Current track list is displayed. Select a desired track to play it. |
 |
Plays the current track repeatedly. Select it again to play the tracks in the current track list repeatedly. When selected again, the function is canceled. |
 |
Tracks in the current track list are played randomly. Select it again to cancel. |
 |
Starts playing a track similar to the current track using Gracenote®'s More Like This™. Select the desired song from the category list to cancel More Like This™. |
|
If selected within a few seconds from the beginning of a song which has started to play, the previous song is selected. If more than a few seconds have elapsed, the song currently being played is replayed from the beginning. Long-press to fast reverse. It stops when you remove your hand from the icon or the commander knob. |
|
Track is played. When selected again, playback is temporarily stopped. |
|
Advances to the beginning of the next song. Long-press to fast forward. |
|
Displays sound settings to adjust audio quality level. Refer to Volume/Display/Sound Controls (Search). |
-
If a file name in the USB memory is too long, it could cause operation problems such as not being able to playback the song.
(Recommended: Within 80 characters)
-
The album art may not display depending on the album art size.
-
To move to the desired location on the track, move the slider indicating the playback time.
-
The appearance of the repeat and shuffle icons changes depending on the type of operation in which the function is used.
Category list
Select the icon to display the following category list.
Select a desired category and item.
|
Category |
Function |
|---|---|
|
Playlist*1 |
Displays playlists on the device. |
|
Artist |
Displays the artist name list. All the tracks or tracks for each album of the selected artist can be played. |
|
Album |
Displays the album name list. |
|
Song |
All the tracks in the device are displayed. |
|
Genre |
Displays the genre list. All the tracks or tracks per album or artist in the selected genre can be played. |
|
Audiobook*2 |
Displays the audiobook list. Chapters can be selected and played. |
|
Podcast*2 |
Displays the podcast list. Episode can be selected and played. |
|
Apple Music Radio*2 (Some Models) |
Displays Apple Music Radio stations. A station can be selected and played. |
|
Folder*3 |
Displays the folder/file list. |
-
Playlist folders of Apple devices are not supported.
-
Apple device only
-
USB-Sticks and USB-Android™ device only
Example of use (to play all tracks in USB device)
(Method 1)
-
Select
to display the category list. -
Select
 .
.All the tracks in the USB device are displayed.
-
Select a desired track.
The selected track is played. All the tracks in the USB device can be played by continuing playback.
(Method 2)*1
-
Select
to display the category list. -
Select
 .
.All the folders in the USB device are displayed.
-
Select
 .
.All the tracks in the USB device are displayed.
-
Select a desired track.
The selected track is played. All the tracks in the USB device can be played by continuing playback.
-
Can be operated using an Android™ device or USB flash memory.
Gracenote® Database
When a USB device is connected to this unit and the audio is played, the album name, artist name, genre and title information are automatically displayed if there is a match in the vehicle's database compilation to the music being played. The information stored in this device uses database information in the Gracenote® music recognition service.
For information related to the most recent Gracenote® database which can be used and how to install it, go to the Mazda Hands Free Website:
Introduction
Gracenote, the Gracenote logo and logotype are either a registered trademark or a trademark of Gracenote, Inc. in the United States and/or other countries.

Gracenote® End User License Agreement
This application or device contains software from Gracenote, Inc. of Emeryville, California (“Gracenote”). The software from Gracenote (the “Gracenote Software”) enables this application to perform disc and/or file identification and obtain music-related information, including name, artist, track, and title information (“Gracenote Data”) from online servers or embedded databases (collectively, “Gracenote Servers”) and to perform other functions. You may use Gracenote Data only by means of the intended End-User functions of this application or device.
You agree that you will use Gracenote Data, the Gracenote Software, and Gracenote Servers for your own personal non-commercial use only. You agree not to assign, copy, transfer or transmit the Gracenote Software or any Gracenote Data to any third party. YOU AGREE NOT TO USE OR EXPLOIT GRACENOTE DATA, THE GRACENOTE SOFTWARE, OR GRACENOTE SERVERS, EXCEPT AS EXPRESSLY PERMITTED HEREIN.
You agree that your non-exclusive license to use the Gracenote Data, the Gracenote Software, and Gracenote Servers will terminate if you violate these restrictions. If your license terminates, you agree to cease any and all use of the Gracenote Data, the Gracenote Software, and Gracenote Servers. Gracenote reserves all rights in Gracenote Data, the Gracenote Software, and the Gracenote Servers, including all ownership rights. Under no circumstances will Gracenote become liable for any payment to you for any information that you provide. You agree that Gracenote, Inc. may enforce its rights under this Agreement against you directly in its own name.
The Gracenote service uses a unique identifier to track queries for statistical purposes. The purpose of a randomly assigned numeric identifier is to allow the Gracenote service to count queries without knowing anything about who you are. For more information, see the web page for the Gracenote Privacy Policy for the Gracenote service.
The Gracenote Software and each item of Gracenote Data are licensed to you “AS IS.”
Gracenote makes no representations or warranties, express or implied, regarding the accuracy of any Gracenote Data from in the Gracenote Servers. Gracenote reserves the right to delete data from the Gracenote Servers or to change data categories for any cause that Gracenote deems sufficient. No warranty is made that the Gracenote Software or Gracenote Servers are error-free or that functioning of Gracenote Software or Gracenote Servers will be uninterrupted. Gracenote is not obligated to provide you with new enhanced or additional data types or categories that Gracenote may provide in the future and is free to discontinue its services at any time.
GRACENOTE DISCLAIMS ALL WARRANTIES EXPRESS OR IMPLIED, INCLUDING, BUT NOT LIMITED TO, IMPLIED WARRANTIES OF MERCHANTABILITY, FITNESS FOR A PARTICULAR PURPOSE, TITLE, AND NON-INFRINGEMENT. GRACENOTE DOES NOT WARRANT THE RESULTS THAT WILL BE OBTAINED BY YOUR USE OF THE GRACENOTE SOFTWARE OR ANY GRACENOTE SERVER. IN NO CASE WILL GRACENOTE BE LIABLE FOR ANY CONSEQUENTIAL OR INCIDENTAL DAMAGES OR FOR ANY LOST PROFITS OR LOST REVENUES.
© Gracenote, Inc. 2009
Updating the database
The Gracenote® media database can be updated using USB device.
-
Connect a USB device containing the software for updating Gracenote®.
-
Select the
icon on the home screen to display the Settings screen. -
Select the
 tab and select
  .
. -
Select
 . The list of the update package stored in the USB device and the version are displayed.
 -
Select the package to use the update.
-
Select
 .
.
How to use Apple CarPlay™ (Some Models)
What is Apple CarPlay™?
Apple CarPlay™ allows you to make calls, send or receive messages, and listen to music using your iPhone® with the vehicle's audio system, or search for destinations using the maps. In addition, voice recognition operation is possible using Siri®.
-
YOU EXPRESSLY ACKNOWLEDGE AND AGREE THAT USE OF APPLE CARPLAY™ (“THE APPLICATION”) IS AT YOUR SOLE RISK AND THAT THE ENTIRE RISK AS TO SATISFACTORY QUALITY, PERFORMANCE, ACCURACY AND EFFORT IS WITH YOU TO THE MAXIMUM EXTENT PERMITTED BY APPLICABLE LAW, AND THAT THE APPLICATION AND INFORMATION ON THE APPLICATION IS PROVIDED “AS IS” AND “AS AVAILABLE”, WITH ALL FAULTS AND WITHOUT WARRANTY OF ANY KIND, AND MAZDA HEREBY DISCLAIMS ALL WARRANTIES AND CONDITIONS WITH RESPECT TO THE APPLICATION AND INFORMATION ON THE APPLICATION, EITHER EXPRESS, IMPLIED OR STATUTORY, INCLUDING, BUT NOT LIMITED TO, THE IMPLIED WARRANTIES AND/OR CONDITIONS OF MERCHANTABILITY, SATISFACTORY QUALITY, FITNESS FOR A PARTICULAR PURPOSE, ACCURACY, QUIET ENJOYMENT, AND NONINFRINGEMENT OF THIRD PARTY RIGHTS. AS EXAMPLES, AND WITHOUT LIMITATION, MAZDA DISCLAIMS ANY WARRANTY REGARDING THE ACCURACY OF DATA PROVIDED BY THE APPLICATION, SUCH AS THE ACCURACY OF DIRECTIONS, ESTIMATED TRAVEL TIME, SPEED LIMITS, ROAD CONDITIONS, NEWS, WEATHER, TRAFFIC, OR OTHER CONTENT PROVIDED BY APPLE, ITS AFFILIATES, OR THIRD PARTY PROVIDERS; MAZDA DOES NOT GUARANTEE AGAINST LOSS OF APPLICATION DATA, WHICH MAY BE LOST AT ANY TIME; MAZDA DOES NOT GUARANTEE THAT THE APPLICATION OR ANY SERVICES PROVIDED THROUGH THEM WILL BE PROVIDED AT ALL TIMES OR THAT ANY OR ALL SERVICES WILL BE AVAILABLE AT ANY PARTICULAR TIME OR LOCATION. FOR EXAMPLE, SERVICES MAY BE SUSPENDED OR INTERRUPTED WITHOUT NOTICE FOR REPAIR, MAINTENANCE, SECURITY FIXES, UPDATES, ETC., SERVICES MAY BE UNAVAILABLE IN YOUR AREA OR LOCATION, ETC. IN ADDITION, YOU UNDERSTAND THAT CHANGES IN THIRD PARTY TECHNOLOGY OR GOVERNMENT REGULATION MAY RENDER THE SERVICES AND/OR APPLICATIONS OBSOLETE AND/OR UNUSABLE.
TO THE EXTENT NOT PROHIBITED BY LAW, IN NO EVENT SHALL MAZDA OR ITS AFFILIATES BE LIABLE FOR PERSONAL INJURY, OR ANY INCIDENTAL, SPECIAL, INDIRECT OR CONSEQUENTIAL DAMAGES WHATSOEVER, INCLUDING, WITHOUT LIMITATION, DAMAGES FOR LOSS OF PROFITS, CORRUPTION OR LOSS OF DATA, FAILURE TO TRANSMIT OR RECEIVE ANY DATA, BUSINESS INTERRUPTION OR ANY OTHER COMMERCIAL DAMAGES OR LOSSES, ARISING OUT OF OR RELATED TO THE APPLICATION OR YOUR USE OF OR INABILITY TO USE THE APPLICATION OR INFORMATION ON THE APPLICATION.
-
When using Apple CarPlay™, please avoid distraction and use Apple CarPlay™ responsibly. Stay fully aware of driving conditions and always obey applicable laws.
-
Apple CarPlay™ is provided by Apple® and its use is subject to your agreement to the Apple CarPlay™ terms of use, which are included as part of the Apple iOS terms of use.
-
When using Apple CarPlay™, location, speed, and other vehicle data is transferred to your iPhone®. For further details, refer to Apple®’s Privacy Policy.
Switching to Apple CarPlay™
Connect the iPhone® by inserting the Apple®-genuine connector cord to the USB terminal indicated by the  mark.
mark.
Refer to How to connect USB port/Auxiliary jack (Search).
-
When you switch your iPhone® connection from Bluetooth® to the vehicle's USB terminal, the system switches to Apple CarPlay™. The applications which was being used via Bluetooth® connection can be used continuously. However, the available functions of the applications using Bluetooth® connection and those on Apple CarPlay™ may differ.
-
If the iPhone® is connected to the USB terminal not indicated by the
mark, the system operates in USB mode.
Display of Apple CarPlay™ Screen
Use any of the following methods to display the Apple CarPlay™ screen in the center display.
-
Select
 on the home screen.
 -
Long press
on the commander switch. -
Select
on the home screen, and select  from the Applications screen.
Apple CarPlay™ home screen

The icons and icon positions displayed on the Apple CarPlay™ home screen may differ depending on the connected iPhone® and iOS version.
|
No. |
Icon |
Explanation |
|---|---|---|
 |
Icon for connected iPhone® |
Launches the Apple CarPlay™ application. Refer to the help information available with each application for the method of using each application. |
 |
 |
Switches to the Mazda Connect home screen. |
 |
 |
Displays the Apple CarPlay™ home screen. |
Convenient Ways to Use Apple CarPlay™
|
Item |
Operation method |
|---|---|
|
Activating the voice recognition function (Siri®)*1 |
Activate Siri® using any of the following two methods to operate Apple CarPlay™ by voice.
|
|
To display the Now Playing screen |
When music is playing in Apple CarPlay™ and a screen other than the Now Playing screen is being displayed, press |
|
To display the MAP screen |
When using map route guidance in Apple CarPlay™ and a screen other than the MAP screen is being displayed, press |
|
To return to Mazda Connect screen |
Press and hold |
 .
.-
The voice recognition function of Mazda Connect cannot be used while Apple CarPlay™ is connected.
To End Apple CarPlay™
To end Apple CarPlay™, disconnect the Apple®-genuine connector cord from the USB terminal and disconnect the iPhone® from the connector cord.
If the connector cord is disconnected from the USB terminal during music playback using Apple CarPlay™, the audio source selection will no longer be available and the vehicle's audio device will be muted.
How to use Android Auto™ mode (Some Models)
What is Android Auto™?
Android Auto™ is an application which allows the operation of an Android™ Smartphone using the vehicle's audio. Android Auto™ functions such as the phone, messages, music, and map can be used with the vehicle's audio system.
-
YOU EXPRESSLY ACKNOWLEDGE AND AGREE THAT USE OF ANDROID AUTO™ (“THE APPLICATION”) IS AT YOUR SOLE RISK AND THAT THE ENTIRE RISK AS TO SATISFACTORY QUALITY, PERFORMANCE, ACCURACY AND EFFORT IS WITH YOU TO THE MAXIMUM EXTENT PERMITTED BY APPLICABLE LAW, AND THAT THE APPLICATION AND INFORMATION ON THE APPLICATION IS PROVIDED “AS IS” AND “AS AVAILABLE,” WITH ALL FAULTS AND WITHOUT WARRANTY OF ANY KIND, AND MAZDA HEREBY DISCLAIMS ALL WARRANTIES AND CONDITIONS WITH RESPECT TO THE APPLICATION AND INFORMATION ON THE APPLICATION, EITHER EXPRESS, IMPLIED OR STATUTORY, INCLUDING, BUT NOT LIMITED TO, THE IMPLIED WARRANTIES AND/OR CONDITIONS OF MERCHANTABILITY, SATISFACTORY QUALITY, FITNESS FOR A PARTICULAR PURPOSE, ACCURACY, QUIET ENJOYMENT, AND NONINFRINGEMENT OF THIRD PARTY RIGHTS. AS EXAMPLES, AND WITHOUT LIMITATION, MAZDA DISCLAIMS ANY WARRANTY REGARDING THE ACCURACY OF DATA PROVIDED BY THE APPLICATION, SUCH AS THE ACCURACY OF DIRECTIONS, ESTIMATED TRAVEL TIME, SPEED LIMITS, ROAD CONDITIONS, NEWS, WEATHER, TRAFFIC, OR OTHER CONTENT PROVIDED BY GOOGLE, ITS AFFILIATES, OR THIRD PARTY PROVIDERS; MAZDA DOES NOT GUARANTEE AGAINST LOSS OF APPLICATION DATA, WHICH MAY BE LOST AT ANY TIME; MAZDA DOES NOT GUARANTEE THAT THE APPLICATION OR ANY SERVICES PROVIDED THROUGH THEM WILL BE PROVIDED AT ALL TIMES OR THAT ANY OR ALL SERVICES WILL BE AVAILABLE AT ANY PARTICULAR TIME OR LOCATION. FOR EXAMPLE, SERVICES MAY BE SUSPENDED OR INTERRUPTED WITHOUT NOTICE FOR REPAIR, MAINTENANCE, SECURITY FIXES, UPDATES, ETC., SERVICES MAY BE UNAVAILABLE IN YOUR AREA OR LOCATION, ETC. IN ADDITION, YOU UNDERSTAND THAT CHANGES IN THIRD PARTY TECHNOLOGY OR GOVERNMENT REGULATION MAY RENDER THE SERVICES AND/OR APPLICATIONS OBSOLETE AND/OR UNUSABLE.
TO THE EXTENT NOT PROHIBITED BY LAW, IN NO EVENT SHALL MAZDA OR ITS AFFILIATES BE LIABLE FOR PERSONAL INJURY, OR ANY INCIDENTAL, SPECIAL, INDIRECT OR CONSEQUENTIAL DAMAGES WHATSOEVER, INCLUDING, WITHOUT LIMITATION, DAMAGES FOR LOSS OF PROFITS, CORRUPTION OR LOSS OF DATA, FAILURE TO TRANSMIT OR RECEIVE ANY DATA, BUSINESS INTERRUPTION OR ANY OTHER COMMERCIAL DAMAGES OR LOSSES, ARISING OUT OF OR RELATED TO THE APPLICATION OR YOUR USE OF OR INABILITY TO USE THE APPLICATION OR INFORMATION ON THE APPLICATION.
-
When using Android Auto™, please avoid distraction and use Android Auto™ responsibly. Stay fully aware of driving conditions and always obey applicable laws.
-
Android Auto™ is provided by Google and its use is subject to your agreement to the Android Auto™ terms of use.
-
When using Android Auto™, location, speed, and other vehicle data is transferred to your smart phone. For further details, refer to Google’s Privacy Policy.
How to use the Android Auto™ mode
Insert an Android™ Smartphone-genuine connector cord into the USB terminal indicated by the icon to connect the Smartphone.
Refer to How to connect USB port/Auxiliary jack (Search).
-
When an Android™ Smartphone connected to Bluetooth® is connected to the vehicle's USB terminal, Bluetooth® is used by Android Auto™ and the system switches to Android Auto™ mode.
-
If the Android™ Smartphone is connected to a USB terminal with no
icon indicated, the system operates in USB mode.
Display of Android Auto™ Mode Screen
Use any of the following methods to display the Android Auto™ mode screen in the center display.
-
Select
on the home screen, and select  from the Applications screen.
 -
Select
 on the home screen.
 -
Press and hold
on the commander switch.
Android Auto™ mode home screen

The media displayed on the Android Auto™ home screen may differ depending on the use conditions and version of the connected Android™ Smartphone.
|
No. |
Icon |
Explanation |
|---|---|---|
|
- |
Displays the use history of each application. The displayed contents differ depending on the application that has been started and its status. |
|
 |
Switches to the map application. |
|
 |
Switches to the call mode. |
 |
 |
Displays the Android Auto™ home screen. |
 |
 |
Switches to the Music application. |
 |
 |
Switches to the Mazda Connect home screen. |
Convenient ways to use Android Auto™ mode
|
Item |
Operation method |
|---|---|
|
Operation using voice recognition*1 |
Any of the following methods can be used to start the voice recognition mode and operate Android Auto™ by voice.
|
|
To display the NowPlaying screen |
When music is playing in Android Auto™ and a screen other than the NowPlaying screen is being displayed, press |
|
To display the MAP screen |
When using map route guidance in Android Auto™ or a screen other than the MAP screen is being displayed, press |
|
To return to the Mazda Connect screen |
Press and hold |
 icon on the Android Auto™ screen.
-
The voice recognition function of Mazda Connect cannot be used while Android Auto™ is connected.
To end Android Auto™
To end the Android Auto™ mode, disconnect the Android™-genuine connector cord from the USB terminal or disconnect the Android™ Smartphone from the connector cord.
If Android Auto™ cannot be connected
When the message, “Mobile Device Error”, is displayed and Android Auto™ cannot be connected.

Make sure that the Android™ Smartphone in question is compatible with Android Auto™.
Before trying to reconnect your Android™ Smartphone to the connector cord, do the Bluetooth® device pairing again.
If the Android Auto™ connection setting cannot be changed
Depending on your Android™ Smartphone, the connection setting may have been in charging mode only when the connector cord is connected.
In this case, switch off the Android Auto™ connection setting once, and then switch it back on while connected to USB mode.
The connection setting can be changed to the Android Auto™ connection in the  tab on the Settings screen (Search).
Bluetooth®
Introduction
Bluetooth® Hands-Free outline
When a Bluetooth® device (mobile phone) is connected to the vehicle's Bluetooth® unit via radio wave transmission, a call can be made or received by pressing the talk button, pick-up button, or hang-up button on the audio remote control switch, or by operating the center display. For example, even if a device (mobile phone) is in your coat pocket, a call can be made without taking the device (mobile phone) out and operating it directly.
Bluetooth® audio outline
When a portable audio unit equipped with the Bluetooth® communication function is paired to the vehicle, you can listen to music stored on the paired portable audio device from the vehicle's speakers. It is not necessary to connect the portable audio device to the vehicle's external input terminal. After programming, operate the vehicle audio control panel to play/stop the audio.
-
For your safety, a device can be paired only when the vehicle is parked. If the vehicle starts to move, the pairing procedure will end. Park the vehicle in a safe place before pairing.
-
The communication range of a Bluetooth® equipped device is about 10 meters (32 ft) or less.
-
Basic audio operation is available using voice commands even if Bluetooth® is not connected.
-
For safety reasons, operation of the center display is disabled while the vehicle is being driven. However, items not displayed in gray can be operated using the commander switch while the vehicle is being driven.
Some Bluetooth® mobile devices are not compatible with the vehicle. Consult an Authorized Mazda Dealer, Mazda's call center or Web support center for information regarding Bluetooth® mobile device compatibility:
-
U.S.A.
Phone: 800-430-0153
-
Canada
Phone: 800-430-0153
-
Mexico
Center of Attention to Client (CAC)
Phone: 01-800-01-MAZDA
Applicable Bluetooth® specification (Recommended)
Ver. 1.1/1.2/2.0  EDR/2.1 EDR/3.0 (conformity)
Component Parts

Microphone (hands-free)
The microphone is used for speaking voice commands or when making a Hands-free call.
Talk button
Activates the voice recognition. In addition, it skips the voice guidance.
Pick-up button
Responds to incoming calls. In addition, after selecting a contact or dialing a number, it places the call when the button is pressed.
Hang-up button
Ends the call or refuses an incoming call. In addition, it ends the voice recognition operation.
Commander switch
The commander switch is used for volume adjustment and display operation. Tilt or turn the commander knob to move the cursor. Press the commander knob to select the icon.
Volume adjustment
The volume dial of the commander switch is used to adjust the volume. Turn the dial to the right to increase volume, to the left to decrease it.
The volume can also be adjusted using the volume button on the steering wheel.
-
Press the volume dial to switch the audio MUTE on and off.
-
If the volume is lower compared to other audio modes, increase the volume from the device side.
Conversation volume and the volume of the voice guidance and ringtone can each be set in advance.
-
Select the
 icon on the home screen to display the Communication screen.
 -
Select
 .
. -
Adjust the
 and the
  using the slider.
Bluetooth® Preparation
Device pairing
To use Bluetooth® audio and Hands-Free, the device equipped with Bluetooth® has to be paired to the unit using the following procedure. A maximum of 7 devices including Bluetooth® audio devices and hands-free mobile phones can be paired.
-
The Bluetooth® system may not operate for 1 or 2 minutes after the ignition is switched to ACC or ON. However, this does not indicate a problem. If the Bluetooth® system does not connect automatically after 1 or 2 minutes have elapsed, make sure that the Bluetooth® setting on the device is normal and attempt to reconnect the Bluetooth® device from the vehicle side.
-
If Bluetooth®-enabled devices are used in the following locations or conditions, connection via Bluetooth® may not be possible.
-
The device is in a location hidden from the center display such as behind or under a seat, or inside the glove compartment.
-
The device contacts or is covered by a metal object or body.
-
The device is set to power-saving mode.
-
Pairing Procedure
-
Select the
icon on the home screen to display the Settings screen. -
Select the
tab. -
Select
 .
. -
Turn the Bluetooth® setting on.
-
Select
 to display the message and switch to the device operation.
 -
Using your device, perform a search for the Bluetooth® device (Peripheral device).
-
Select “Mazda” from the device list searched by the device.
-
(Device with Bluetooth® version 2.0)
Input the displayed 4-digit pairing code into the device.
(Device with Bluetooth® version 2.1 or higher)
Make sure the displayed 6-digit code on the audio is also displayed on the device, and touch the
. Connection permission and phonebook access permission for your mobile device may be required depending on the mobile device.
-
If pairing is successful, the functions of the device connected to Bluetooth® are displayed.
-
(Devices compatible with Mazda E-mail / SMS function)
SMS (Short Message Service) messages, and E-mail for the device are downloaded automatically. A download permission operation for your device may be required depending on the device.
-
When Call history and messages are downloaded automatically, each automatic download setting must be on.
Refer to Communication Settings (Search).
After a device is registered, the system automatically identifies the device. By activating Bluetooth® Hands-Free again, or by activating Bluetooth® Hands-Free first after switching the ignition from OFF to ACC, the device connection condition is indicated in the center display.
IMPORTANT note about pairing and automatic reconnection:
-
If pairing is redone on the same mobile phone device, first clear “Mazda” displayed on the Bluetooth® setting screen of the mobile device.
-
When the OS of the device is updated, the pairing information may be deleted. If this happens, reprogram the pairing information to the Bluetooth® unit.
-
Before you pair your device, make sure that Bluetooth® is “ON”, both on your phone and on the vehicle.
Device selection
If several devices have been paired, the Bluetooth® unit links the device last paired. If you would like to link a different paired device, it is necessary to change the link. The order of device priority after the link has been changed is maintained even when the ignition is switched off.
Connecting other devices
-
Select the
icon on the home screen to display the Settings screen. -
Select the
tab. -
Select
. -
Turn the Bluetooth® setting on.
-
Select the name of the device you would like to connect.
-
 selection
Connects both devices as hands-free and Bluetooth® audio.
 selection
Connects as a hands-free device.
 selection
Connects as Bluetooth® audio.
The following functions can be used for the Hands-free or audio.
-
Hands-free: Phone calls and E-mail/SMS
-
Audio: Bluetooth® audio, Pandora®, Aha™, Stitcher™ radio
Disconnecting a device
-
Select the
icon on the home screen to display the Settings screen. -
Select the
tab. -
Select
. -
Turn the Bluetooth® setting on.
-
Select the device name which is currently connected.
-
Select
 .
.
Deleting a device
Selecting and deleting devices
-
Select the
icon on the home screen to display the Settings screen. -
Select the
tab. -
Select
. -
Turn the Bluetooth® setting on.
-
Select the device name which you would like to delete.
-
Select
 .
. -
Select
.
Deleting all devices
-
Select the
icon on the home screen to display the Settings screen. -
Select the
tab. -
Select
. -
Select
 .
. -
Select
 .
. -
Select
.
Changing PIN code
PIN code (4 digits) can be changed.
-
Select the
icon on the home screen to display the Settings screen. -
Select the
tab. -
Select
. -
Select
. -
Select
 .
. -
Input the new PIN code to be set.
-
Select
.
Available Language
The Bluetooth® Hands-Free System applies to the following languages:
-
English
-
Spanish
-
French
Refer to Settings (Search).
Bluetooth® Audio
Applicable Bluetooth® specification (Recommended)
Ver. 1.1/1.2/2.0 EDR/2.1 EDR/3.0 (conformity)
Response profile
-
A2DP (Advanced Audio Distribution Profile) Ver. 1.0/1.2
-
AVRCP (Audio/Video Remote Control Profile) Ver. 1.0/1.3/1.4
A2DP is a profile which transmits only audio to the Bluetooth® unit. If your Bluetooth® audio device corresponds only to A2DP, but not AVRCP, you cannot operate it using the control panel of the vehicle's audio system. In this case, only the operations on the mobile device are available the same as when a portable audio device for a non-compliant Bluetooth® device is connected to the AUX terminal.
|
Function |
A2DP |
AVRCP |
||
|---|---|---|---|---|
|
Ver. 1.0 |
Ver. 1.3 |
Ver. 1.4 |
||
|
Playback |
X |
X |
X |
X |
|
Pause |
X |
X |
X |
X |
|
File (Track) up/down |
— |
X |
X |
X |
|
Reverse |
— |
— |
X |
X |
|
Fast-forward |
— |
— |
X |
X |
|
Text display |
— |
— |
X |
X |
|
Repeat |
— |
— |
Depends on device |
Depends on device |
|
Shuffle |
— |
— |
Depends on device |
Depends on device |
|
Scan |
— |
— |
Depends on device |
Depends on device |
|
Folder up/down |
— |
— |
— |
Depends on device |
X: Available
—: Not available
-
The battery consumption of Bluetooth® audio devices increases while Bluetooth® is connected.
-
If a general mobile phone device is USB connected during music playback over the Bluetooth® connection, the Bluetooth® connection is disconnected. For this reason, you cannot have music playback over a Bluetooth® connection and music playback using a USB connection at the same time.
-
If a device which supports AVRCP Ver. 1.6 or higher is connected, song information may not display correctly.
-
The system may not operate normally depending on the Bluetooth® audio device.
Switching to Bluetooth® audio mode
To listen to music or voice audio recorded to a Bluetooth® audio device, switch to the Bluetooth® audio mode to operate the audio device using the audio system control panel. Any Bluetooth® audio device must be paired to the vehicle's Bluetooth® unit before it can be used.
Refer to Bluetooth® Preparation (Search).
-
Turn on the Bluetooth® audio device's power.
-
Switch the ignition to ACC or ON.
-
Select the
icon on the home screen to display the Entertainment screen. -
When
is selected, switches to the Bluetooth® audio mode to begin playback.
-
If the Applications screen is not displayed on the device, Bluetooth® audio may not play on the center display.
-
If Bluetooth® audio is used after using Pandora®, Aha™ or Stitcher™ radio, the application on the mobile device has to be closed first.
-
If the Bluetooth® audio device does not begin playback, select the
 icon.
icon. -
If the mode is switched from Bluetooth® audio mode to another mode (radio mode), audio playback from the Bluetooth® audio device stops.
How to Use Pandora®
What is Pandora®?
Pandora®*1 is free personalized Internet radio. Simply enter a favorite artist, track, genre, and Pandora® will create a personalized station that plays their music and more like it. Rate songs by giving thumbs-up and thumbs-down feedback to further refine your station, discover new music and help Pandora® play only music you like.
-
Pandora®, the Pandora® logo, and the Pandora® trade dress are trademarks or registered trademarks of Pandora Media, Inc., used with permission.
-
Pandora® may not be available outside of the U.S.A..
-
To operate Pandora® from your Bluetooth® device, perform the following in advance:
-
Create Pandora® account on the Web.
-
Create Pandora® station using Pandora® application.
-
Install Pandora® application on your device.
-
Playback
Select the icon on the home screen to display the Entertainment screen. When  is selected, the following icons are indicated in the bottom part of the center display.
|
Icon |
Function |
|---|---|
|
Displays the Entertainment menu. Use to switch to a different audio source. |
|
Displays the station list. Use to switch to other stations. |
 |
Thumbs-Down Press the |
 |
Thumbs-Up Press the |
 |
Bookmarking Bookmarks the song or artist currently being played. |
|
Plays the track. When selected again, playback is temporarily stopped. |
|
Goes to the next song. |
|
Displays sound settings to adjust audio quality level. Refer to Volume/Display/Sound Controls (Search). |
 icon to tell Pandora® “you like this track” and it helps to bring in more tracks like it to your station.
-
The skip function may not be available depending on the device.
-
The number of skips is limited by Pandora®.
-
If the
 icon is selected when the skip song function is running, the next song is skipped.
Selection from station list
Selection can be made from a programmed radio station list.
-
Select the
icon. -
Select the desired radio station.
When  is selected, songs randomly selected from the radio station list are played.
Selecting the sort method
The displayed order of the station list can be changed.
-
Select the
icon. -
Select
 .
. -
Select
 to display in the order starting from the newly created station.
 -
Select
 to display in alphabetical order.
How to Use Aha™
What is Aha™?
Aha™*1 is an application which can be used to enjoy various Internet content such as Internet radio and podcasts.
Stay connected to your friends activities by getting updates from Facebook and Twitter.
Using the location-based service, nearby services and destinations can be searched or real-time local information can be obtained.
For details on Aha™, refer to “http://www.aharadio.com/”.
-
Aha™, the Aha™ logo, and the Aha™ trade dress are trademarks or registered trademarks of Harman International Industries, Inc., used with permission.
-
The service content provided by Aha™ varies depending on the country in which the user resides. In addition, the service is not available in some countries.
-
To operate Aha™ from your Bluetooth® device, perform the following in advance:
-
Install the Aha™ application to your device.
-
Create an Aha™ account for your device.
-
Log onto Aha™ using your device.
-
Select the preset station on your device.
-
-
If the Applications screen is not displayed on the device, Aha™ may not play on the center display.
Playback
Select the icon on the home screen to display the Entertainment screen. When  is selected, the following icons are displayed at the bottom of the center display. The displayed icon differs depending on the selected station.
In addition, icons other than the following icons may be displayed.
|
Icon |
Function |
|---|---|
|
Displays the Entertainment menu. Use to switch to a different audio source. |
|
Displays the main menu. Use to switch to other stations. |
|
Displays the content list. Use to switch to other desired content on the station. |
|
Like*1 Evaluates the current content as “Like”. |
|
Dislike*1 Evaluates the current content as “Dislike”. |
 |
Reverses for 15 seconds. |
 |
Map (vehicles with navigation system) Displays the destination searched by the location based services on the navigation system. |
 |
Call A call can be made to the telephone number of a shop searched using the Location Based Services. Available when a device is connected as a Hands-Free. |
|
Returns to the previous content. |
|
Pauses playback of the content. When selected again, playback resumes. |
|
Goes to the next content. |
 |
Fast-forwards for 30 seconds. |
|
Displays sound settings to adjust audio quality level. Refer to Volume/Display/Sound Controls (Search). |
-
Some stations may use alternate variations of Like and Dislike, based on station type or provider.
Main menu
Select the icon.

Switch the tab and select the station category.
|
Tab |
Function |
|---|---|
|
Presets |
Displays the preset station list set on the device. Select the preset station name to play the station content. |
|
Nearby |
Select the desired station. Guidance is provided to the searched destination near the vehicle's position. You can designate desired categories previously set using the filter setting on your device. |
The available Location Based Services may differ because the services depend on the content provided by Aha™.
Example of use (Location Based Services)
-
Select the desired station from the “Nearby” tab on the main menu.
The destination name or address playback starts in the order of the destination name list.

-
When the
 icon is selected, the currently displayed destination is displayed on the navigation system (vehicles with navigation system).
 -
When the
 icon is selected, a phone call is placed to the currently displayed destination.
 -
Select the
 icon to display the content list.
Selection of other destinations from the list can be made.

How to Use Stitcher™ Radio
What is Stitcher™ Radio?
Stitcher™*1 radio is an application which can be used to listen to Internet radio or stream podcasts.
Recommended content is automatically selected by registering content which you put into your favorites, or by pressing the Like or Dislike button.
For details on Stitcher™ Radio, refer to “http://stitcher.com/”.
-
Stitcher™, the Stitcher™ logo, and the Stitcher™ trade dress are trademarks or registered trademarks of Stitcher, Inc., used with permission.
-
To operate Stitcher™ Radio from your Bluetooth® device, perform the following in advance:
-
Install the Stitcher™ Radio application to your device.
-
Create a Stitcher™ Radio account for your device.
-
Log onto Stitcher™ Radio using your device.
-
-
If the Applications screen is not displayed on the device, Stitcher™ may not play on the center display.
Playback
Select the icon on the home screen to display the Entertainment screen. When  is selected, the following icons are indicated in the bottom part of the center display.
|
Icon |
Function |
|---|---|
|
Displays the Entertainment menu. Use to switch to a different audio source. |
|
Displays the station list. Use to switch to other stations. |
|
Dislike Evaluates the current program as “Dislike”. |
|
Like Evaluates the current program as “Like”. |
|
Adds the current station to your favorites or deletes the current station from your favorites. |
 |
Reverses for 30 seconds. |
|
Plays the station. Select it again to pause playback. |
|
Goes to the next station. |
|
Displays sound settings to adjust audio quality level. Refer to Volume/Display/Sound Controls (Search). |
Station list
-
Select the
icon to display the station list. Favorites station name: Select to display the program registered to your favorites. Category name: A recommended category selected from your favorites by Stitcher™ is displayed.Select it to display the category program.

-
Select the program name to play it.
Add to your favorites
If the current program has not been registered to your favorites, it can be registered to your favorites.
-
Select the
icon to display the favorites station which the registration can be added. -
Select the station name which you want to register.
-
Select
to add the program to the selected favorites station.
-
Multiple favorites stations can be selected and registered.
-
Favorites stations registered by oneself as well those set by default are displayed.
Delete from your favorites
If the current program has already been registered to your favorites, the program can be deleted from your favorites.
-
Select the
icon. -
The program is automatically deleted from the favorites station.
Bluetooth® Hands-Free
Making a Call
For Mazda Connect, making calls is possible using any of the following six methods:
-
Phonebook downloaded from Bluetooth® device (mobile phone) (voice recognition function can be used)
-
Favorites
-
Call record
-
Dialing a telephone number (voice recognition function can be used)
-
“Redial” - Voice recognition command for making a call to the latest outgoing call record.
-
“Call back” - Voice recognition command for making a call to the latest incoming call record.
Phonebook Usage
Telephone calls can be made by saying the contact name in the downloaded phonebook or the name of a person whose phone number has been registered in the Bluetooth® Hands-Free. Refer to Import contact (Download Phonebook).
-
Press the talk button.
-
Wait for the beep sound.
-
Say: “Call XXXXX... (Ex. “John”) Mobile”. (You can also say, “Home”, “Work”, or “Other” instead of “Mobile”, depending on how you set up your contact information.)
-
Follow the voice guidance to make the call, or simple press the pick-up button on the steering switch during or after the guidance to make the call.
Screen operation
-
Select the
icon on the home screen to display the Communication screen. -
Select
 to display the contact list.
 -
Select the contact you would like to call to display the details for the contact.
-
Select the desired phone number to make the call.
Import contact (Download Phonebook)
Phonebook data from your device (Mobile phone) can be sent and registered to your Bluetooth® Hands-Free phonebook using Bluetooth®.
(Automatic downloading)
The “Auto Download Contacts” setting must be on. When hands-free is connected to the device, the phonebook is downloaded automatically.
Refer to Communication Settings (Search).
(Manually downloading)
If the “Auto Download Contacts” setting is off, download the phonebook using the following procedure.
-
Select the
icon on the home screen to display the Communication screen. -
Select
to display the contact list. -
Select
 .
. -
Select
 or
or  to switch to the device operation.
 -
If
is selected, select  .
. -
Download will be started from the mobile phone.
-
If “Import All Contacts” is performed after saving the phonebook to the Bluetooth® unit, the phonebook will be overwritten.
-
A maximum of 1,000 contacts can be registered to the phonebook.
-
Phonebook, incoming/outgoing call record, and favorite memories are exclusive to each mobile phone to protect privacy.
Favorites Contacts
A maximum of 50 contacts can be registered. It will take less time to make a call after registering the telephone number. In addition, you do not have to look for the person you want to call in the phonebook.
Registering your favorites
-
Select the
icon on the home screen to display the Communication screen. -
Select
 to display the favorites list.
 -
Select
 .
. -
Select
 or
or  .
. -
Select from the displayed list.
When “Add New Contact” is selected, information such as the selected person’s name is also registered. In addition, when “Add New Contact Details” is selected, only the telephone number of the selected person is registered.
Calling a favorite
-
Select the
icon on the home screen to display the Communication screen. -
Select
to display the favorites list. -
(If only one phone number is registered to contact)
Select the contact information you would like to call. Go to Step 5.
(If multiple phone numbers are registered to contact)
Select the contact you would like to call to display the screen indicating the details for the contact. Go to Step 4.
-
Select the phone number you would like to call.
-
Select
.
Deleting a favorite
-
Select the
icon on the home screen to display the Communication screen. -
Select
to display the favorites list. -
Select
. -
Select
. -
Select the contact information which you would like to delete.
-
Select
.
Changing the display order of your favorites list
-
Select the
icon on the home screen to display the Communication screen. -
Select
to display the favorites list. -
Select
. -
Select
 .
. -
The contact can be moved after it is selected.
-
Slide the contact or move it using the commander switch, then select
.
Changing contact name of your favorites
-
Select the
icon on the home screen to display the Communication screen. -
Select
to display the favorites list. -
Select
. -
Select
 .
. -
Select the contact to display the keyboard screen.
-
If a new name is input and
is selected, the contact name is stored.
If the contact is long-pressed when the favorites list is displayed, the contact information can be edited (deleted, moved).
Telephone Number Input
Practice this while parked until you are confident you can do it while driving in a non-taxing road situation. If you are not completely comfortable, make all calls from a safe parking position, and only start driving when you can devote your full attention to driving.
-
Select the
icon on the home screen to display the Communication screen. -
When
 is pressed, the dial pad is displayed.
 -
Input the telephone number using the dial pad.
-
Select
to make the call.
Numeral or symbol entry
Use the dial pad.
Long-press the  to input +.
Select  to delete the currently input value.
Long-press to delete all input values.
Redial Function
Makes a call to the last person called (latest person on outgoing call record) from the mobile phone/vehicle.
-
Press the talk button.
-
Wait for the beep sound.
-
Say: “Redial”
Call back Function
Makes a call to the last person who called your (latest person on incoming call record) mobile phone/vehicle.
-
Press the talk button.
-
Wait for the beep sound.
-
Say: “Call back”
Mobile 911 (U.S.A./Canada only)
If the vehicle is involved in a moderate to severe collision, a call is made automatically to 911 from the connected device. The “Emergency Assistance Call” setting must be on.
Refer to Communication Settings (Search).
Though the system can be set to not call 911, doing so will defeat the purpose of the system. Mazda recommends that the Mobile 911 system remain activated.
-
Mobile 911 is a secondary function of the audio entertainment system. Therefore, the mobile 911 function does not assure that the call is always made to 911 after an accident occurs.
-
A Hands-free device must be paired and connected. The 911 operator can verify the vehicle's position information using the Hands-free device GPS if equipped.
-
If the vehicle is involved in a moderate to severe collision, notification of the call to 911 is made via audio and screen display. To cancel the call, press
 or hang-up button within 10 seconds.
 -
If
or hang-up button is not pressed within 10 seconds, the call is made to 911 automatically.
Receiving an Incoming Call
When an incoming call is received, the incoming call notification screen is displayed. The “Incoming Call Notifications” setting must be on.
Refer to Communication Settings (Search).
To accept the call, press the pick-up button on the audio control switch or select  on the screen.
To reject the call, press the hang-up button on the audio control switch or select  on the screen.
The following icons are displayed on the screen during a call. Icons which can be used differ depending on use conditions.
|
Icon |
Function |
|---|---|
 |
Displays the Communication menu. |
 |
Ends the call. |
 |
Transferring a call from hands-free to a mobile phone Communication between the Bluetooth® unit and a device (mobile phone) is canceled, and an incoming call will be received by the device (mobile phone) like a standard call. |
 |
Transferring a call from a device (mobile phone) to hands-free Communication between devices (mobile phone) can be switched to Bluetooth® Hands-Free. |
 |
Mute The microphone can be muted during a call. When selected again, the mute is canceled. |
 |
To make a 3-way call, select the contacts from the following:
The device may be unusable depending on the contractual content. |
 |
The call on hold is made to make a 3-way call. The device may be unusable depending on the contractual content. |
 |
Switches the call on hold. |
 |
DTMF (Dual Tone Multi-Frequency Signal) Transmission This function is used when transmitting DTMF via the dial pad. The receiver of a DTMF transmission is generally a home telephone answering machine or a company's automated guidance call center. Input the number using a dial pad. |
 : Call History is displayed.
 : The dial pad is displayed. Input the phone number.
-
If the ignition is switched off during a hands-free call, the line is transferred to the device (Mobile phone) automatically.
-
If the DTMF code has two or more digits or symbols, each one must be transmitted individually.
Call Interrupt
A call can be interrupted to receive an incoming call from a third party.
When  is selected or the pick-up button on the steering wheel is pressed, the current call is held and the system switches to the new incoming call.
When  is selected, the current call is ended and the system switches to the new incoming call (GSM network only).
When is selected or the hang-up button on the steering wheel is pressed, an incoming call is refused.
-
The function may not be available depending on the contractual content of the mobile device.
-
The function may not be operable depending on the type of the telephone network and the mobile device.
Receiving and Replying to Messages (available only with E-mail/SMS compatible phones)
SMS (Short Message Service) messages, and E-mail received by connected devices can be downloaded, displayed, and played (read by the system).
Additionally, replies can also be made to calls and messages in the received messages.
Downloading messages
Up to 20 new messages can be downloaded and displayed from a connected device.
(Automatic downloading)
The “Auto Download Email” (E-mail) or “Auto Download Text Message” (SMS) setting must be on. A message is downloaded automatically when the Bluetooth® unit is connected to the device.
Refer to Communication Settings (Search).
(Manually downloading)
When the “Auto Download Email” (E-mail) or “Auto Download Text Message” (SMS) setting is off, the message is downloaded using the following procedure.
-
Select the
icon on the home screen to display the Communication screen. -
Select
 or
or  to display the Inbox.
 -
Select
 .
. -
Download will be started from the mobile phone.
-
Attached data is not downloaded.
-
Messages up to 1 kilobyte (E-mail)/140-bytes (SMS) can be downloaded.
-
A message list is created for each device.
-
If the connected device does not correspond to MAP 1.0, the AT command is used to download. The downloaded message indicates that it is already read.
-
Downloading using the AT command may not function depending on the connected device.
-
If an iPhone is connected, the following functions cannot be used.
-
Downloading past messages
-
Replying to messages
-
-
iPhone is a trademark of Apple Inc., registered in the U.S. and other countries.
Receiving messages
(Method 1)
When a device receives a message, a message received notification is displayed. The “Email Notifications” (E-mail) or “Text Notifications” (SMS) setting must be on.
Refer to Communication Settings (Search).
Select  and display the message.
(Method 2)
-
Select the
icon on the home screen to display the Communication screen. -
Select
 and display the new message list for E-mail and SMS.
 -
Select the message you would like to display.
The following icons are displayed in the lower part of the details on the message. Icons which can be used differ depending on use conditions.
|
Icon |
Function |
|---|---|
|
Displays the Communication menu. |
|
Displays the inbox. |
|
Plays back a message. When selected again, playback is temporarily stopped. |
|
Displays the previous message. |
|
Displays the next message. |
 |
Only replies to the sender of the currently displayed message. Select the sentence on the displayed reply screen and select the sentence for sending from the preset message. Select |
 |
(Only E-mail) Replies to all members including CC. Select the sentence on the displayed reply screen and select the sentence for sending from the preset message. Select |
|
Makes a call to a person who sent a message. For E-mail, this function may not work depending on the device. |
 |
Deletes a message. The messages stored in a device is also deleted. |
 .
.Example of use (verify unread E-mail)
-
Select the
icon on the home screen to display the Communication screen. -
Select
to display the inbox.
-
Select the unread message displayed in bold.
-
The details of the message are displayed and replying to the message, making a call, or playback can be performed.
Changing account for displaying (E-mail only)
-
Select
 .
. -
Select the account which you would like to display. Only the messages for the selected account are displayed in the inbox.
Editing preset messages
-
Select the
icon on the home screen to display the Communication screen. -
Select
. -
Select
 .
. -
Select the preset message which you would like to edit. The keyboard screen is displayed.
-
When the message is input and
is selected, the message is stored as a preset message.
-
Select the
 icon to change the language.
 -
Select the
 icon to switch between capitalized and lower-case characters.
 -
Select the
 icon to return to the previous screen without storing the edit.
Communication Settings
Select the icon on the home screen to display the Communication screen.
Select to change the setting.
|
Item |
Setting |
Function |
|---|---|---|
|
Bluetooth® |
— |
Go to Bluetooth® setting menu. Refer to Bluetooth® Preparation (Search). |
|
Incoming Call Notifications |
On/Off |
Notifies when an incoming call is received. |
|
Auto Download Text Message |
On/Off |
Downloads SMS automatically when the Bluetooth® unit is connected to the device. |
|
Text Notifications |
On/Off |
Notifies when a new SMS is received. |
|
Auto Download Email*1 |
On/Off |
Downloads E-mail automatically when the Bluetooth® unit is connected to the device. |
|
Email Notifications |
On/Off |
Notifies when a new Email is received. |
|
Auto Download Call History |
On/Off |
Downloads Call History automatically when the Bluetooth® unit is connected to the device. |
|
Auto Download Contacts*1 |
On/Off |
Downloads the phonebook automatically when the Bluetooth® unit is connected to the device. |
|
Ringtone |
Car/Phone/Off |
The type of ring tone can be changed. Three selections are available including the standard ring tone set on the vehicle, the ring tone registered to your Bluetooth® device, or no ring tone. |
|
Phone Volume |
Adjusts using the slider. |
Adjusts the conversation volume. |
|
VR and Ringtone |
Adjusts using the slider. |
Adjusts the voice guidance and ringtone volume. |
|
Contacts Display Order |
First Name, Last Name |
Displays the contact information in alphabetical order of the first name. |
|
Last Name, First Name |
Displays the contact information in alphabetical order of the last name. |
|
|
Edit Preset Messages |
— |
Edits the preset message. Refer to Receiving and Replying to Messages (available only with E-mail/SMS compatible phones) (Search). |
|
Emergency Assistance Call |
On/Off |
Mobile Utilizes the Mobile 911 function. |
|
Restore Factory settings |
— |
Initializes all Communication Settings. |
-
Depending on the device, it may be necessary to acquire download permission on the device side.
Voice Recognition
Basic Operation Method
Activating Voice Recognition
Press the talk button.
Ending Voice Recognition
Use one of the following methods:
-
Press the hang-up button.
-
Say, “Cancel”.
-
Operate the commander switch or the center display (only when vehicle is stopped).
Skipping Voice Guidance (for faster operation)
Press and release the talk button.
Troubleshooting for Voice Recognition
If you do not understand an operation method while in the voice recognition mode, say “Tutorial” or “Help”.
Commands useable anytime during voice recognition
“Go Back” and “Cancel” are commands which can be used at anytime during voice recognition.
Returning to previous operation
To return to the previous operation, say, “Go Back” while in voice recognition mode.
Cancel
To put the Bluetooth® Hands-Free system in standby mode, say, “Cancel” while in voice recognition mode.
To prevent a deterioration in the voice recognition rate and voice quality, the following points should be observed:
-
The voice recognition cannot be performed while voice guidance or the beep sound is operating. Wait until the voice guidance or the beep sound is finished before saying your commands.
-
Phone related commands are available only when your phone is connected via Bluetooth®. Make sure your phone is connected via Bluetooth® before you operate phone related voice commands.
-
Music play commands, such as Play Artist and Play Album can be used only in USB audio mode.
-
Do not speak too slowly or loudly (no loud voice).
-
Speak clearly, without pausing between words or numbers.
-
Dialects or different wording other than hands-free prompts cannot be recognized by voice recognition. Speak in the wording specified by the voice commands.
-
It is not necessary to face the microphone or approach it. Speak the voice commands while maintaining a safe driving position.
-
Close the windows and/or the moonroof to reduce loud noises from outside the vehicle, or turn down the airflow of the climate control system while Bluetooth® Hands-Free is being used.
-
Make sure the vents are not directing air up towards the microphone.
Voice Command List
Voice command
When the talk button is pressed and the following command is spoken, the audio or navigation can be operated. The commands in the () can be omitted. The specified name and number are put into the {}.
Standard command
|
Voice command |
Function |
|---|---|
|
Help |
Usable commands can be verified. |
|
Tutorial |
Basic voice commands and methods of use can be verified. |
|
(Navigate/Take me/Drive) Home |
Set the destination to Home. |
Communication (phone) related command
|
Voice command |
Function |
|---|---|
|
Call {name in phonebook} (mobile/home/work/other) Example: “Call John Mobile” |
Call to the contact in the downloaded phonebook. Refer to Making a Call (Search). |
|
Redial |
Call to the last contact you called. Refer to Making a Call (Search). |
|
Callback |
Call to the last contact who called you. Refer to Making a Call (Search). |
Entertainment (audio) related command
|
Voice command |
Function |
Corresponding audio source |
|---|---|---|
|
(Go to/Play) Bluetooth (Audio) |
Switches the audio source to BT audio. Can also switch to each audio source by similarly using commands such as FM, AM, or USB. |
All |
|
Play Artist {Artist name} |
Plays the selected artist. |
USB |
Navigation related command (Some Models)
For the navigation screen voice commands, refer to the separate navigation system manual.
-
Some commands cannot be used depending on the grade and specification.
-
Some commands cannot be used depending on the device connection conditions and the use conditions.
-
The commands are examples of the available commands.
Settings
Select the icon on the home screen and display the Settings screen.
Switch the tab and select the setting item you want to change.
You can customize settings in the setup display as follows:
|
Tab |
Item |
Function |
|
|---|---|---|---|
|
AD-Disp |
Height Brightness Control Other |
Refer to Active Driving Display (Search). |
|
|
Display |
Refer to Volume/Display/Sound Controls (Search). |
||
|
Safety |
Distance Recognition Support System SBS/SCBS Other |
Refer to Personalization Features (Search). |
|
|
Sound |
Refer to Volume/Display/Sound Controls (Search). |
||
|
Clock |
Adjust Time |
Displays the currently set time is displayed. Press AM/PM can only be selected with the 12-hour clock display. |
|
|
GPS Sync |
Synchronizes with GPS when turned on. When turned off, the time can be changed from “Adjust Time”. |
||
|
Time Format |
Changes the display between 12 and 24-hour clock time. |
||
|
Time Zone Select |
When it's not synchronized with GPS, select the region you want to specify. |
||
|
Daylight Savings Time |
Turns the daylight saving time setting on/off. When ON, the time advances 1 hour. When OFF, it returns to normal time. |
||
|
Vehicle |
Rain Sensing Wiper Door Locks Other |
Refer to Personalization Features (Search). |
|
|
Devices |
Bluetooth |
Refer to Bluetooth® Preparation (Search). |
|
|
Android Auto (Some Models) |
An Android Auto™ mode connection can be set on or off when connecting an Android™ Smartphone. The setting takes effect directly after switching on/off. Displays in gray and cannot be selected if an Android™ Smartphone is not connected. |
||
|
Apple CarPlay (Some Models) |
An Apple CarPlay™ connection can be set on or off when connecting an iPhone®. For the setting to take effect, it is necessary to connect the iPhone® again. Displays in gray and cannot be selected if an iPhone® is not connected. |
||
|
System |
Tool Tips |
Turns button explanations ON/OFF. |
|
|
Language |
Changes the language. |
||
|
Temperature |
Changes the setting between Fahrenheit and Celsius. |
||
|
Distance |
Changes the setting between miles and kilometers. |
||
|
Music Database Update |
Used to update Gracenote®. Gracenote® is used with USB Audio, and provides:
Gracenote® can be downloaded from the Mazda Handsfree Website. Refer to Gracenote® Database (Search). |
||
|
Restore All Factory Settings |
Memory and settings are initialized to the factory settings. The initialization launches by selecting the |
||
|
About |
Agreements and Disclaimers |
Verify the disclaimer and agree. |
|
|
Version Information |
Can verify the current audio unit OS version and Gracenote® Database version. |
||
Applications
Select the icon on the home screen to display the Applications screen. The following information can be verified.
|
Top screen |
Item |
Function |
|
|---|---|---|---|
|
SiriusXM Travel Link |
― |
Refer to How to use SiriusXM Travel Link® (Search). |
|
|
HD Radio™ Traffic Map |
― |
― |
|
|
Fuel Economy Monitor |
Fuel Consumption Display |
Refer to Fuel Economy Monitor (Search). |
|
|
Vehicle Status Monitor |
Warning Guidance |
Warnings currently active can be verified. |
Refer to If a Warning Light Turns On or Flashes (Search). |
|
Maintenance |
Scheduled Maintenance Tire Rotation Oil Change |
Refer to Maintenance Monitor (Search). |
|
|
Apple CarPlay (Some Models) |
― |
Refer to How to use Apple CarPlay (Search). |
|
|
Android Auto (Some Models) |
― |
Refer to How to use Android Auto™ mode (Search). |
|
Troubleshooting
Mazda Bluetooth® Hands-Free Customer Service
If you have any problems with Bluetooth®, contact our toll-free customer service center.
-
U.S.A.
Phone: 800-430-0153 (Toll-free)
-
Canada
Phone: 800-430-0153 (Toll-free)
-
Mexico
Center of Attention to Client (CAC)
Phone: 01-800-01-MAZDA (Toll-free)
Bluetooth® Device pairing, connection problems
|
Symptom |
Cause |
Solution method |
|---|---|---|
|
Unable to perform pairing |
― |
Make sure that the Bluetooth® device is compatible with the Bluetooth® unit, and that Bluetooth® and Find Mode*1 are on and the airplane mode is off in the Bluetooth® device setting. Turn off the power of the Bluetooth® device once, then turn it back on. If pairing is still not possible after this, contact an Authorized Mazda Dealer or Mazda Bluetooth® Hands-Free Customer Service. |
|
Pairing cannot be performed again |
The pairing information paired to the Bluetooth® unit or device is not recognized correctly. |
Perform pairing using the following procedure:
If pairing is not possible after trying the procedure, turn off the power of the Bluetooth® device once, then turn it back on. If pairing is still not possible after this, contact an Authorized Mazda Dealer or Mazda Bluetooth® Hands-Free Customer Service. |
|
Unable to perform pairing |
The Bluetooth® function and the Find Mode/Visible setting*1 on the device may turn off automatically after a period of time has elapsed depending on the device. |
Check whether the Bluetooth® function and the Find Mode/Visible setting*1 on the device are turned on and pairing or reconnect. |
|
Does not connect automatically when starting the engine |
||
|
Automatically connects, but then disconnects suddenly |
||
|
Disconnects intermittently |
The device is in a location in which radio wave interference can occur easily, such as inside a bag in a rear seat, in a rear pocket of a pair of pants. |
Move the device to a location in which radio wave interference is less likely to occur. |
|
Does not connect automatically when starting the engine |
The pairing information is updated when the device OS is updated. |
Perform pairing using the following procedure:
If pairing is not possible after trying the procedure, turn off the power of the Bluetooth® device once, then turn it back on. If pairing is still not possible after this, contact an Authorized Mazda Dealer or Mazda Bluetooth® Hands-Free Customer Service. |
-
Setting which detects the existence of a device external to the Bluetooth® unit.
-
When the OS of the device is updated, the pairing information may be deleted. If this happens, reprogram the pairing information to the Bluetooth® unit.
-
If you pair your phone which has already been paired to your vehicle more than once in the past, you need to delete “Mazda” on your mobile device. Then, execute the Bluetooth® search on your mobile device once again, and pair to a newly detected “Mazda”.
-
Before you pair your device, make sure that Bluetooth® is “ON”, both on your phone and on the vehicle.
-
If Bluetooth®-enabled devices are used in the following locations or conditions, connection via Bluetooth® may not be possible.
-
The device is in a location hidden from the center display such as behind or under a seat, or inside the glove compartment.
-
The device contacts or is covered by a metal object or body.
-
The device is set to power-saving mode.
-
-
Different Bluetooth®-enabled devices can be used for Bluetooth® Hands-Free and Bluetooth® audio. For example, device A can be connected as a Bluetooth® Hands-Free device and device B can be connected as a Bluetooth® audio device. However, the following may occur when they are used at the same time.
-
The Bluetooth® connection of the device is disconnected.
-
Noise occurs in the Hands-Free audio.
-
Hands-Free operates slowly.
-
Voice recognition related problems
|
Symptom |
Cause |
Solution method |
|---|---|---|
|
Poor voice recognition |
|
Regarding the causes indicated on the left, be careful with how you speak. In addition, when numbers are spoken in a sequence, recognition ability will improve if no stop is placed between the numbers. |
|
False recognition of numbers |
||
|
Poor voice recognition |
There is a malfunction in the microphone. |
A poor connection or malfunction with the microphone may have occurred. Consult an Authorized Mazda Dealer. |
|
Phone-related voice recognition is disabled |
There is a problem with the connection between the Bluetooth® unit and the device. |
If there is any malfunction after checking the pairing situation, check for device pairing or connection problems. |
|
Names in the phonebook are not easily recognized |
The Bluetooth® system is under a condition in which recognition is difficult. |
By carrying out the following measures, the rate of recognition will improve.
|
|
When operating the audio, a song name is not recognized |
Song names cannot be recognized by voice. |
― |
|
You want to skip guidance |
― |
Guidance can be skipped by quickly pressing and releasing the talk button. |
Regarding problems with calls
|
Symptom |
Cause |
Solution method |
|---|---|---|
|
When starting a call, vehicle noise from the other party can be heard |
For about 3 seconds after starting a call, the Bluetooth® unit's Noise Suppression function requires time to adapt to the call environment. |
This does not indicate a problem with the device. |
|
The other party cannot be heard or the speaker's voice is quiet |
The volume is set at zero or low. |
Increase the volume. |
Other problems
|
Symptom |
Cause |
Solution method |
|---|---|---|
|
The indication for the remaining battery is different between the vehicle and the device |
The indication method is different between the vehicle and the device. |
― |
|
When a call is made from the vehicle, the telephone number is updated in the incoming/outgoing call record but the name does not appear |
The number has not been registered into the phonebook. |
If the number has been registered into the phonebook, the incoming/outgoing call record is updated by the name in the phonebook when the engine is restarted. |
|
The cell phone does not synchronize with the vehicle regarding the incoming/outgoing call record |
Some types of cell phones do not synchronize automatically. |
Operate the cell phone for synchronization. |
|
It takes a long time to complete the function for changing the language |
A maximum of 60 seconds is required. |
― |
