


Seats
Adjusting the Front Passenger's Seat

-
Seat Recline
To change the seatback angle, lean forward slightly while raising the lever. Then lean back to the desired position and release the lever.
Make sure the lever returns to its original position and the seatback is locked in place by attempting to push it forward and backward.
-
Seat Slide
To move a seat forward or backward, raise the lever and slide the seat to the desired position and release the lever.
Make sure the lever returns to its original position and the seat is locked in place by attempting to push it forward and backward.
Getting in or out of the Rear Seat
Do not operate a front seat while an occupant is seated in it:
Folding down the seatback or operating the seat switch while an occupant is seated in the seat is dangerous because the seatback folds down or reclines suddenly, and moves to an unintended position which may affect the driving when operated which could cause an injury.
When returning the operated seat to its sitting position, make sure that the seat is firmly locked and the red indication on the walk in strap is not visible (Manual seat):
If the vehicle is driven without the seat firmly locked, the seatback could fold down suddenly and cause an accident. In addition, the seat is not locked if the red indication on the walk in strap is visible. Make sure that the seat is firmly locked and the red indication on the walk in strap is not visible.

-
Walk in strap
-
Red indication


-
Be careful of the top of the door opening when getting in or out of the rear seat. Otherwise, you could hit your head or body, resulting in injury.
-
Lower the head restraint when operating the front seat. If the seat is operated with the head restraint raised, the head restraint may contact the ceiling of the vehicle causing damage.
This vehicle has freestyle doors with the rear door hinged at its rear and opening in the opposite direction to the front door. While the front door is closed, the rear door cannot be opened.
Refer to Freestyle Doors (Search).
Before getting in or out of the rear seat, open the rear door.
Change the seatback angle and the forward-back position of the front seat to make it easier to get in or out of the rear seat.
Perform the following procedure if necessary.
When getting in the vehicle
Manual seat
-
Operate the angle adjustment (reclining) lever, forward/back adjustment (sliding) lever on the side of the front seat, or the walk in strap.
Pull the walk in strap to fold the seatback forward and slide the seat forward.

-
Walk in strap
-
-
Slide the seat rearward with the seatback folded forward and then raise the seatback to return the operated front seat to its sitting position after getting in the vehicle.
-
Make sure that the seatback and slide are firmly locked by attempting to lightly move the front seat forward and back.
Power seat
-
Operate the angle adjustment (reclining) switch, forward/back adjustment (sliding) switch on the side of the front seat, or the walk in switch.
The seatback folds forward while the upper side of the angle switch is pressed, and the seat slides forward while the upper side of the slide switch is pressed.

-
Walk in switch
-
Angle switch
-
Slide switch
-
-
Perform the following procedure to return the operated front seat to its sitting position after getting in the vehicle.
-
Press the lower side of the angle switch. The seatback reclines while the switch is being pressed.
-
Press the lower side of the slide switch. The seat slides rearward while the switch is being pressed.
-
After a few seconds have passed since the power switch was switched OFF, the seat cannot be moved even if the walk in switch is operated. The seat can be moved by operating the walk in switch again after a door is opened or closed or the power seat switch is operated.
When getting out of the vehicle
Manual seat
-
The seatback can be folded forward and the seat can be slid forward by pulling the walk in strap on the front seat.

-
Walk in strap
-
-
Slide the seat rearward with the seatback folded forward and then raise the seatback to return the operated front seat to its sitting position after getting out the vehicle.
-
Make sure that the seatback and slide are firmly locked by attempting to lightly move the front seat forward and back.
Power seat
-
Press the upper side of the angle switch. The seatback folds forward while the switch is being pressed.
-
Press the upper side of the slide switch. The seat slides forward while the switch is being pressed.
-
Walk in switch
-
Angle switch
-
Slide switch
-
While an occupant is not seated on the driver’s seat, the seat can be moved using the walk in switch.
-
After a few seconds have passed since the power switch was switched OFF, the seat cannot be moved even if the walk in switch is operated. The seat can be moved by operating the walk in switch again after a door is opened or closed or the power seat switch is operated.
-
-
Perform the following procedure to return the operated front seat to its sitting position after getting out the vehicle.
-
Operate the angle adjustment (reclining) switch on the side of the front seat or the angle switch on the back of the front seat to raise the seatback.
-
Operate the forward/back adjustment (seat slide) switch on the side of the front seat or the slide switch on the back of the front seat to slide the seat rearward.
-
Rear Seat
Head Restraints
Your vehicle is equipped with head restraints on all outboard seats and the rear center seat. The head restraints are intended to help protect you and the passengers from neck injury.
Always drive with the head restraints installed when seats are being used and make sure they are properly adjusted:
Driving with the head restraints adjusted too low or removed is dangerous. With no support behind your head, your neck could be seriously injured in a collision.
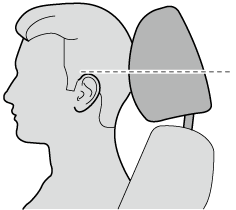
Height Adjustment
Adjust the head restraint so that the center is even with the top of the passenger's ears.
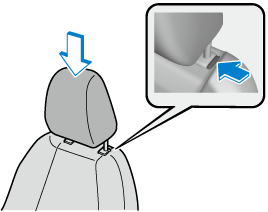
To raise a head restraint, pull it up to the desired position.
To lower the head restraint, press the stop-catch release, then push the head restraint down.
Front seats
Rear seats
(Rear center seat)
(Rear outboard seats)
The height of the foldable head restraints equipped on the rear outboard seats cannot be adjusted.
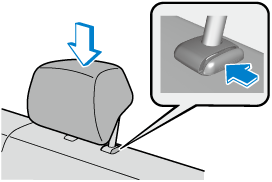
Removal/Installation
To remove the head restraint, pull it up while pressing the stop-catch.
To install the head restraint, insert the legs into the holes while pressing the stop-catch.
Always drive with the head restraints installed when seats are being used and make sure they are properly installed:
Driving with the head restraints not installed is dangerous. With no support behind your head, your neck could be seriously injured in a collision.
After installing a head restraint, try lifting it to make sure that it does not pull out:
Driving with an unsecured head restraint is dangerous as the effectiveness of the head restraint will be compromised which could cause it to unexpectedly detach from the seat.
-
When installing a head restraint, make sure that it is installed correctly with the front of the head restraint facing forward. If the head restraint is installed incorrectly, it could detach from the seat during a collision and result in injury.
-
The head restraints on each of the front and rear seats are specialized to each seat. Do not switch around the head restraint positions. If a head restraint is not installed to its correct seat position, the effectiveness of the head restraint during a collision will be compromised which could cause injury.
