


Charging
Charging
Preparation Before Charging
This vehicle is driven by consuming the electrical power stored in the high voltage battery. Therefore, it is necessary to charge the high voltage battery.
The parts related to charging are located in the following positions.

-
Mazda Connect

-
Charge cable

-
Charge port
Charge cable
The charge cable is connected to the power supply and the vehicle to send electrical power to the vehicle. For details regarding the charge cable, refer to the instruction manual accompanying the charge cable.
In general, keep the charge cable at home. If the charge cable is kept in the vehicle, firmly secure it using the following procedure.
-
Store the charge cable in its special storage bag.
-
Attach the 2 hooks of the storage bag to each of the 2 luggage hooks on the right side of the luggage compartment, and tightly secure the storage bag. At this time, make sure that the logo on the storage bag is facing toward the center of the luggage compartment.

Be careful when handling the storage bag because the hooks on the storage bag have sharp areas. If your hands or fingers touch the sharp areas, your hands or fingers could be injured.


When the storage bag hooks and the luggage hooks hit against each other, they make noise. If the noise distracts your attention while driving, wrap the included sheet around the areas the hooks make contact.
The component parts of the charge cable are as follows.

-
Charge connector
-
Control box
-
Charge plug
Charge connector
The charge connector is used for connecting to the normal charge port.
When the charge connector is connected to the normal charge port, a vehicle system locks the charge connector.
When the charge connector is locked by the vehicle system, it unlocks when the driver’s door is unlocked.
If the charge connector locked by the vehicle system is not unlocked even though the driver’s door is unlocked, consult an Authorized Mazda Dealer.
The conditions for locking the system on the vehicle side can be changed.
For the procedure to change the conditions, refer to Charging Settings (Search).
Control box
The control box indicates the charge status by turning on/flashing the indicator light.
For the indicator light illumination/flash pattern, refer to the instruction manual accompanying the charge cable.
Charge plug
The charge plug is the part for connecting to the power supply.
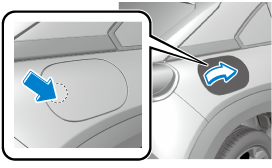
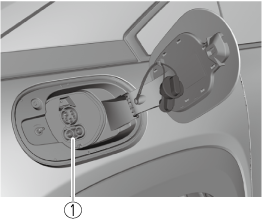
Charge port
The charge port refers to the area where the charge connector is connected.
The component parts of the charge port are as follows.

-
Charge indicator
-
Normal charge port
-
Normal charge port cap
-
Charge lid
-
Quick charge port cap
-
Quick charge port
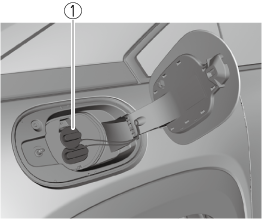
Charge indicator
The charging indicator indicates the charging status by turning on/flashing the light.
For the charging indicator illumination/flash pattern, refer to Checking Charging Status (Search).
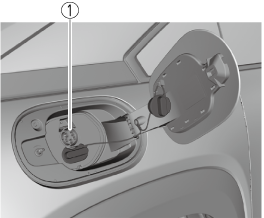
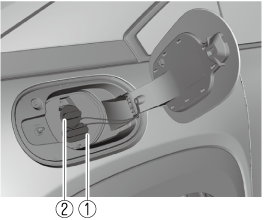
Normal charge port
The normal charge port is the part to which the connector of the charge cable is connected. This is used for normal charging.
Charge lid
The charge lid is locked/unlocked in conjunction with the door locking/unlocking mechanism.
When unlocking the driver’s door, the charge lid is unlocked. When locking the driver’s door, the charge lid is locked.
However, if the driver’s door is unlocked using the auxiliary key, the charge lid is not unlocked.
When the driver's door is locked using any of the following functions, the charge lid is also locked at the same time.
-
Vehicle speed sensing auto door lock function
-
Auto re-lock function
Quick charge port
The quick charge port is the part to which the connector of the quick charger is connected. This is used for quick charging.
Battery heater
The battery heater is designed to maintain the appropriate high voltage battery temperature.
Because the driving performance and the charging performance decrease if the high voltage battery temperature decreases, decreases in their performance are reduced by maintaining the appropriate high voltage battery temperature using the battery heater.
When the high voltage battery temperature decreases significantly while parking or charging, the battery heater operates. When the temperature increases to the specified value, the heater turns off.
However, when the high voltage battery level is low, the battery heater does not operate.
-
Because the electrical power of the high voltage battery is used by the battery heater, we recommend that the charge connector is left connected to the vehicle when parked in a location where charging is available.
-
If the vehicle is not used for a long period of time, we recommend that the battery heater is turned off using [Settings] in Mazda Connect.
-
When the battery heater operates, the charging time could take longer.
Battery cooling
If the high voltage battery temperature is high after driving the vehicle, it is possible to cool the high voltage battery while the vehicle is parked to extend the life of the high voltage battery.
If the Excessive Battery Temperature notification is displayed on the center display after completing a trip, select Start to operate the battery cooling.
Because the electrical power of the high voltage battery is used by the battery cooling, we recommend that the charge connector is connected to the vehicle while the battery cooling is operating, when parked in a location where charging is available.
Charging
Checking Charging Status
Charge indicator
The illumination/flash pattern of the charge indicator can be checked using the labels on the charge lid.

|
Charge indicator illumination/flash pattern |
Content |
|
|---|---|---|
|
— |
OFF |
Charging is possible. |
 (White) |
ON |
Turns on when waiting for starting to charge. |
 (White) |
Flashes slowly |
The brightness changes when the charging timer is set. |
 (Green) |
Flashes slowly |
The brightness changes during charging. |
 (Green) |
ON |
Turns on when charging is completed. Turns off after a certain period of time has passed since charging was completed. |
 (Amber) |
Flashes |
Flashes when the charging connector is connected and the selector lever is in a position other than P. Shift the selector lever to the P position. |
 (Amber) |
ON |
Turns on if there is a problem with the charging system when the charging connector is connected. Wait a few minutes then reconnect the charging connector. |
 (Red) |
ON |
Turns on if there is a problem with the charging system and the charging port lid is opened or the charging connector is connected. Have your vehicle inspected by an Authorized Mazda Dealer. |
Multi-information Display
When the driver's door is opened with the charge connector connected, the charging status is displayed on the multi-information display.
(Power switch OFF)

-
Message
-
High voltage battery indication
-
Maximum driving distance
-
Charging completion time
-
Remaining charge
(Power switch ON)

-
High voltage battery indication
-
Maximum driving distance
-
Charging completion time
-
Remaining charge
|
Indication |
Content |
|
|---|---|---|
|
— |
Preparing to Charge |
Displays while the charging timer is being canceled and when the charging connector is connected. |
|
— |
Charging Scheduled |
Displays while in charging timer mode and when the charging connector is connected. |
 |
Charging |
Displays during charging. |
 |
Charging Complete |
Displays when charging is completed. |
 |
Charging Error. Shift Selector Lever Not in Park |
Displays when charging is started with the selector lever in a position other than P. |
|
Charging Interrupted. See Owner's Manual for Details |
Displays when charging is interrupted. |
|
|
Charging Error. Have the Vehicle Inspected |
Displays when charging is not possible due to a charging system problem. |
|
When charging is started, the charging status screen is displayed for a while. The charging status screen turns off after a certain period of time passes or the doors or liftgate is locked.
The screen is displayed again when the doors or liftgate is unlocked.
Convenient Functions
Timer Charging
Timer charging is a function which charges the battery automatically according to a preset time.
You can charge the battery using this function during time periods when electricity rates are low. In addition, the maximum charge limit can be set and changed.
For the setting method, refer to Charging Settings (Search).
Canceling the Charging Timer
You can cancel the charging timer setting temporarily to start charging the battery immediately.
For the setting method, refer to Charging Settings (Search).
Climate Control Timer
The climate control timer is a function which operates the cooling or heating system automatically according to a preset time.
The power consumption of the air conditioner after starting to drive the vehicle is reduced by operating the air conditioner and providing a comfortable temperature in the cabin before driving.
For the setting method, refer to Turning On the Climate Control System Using the Timer (Climate Control Timer) (Search).
Charge Connector Lock
The charge connector lock is a function which locks the charging connector connected to the vehicle so that it cannot be pulled out.
You can also select the lock conditions for the charging connector according to locations and situations.
For the setting method, refer to Charging Settings (Search).
-
Locked When Connected
The charging connector is locked at the same time the charging connector is connected. The charging connector is unlocked for 30 seconds after the driver’s door is unlocked.
Select Locked When Connected when charging in the following locations/situations.
-
Outdoor parking lot
-
Charging using your charging cable at a charging facility
-
-
Locked When Charging
The charging connector is locked only while charging. The charging connector is unlocked when the charging is finished. In addition, the charging connector is unlocked for 30 seconds after the driver’s door is unlocked, even while charging.
Select Locked When Charging when leaving the vehicle while charging at a public charging station where people are waiting to charge their vehicles.
-
Off
The charging connector is not locked.
Select Off when charging in the following locations/situations.
-
Indoor parking lot with a shutter
-
Use of the charge connector lock is prohibited at a public charging station.
-
Functions using a Smartphone
You can check the remaining high voltage battery power, operate the charging, and operate the air conditioner remotely by using a Smartphone.
Please refer to local Mazda website for more Connected Service information.
